Organizing Files
Master file and folder organization to keep your Junovy Cloud Storage tidy, searchable, and efficient for team collaboration
This chapter teaches you essential file management skills to maintain an organized cloud storage system. You'll learn folder structure best practices, file naming conventions, and how to use tags and favorites to quickly locate your content as your storage grows.
Chapter Contents:
- Creating and managing folder hierarchies
- File naming conventions for easy searching
- Using tags, comments, and metadata
- Organizing shared folders for team collaboration
- Setting up favorites and quick access shortcuts
- Bulk file operations (move, copy, rename)
- Archive and cleanup strategies for old files
- Search techniques and saved search filters
Skills You'll Gain:
- Design logical folder structures that scale with your needs
- Implement consistent naming systems across your organization
- Use NextCloud's organizational features effectively
- Maintain clean, searchable file systems over time
Prerequisites: Completed account setup and have desktop/mobile apps installed.
- Creating Folder Structures
- File Naming Conventions
- Tags, Comments, Searching and Favourites
- Sharing and Collaboration Workflows
- Custom Permissions for Public Shares
- Advanced Features and Power User Tips
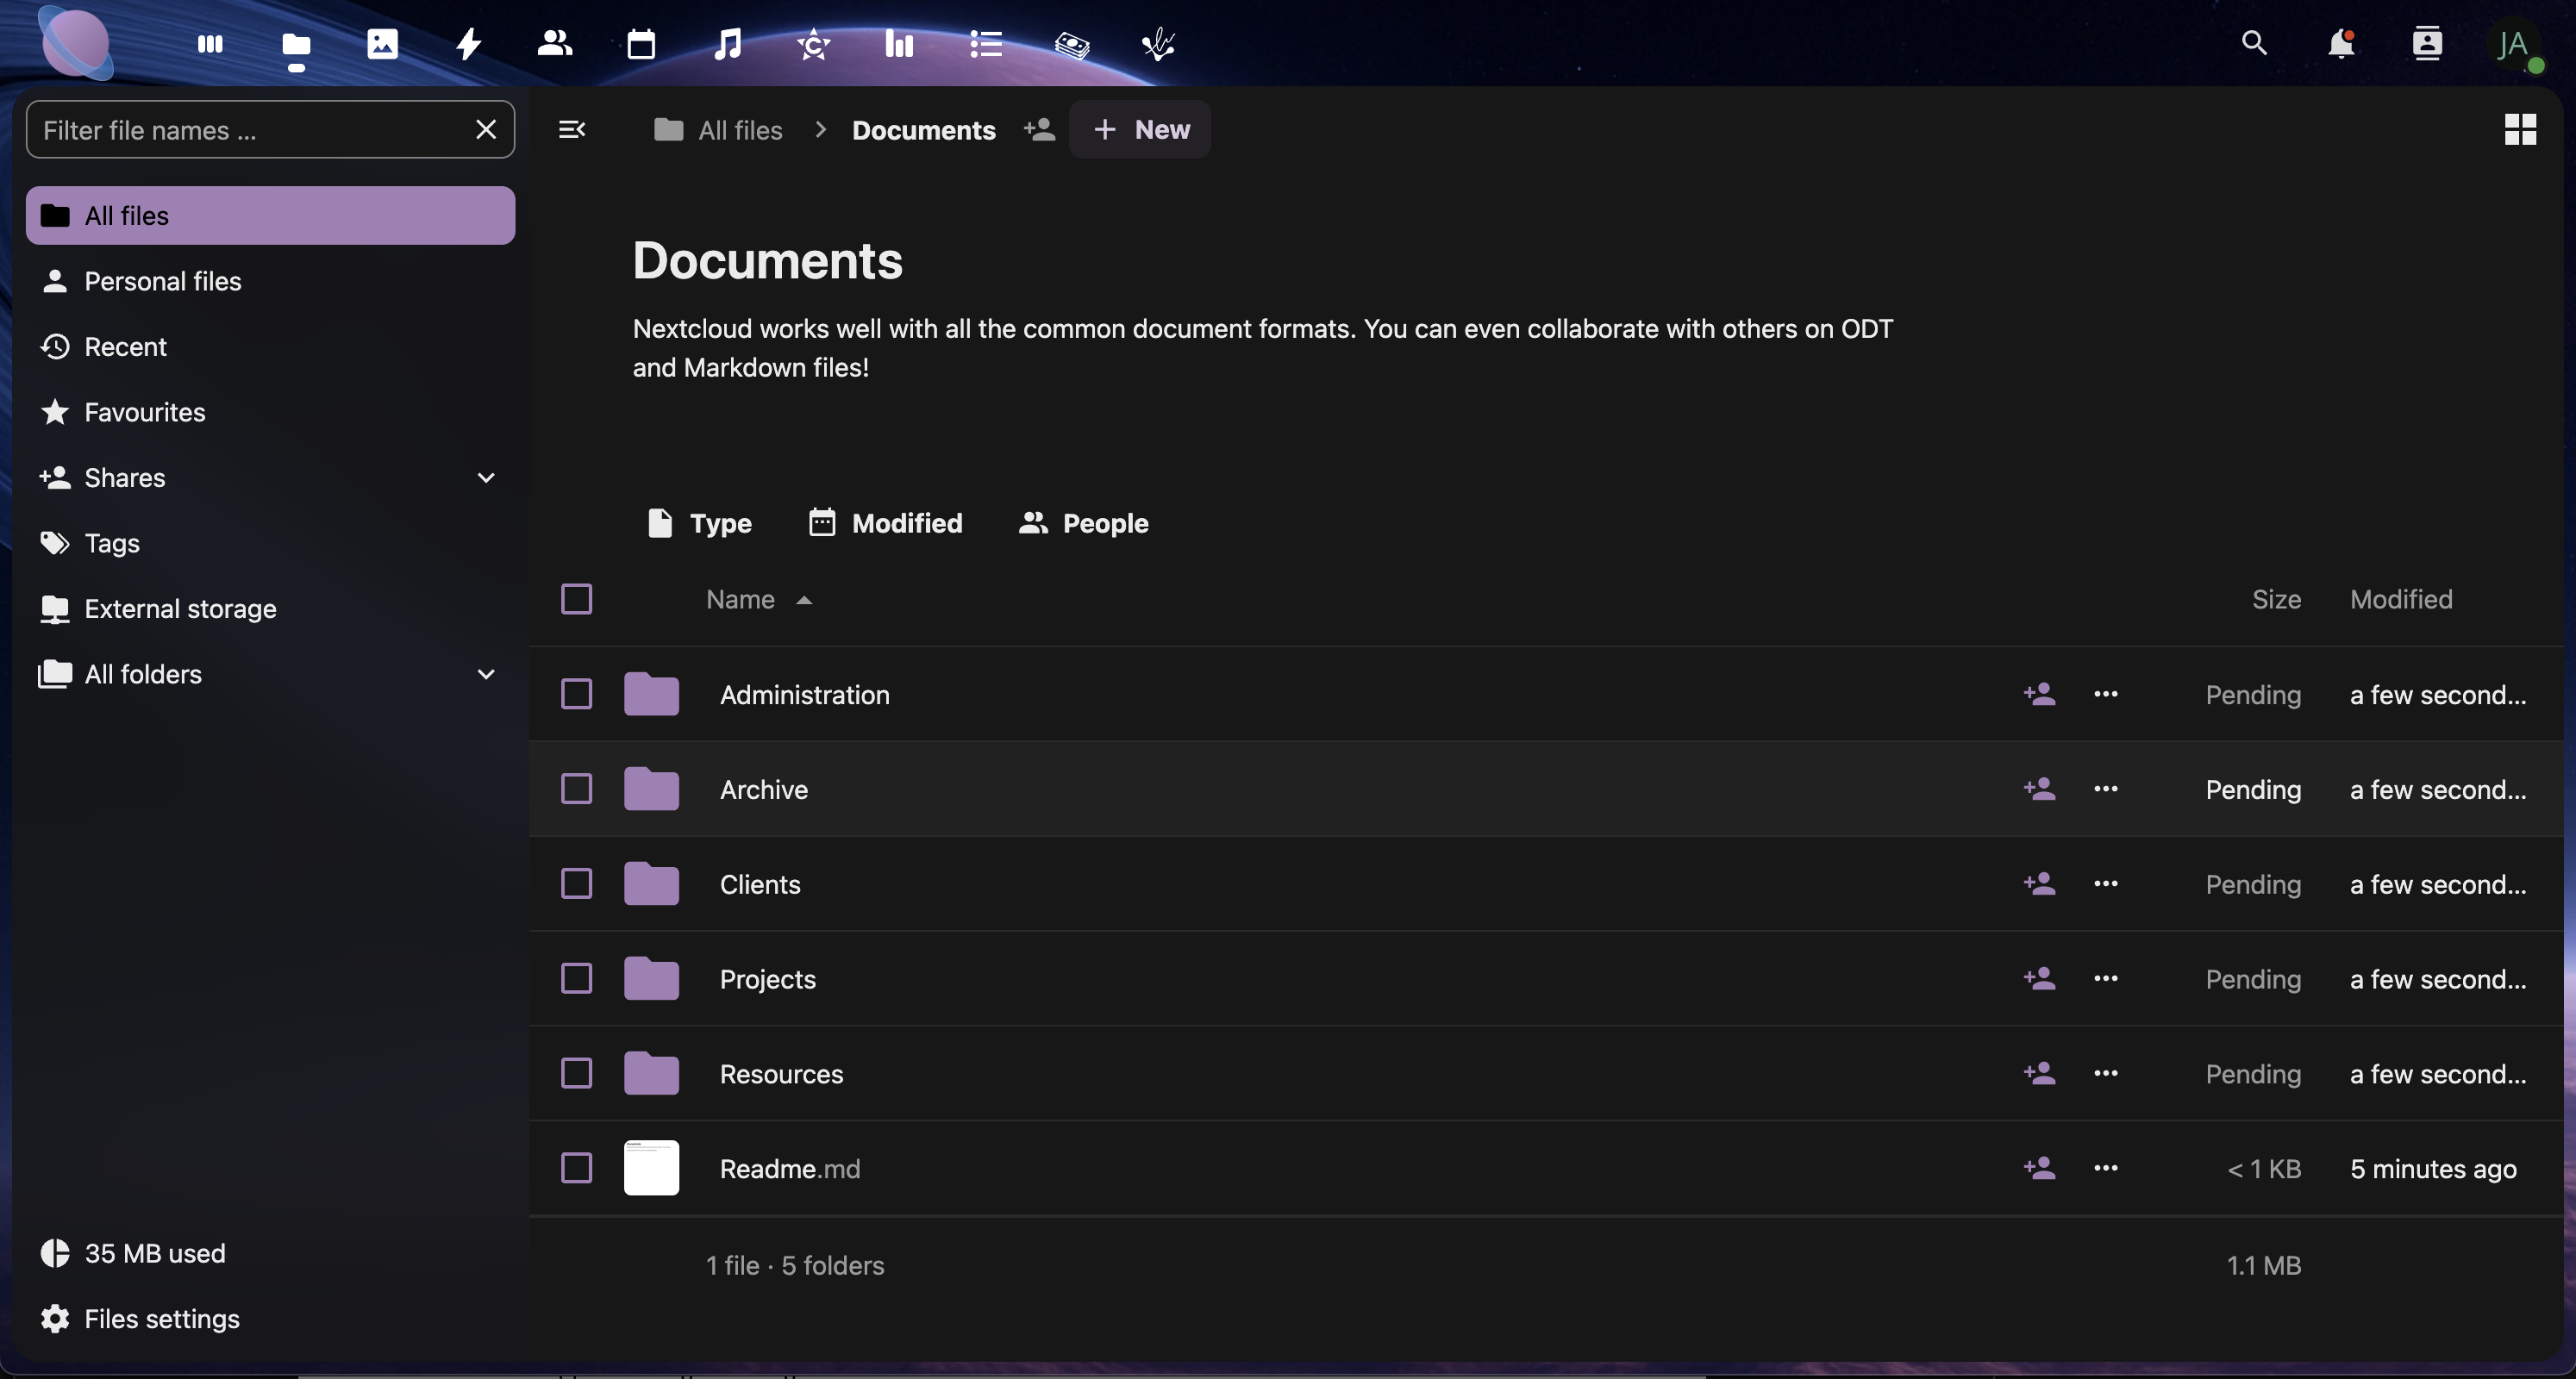
Creating Folder Structures
A well-organized folder structure is the foundation of efficient file management. This page will help you design a logical hierarchy that grows with your needs and makes finding files effortless.
Why Good Organization Matters
- Save time searching for files
- Improve collaboration when sharing with team members
- Reduce confusion about file versions and locations
- Scale efficiently as your storage grows
- Maintain consistency across projects and users
Step 1: Plan Your Main Categories
Before creating folders, think about how you naturally group your work:
For Business Users:
- Projects
- Clients
- Administration
- Resources/Templates
- Archive
For Personal Users:
- Documents
- Photos
- Work
- Personal
- Backup
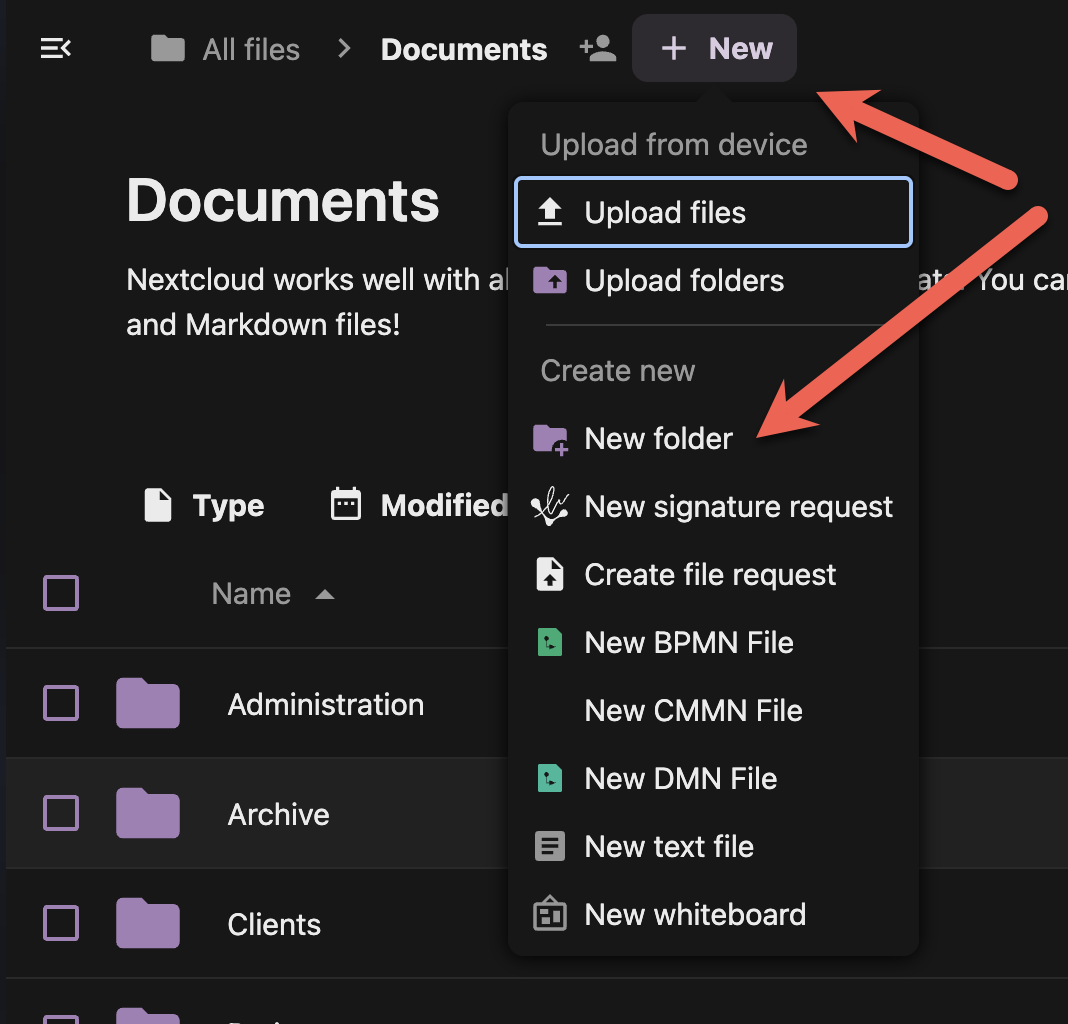
Step 2: Create Your Top-Level Folders
Pro Tip: Use numbers to control folder order (01, 02, 03) since folders sort alphabetically.
Step 3: Build Subfolders with Purpose
Create 2-3 levels maximum to avoid deep nesting:
Example: Projects Structure
01 - Projects/
├── 2024-Website-Redesign/
│ ├── Assets/
│ ├── Documents/
│ └── Final-Deliverables/
├── 2024-Marketing-Campaign/
│ ├── Creative/
│ ├── Reports/
│ └── Resources/
└── Templates/
- Double-click a main folder to open it
- Use the "+" button to create subfolders
- Keep subfolder names descriptive but concise
- Maintain consistent naming across similar projects
Step 4: Implement Naming Conventions
Date-Based Naming:
- Use YYYY-MM-DD format for chronological sorting
- Example: "2024-08-30-Meeting-Notes"
Project-Based Naming:
- Start with project code or client name
- Example: "ACME-Logo-Design-v3"
Status Indicators:
- Add prefixes for file status
- Examples: "DRAFT-", "FINAL-", "REVIEW-"
Step 5: Set Up Standard Subfolders
Create consistent subfolders within projects:
Recommended Subfolders:
- Assets - Images, logos, resources
- Documents - Text files, PDFs, presentations
- Working - Draft files and work-in-progress
- Final - Completed deliverables
- Archive - Old versions and unused files
- Select multiple folders by holding Ctrl (Windows/Linux) or Cmd (Mac)
- Right-click and choose "Create subfolder structure" if available
- Or create subfolders manually in each project
Step 6: Use Color Coding (Optional)
Add visual organization with folder colors:
- Right-click any folder
- Select "Details" or "Properties"
- Choose a color tag from the available options
- Use consistent colors for similar folder types
[Screenshot: Folder color options in the right-click menu]
Color Coding Examples:
- 🔴 Red: Urgent/Important
- 🟡 Yellow: In Progress
- 🟢 Green: Completed
- 🔵 Blue: Client Work
- 🟣 Purple: Personal
Best Practices Summary
✅ Do:
- Keep folder names under 50 characters
- Use consistent naming conventions
- Limit hierarchy to 3-4 levels maximum
- Plan your structure before creating folders
- Review and reorganize quarterly
❌ Don't:
- Use special characters in folder names
- Create folders for single files
- Duplicate folder structures
- Make folders too specific (they become empty)
- Ignore naming conventions once established
Next Steps
With your folder structure in place, you're ready to learn about file naming conventions and tagging systems in the next page. A good folder structure combined with smart file naming makes your cloud storage incredibly efficient to navigate.
File Naming Conventions
Consistent file naming is just as important as good folder structure. Smart naming conventions make files instantly recognizable, searchable, and easy to sort, whether you're working alone or with a team.
Why File Naming Matters
- Instant recognition of file content and purpose
- Chronological sorting shows newest/oldest files first
- Version control prevents confusion about which file is current
- Search efficiency helps you find files using keywords
- Team collaboration ensures everyone understands file purposes
Step 1: Choose Your Naming Format
Pick one format and stick to it across your entire organization:
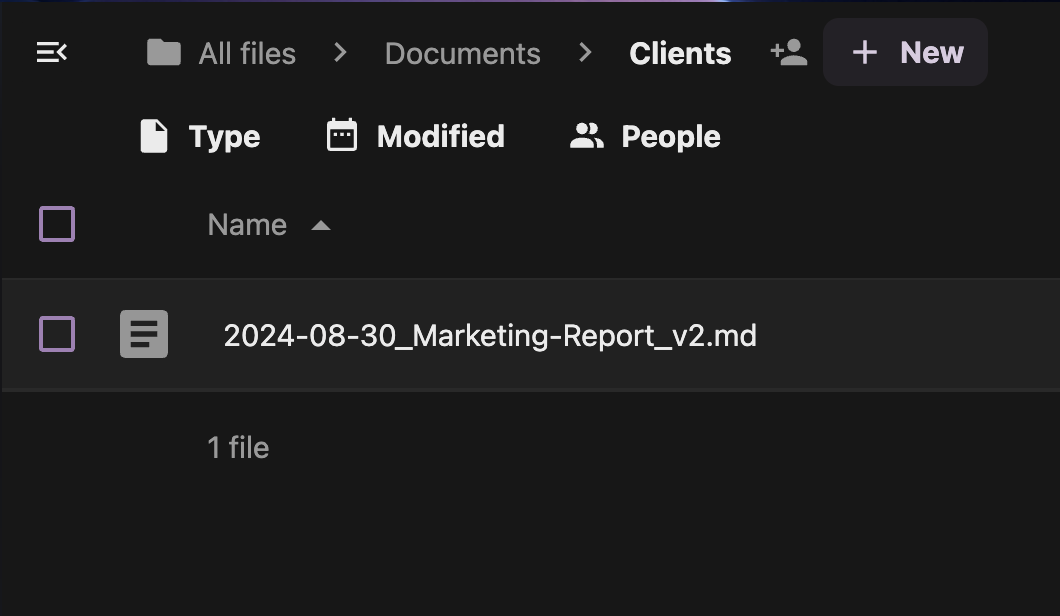
Date-First Format (Recommended): YYYY-MM-DD_Description_Version
- Example:
2024-08-30_Marketing-Report_v2.pdf - Benefit: Automatic chronological sorting
Project-First Format: ProjectCode_Description_YYYY-MM-DD
- Example:
ACME_Logo-Design_2024-08-30.ai - Benefit: Groups project files together
Client-First Format: ClientName_ProjectType_Description
- Example:
Johnson-Co_Website_Homepage-Mockup.psd - Benefit: Easy client file identification
Step 2: Create a Naming Template
Document your chosen format for team consistency:
Template Example:
Format: [Date]_[Project]_[Description]_[Version]
Date: YYYY-MM-DD
Project: Short code or client name
Description: What the file contains
Version: v1, v2, final, draft
- Create a new document in your Templates folder
- Title it: "File Naming Convention"
- Include examples for different file types
- Share with team members for consistency
Step 3: Handle Different File Types
Documents:
2024-08-30_Proposal_ClientName_v3.docx2024-08-30_Invoice_12345_final.pdf2024-08-30_Meeting-Notes_TeamSync.txt
Design Files:
2024-08-30_Logo_ACME_concept-A.ai2024-08-30_Banner_Homepage_1920x1080.png2024-08-30_Mockup_Mobile-App_wireframe.sketch
Media Files:
2024-08-30_Video_Product-Demo_4K.mp42024-08-30_Photo_Team-Headshots_processed.jpg2024-08-30_Audio_Podcast_Episode-15.wav
Step 4: Implement Version Control
Use clear version indicators to track file evolution:
Version Naming Options:
- v1, v2, v3 - Simple numeric versions
- draft, review, final - Status-based naming
- YYYY-MM-DD - Date-based versions
- initials - Author-based versions (JD, SM, etc.)
Example Version Progression:
2024-08-30_Website-Proposal_ACME_draft.docx
2024-08-30_Website-Proposal_ACME_v2.docx
2024-08-30_Website-Proposal_ACME_review.docx
2024-08-30_Website-Proposal_ACME_final.docx
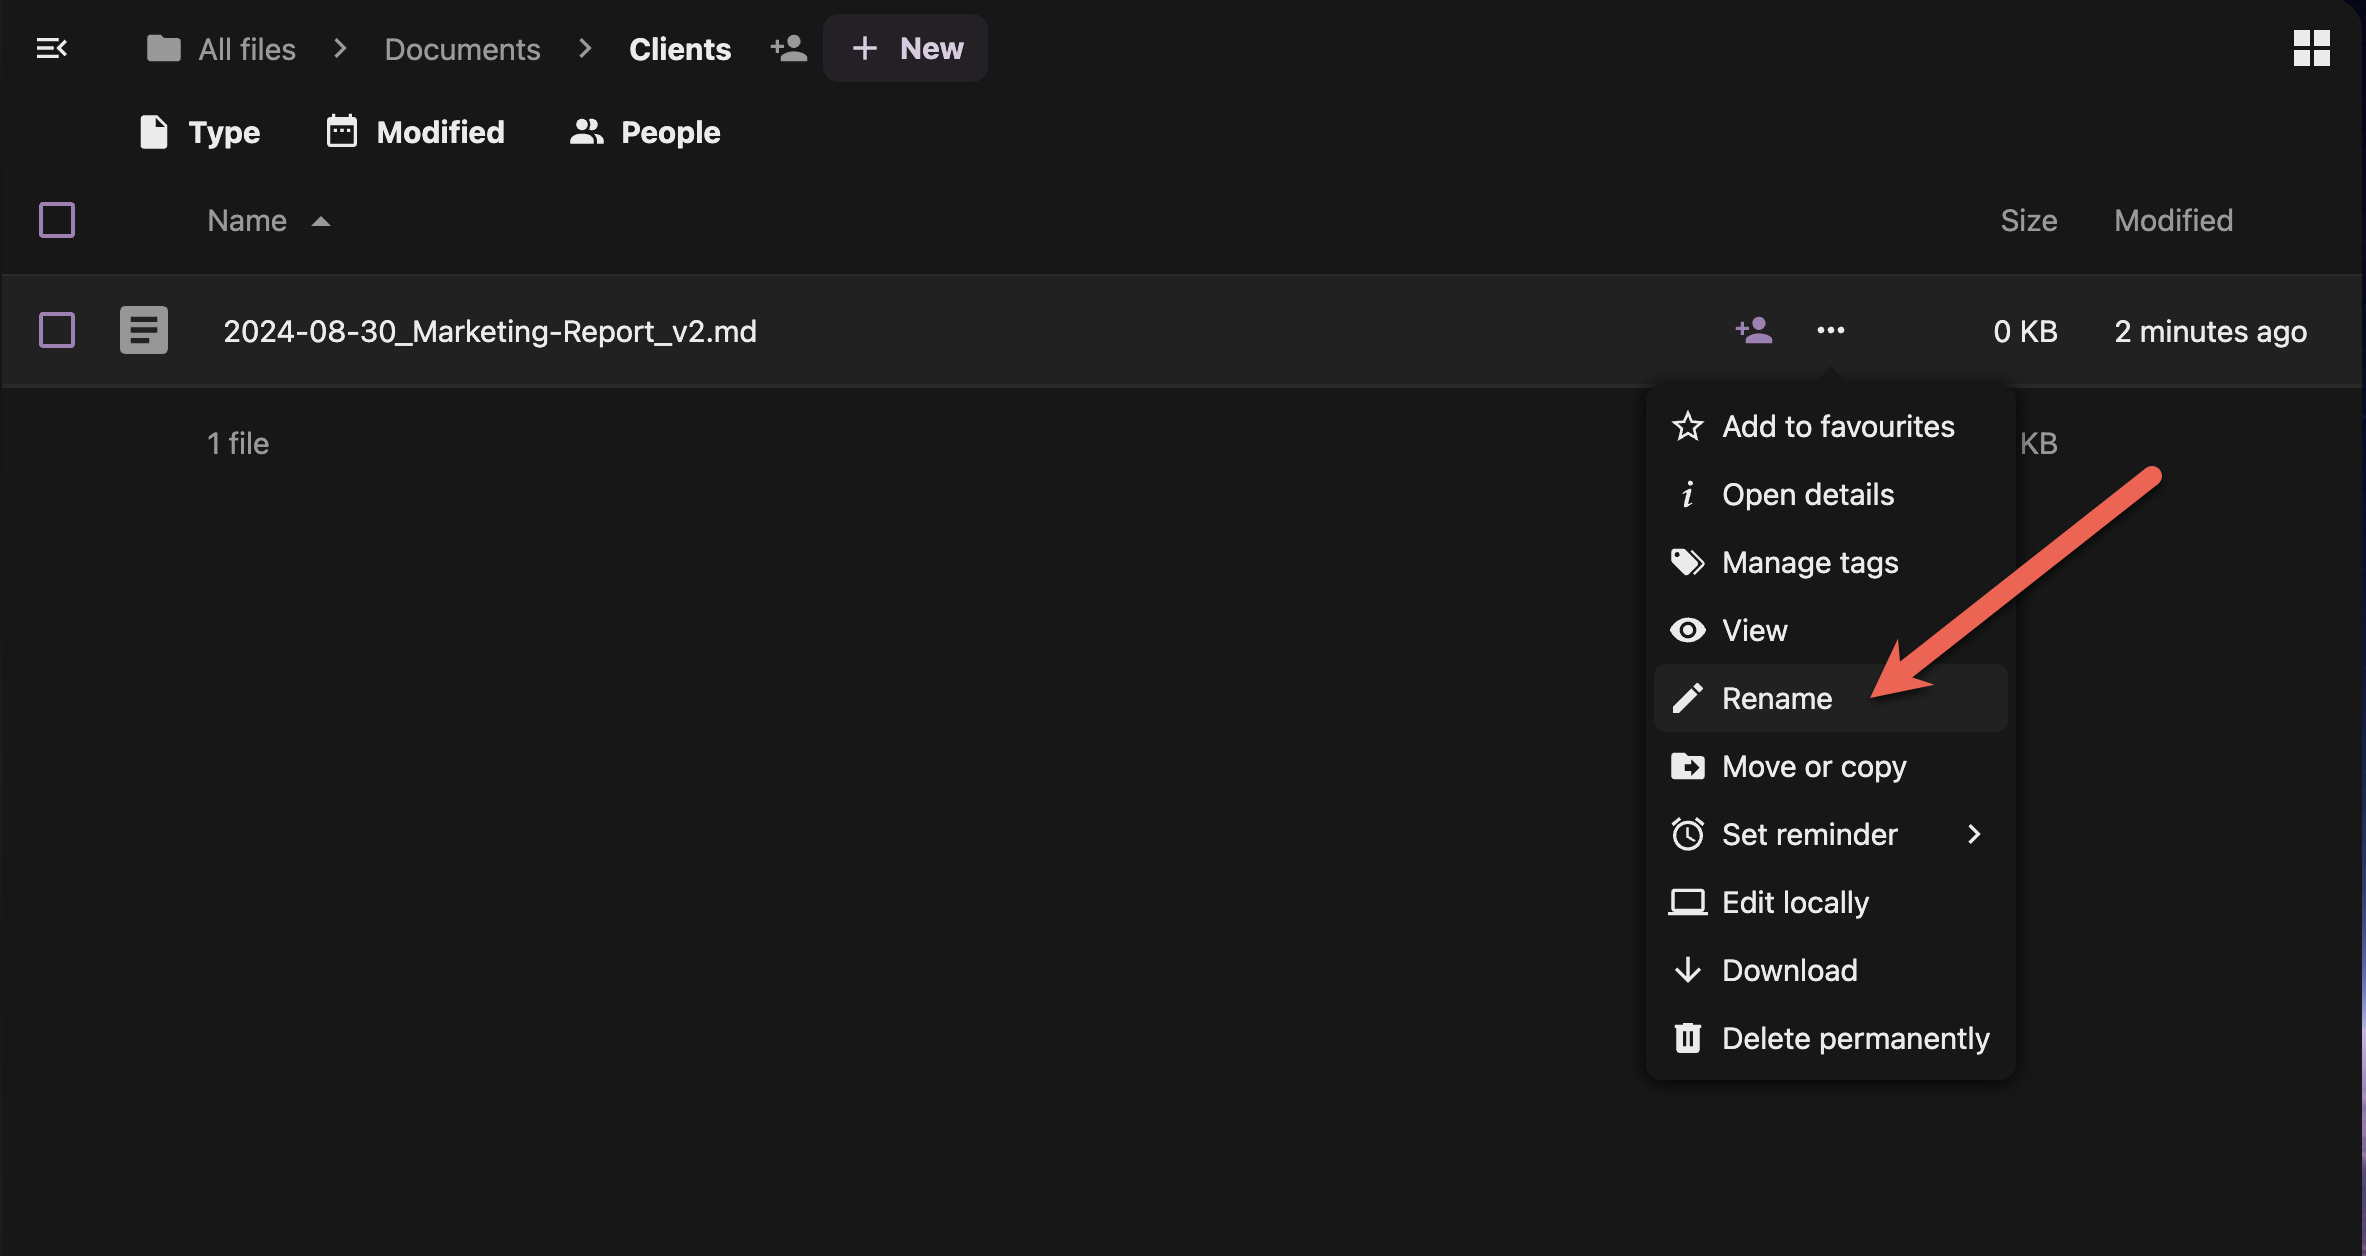
Step 5: Rename Existing Files
Clean up your current files to match your new convention:
- Right-click a file you want to rename
- Select "Rename" from the context menu
- Update the filename following your convention
- Press Enter to save
Bulk Renaming (Advanced):
- Select multiple similar files using Ctrl+click
- Use the desktop app's bulk rename feature if available
- Consider renaming in batches by file type or project
Step 6: Use Descriptive Keywords
Include searchable keywords in your filenames:
Good Examples:
2024-08-30_SEO-Audit_Keywords-Research_final.xlsx2024-08-30_Brand-Guide_Logo-Colors-Fonts.pdf2024-08-30_Budget-Forecast_Q4-Planning.docx
Keywords to Include:
- Purpose: audit, report, guide, template
- Content type: data, analysis, mockup, screenshot
- Status: draft, final, approved, archived
- Audience: internal, client, public, team
Step 7: Avoid Common Naming Mistakes
❌ Characters to Avoid:
- Special characters:
/ \ : * ? " < > | - Spaces at beginning or end
- Multiple consecutive spaces
- Only numbers or dates
❌ Bad Examples:
untitled1.docx(no description)Final version 2 REAL final.pdf(confusing versions)client stuff/meeting notes.txt(contains slash)Document1 copy.docx(generic name)
✅ Good Examples:
2024-08-30_Client-Presentation_Q3-Results_final.pptx2024-08-30_User-Research_Survey-Analysis_v2.xlsx2024-08-30_Contract_Service-Agreement_signed.pdf
Creating File Naming Templates
Set up templates for common file types:
Template Examples:
YYYY-MM-DD_Meeting-Notes_[Meeting-Type]_[Attendees].docx
YYYY-MM-DD_Invoice_[Client]_[InvoiceNumber].pdf
YYYY-MM-DD_Design_[Project]_[Version].[ext]
Best Practices Checklist
✅ Consistency Rules:
- Use the same format across all files
- Stick to your chosen date format (YYYY-MM-DD recommended)
- Apply version control consistently
- Include descriptive keywords
✅ Technical Guidelines:
- Keep filenames under 255 characters
- Use hyphens or underscores instead of spaces
- Avoid special characters
- Use consistent capitalization
✅ Team Coordination:
- Document your conventions
- Train team members on the system
- Review and update conventions quarterly
- Lead by example with consistent naming
Next Steps
With solid folder structures and file naming conventions in place, you're ready to learn about using tags, comments, and metadata to make your files even more organized and searchable. The next page will show you how to add rich information to your files for powerful organization capabilities.
Tags, Comments, Searching and Favourites
Beyond folders and filenames, Junovy Cloud Storage offers powerful organisational tools through tags, comments, and favourites. These features add rich context to your files, making them easier to find, categorise, and collaborate on.
What Are Tags, Comments, and Metadata?
These tools work together to create a comprehensive organisational system that goes beyond traditional folder structures.
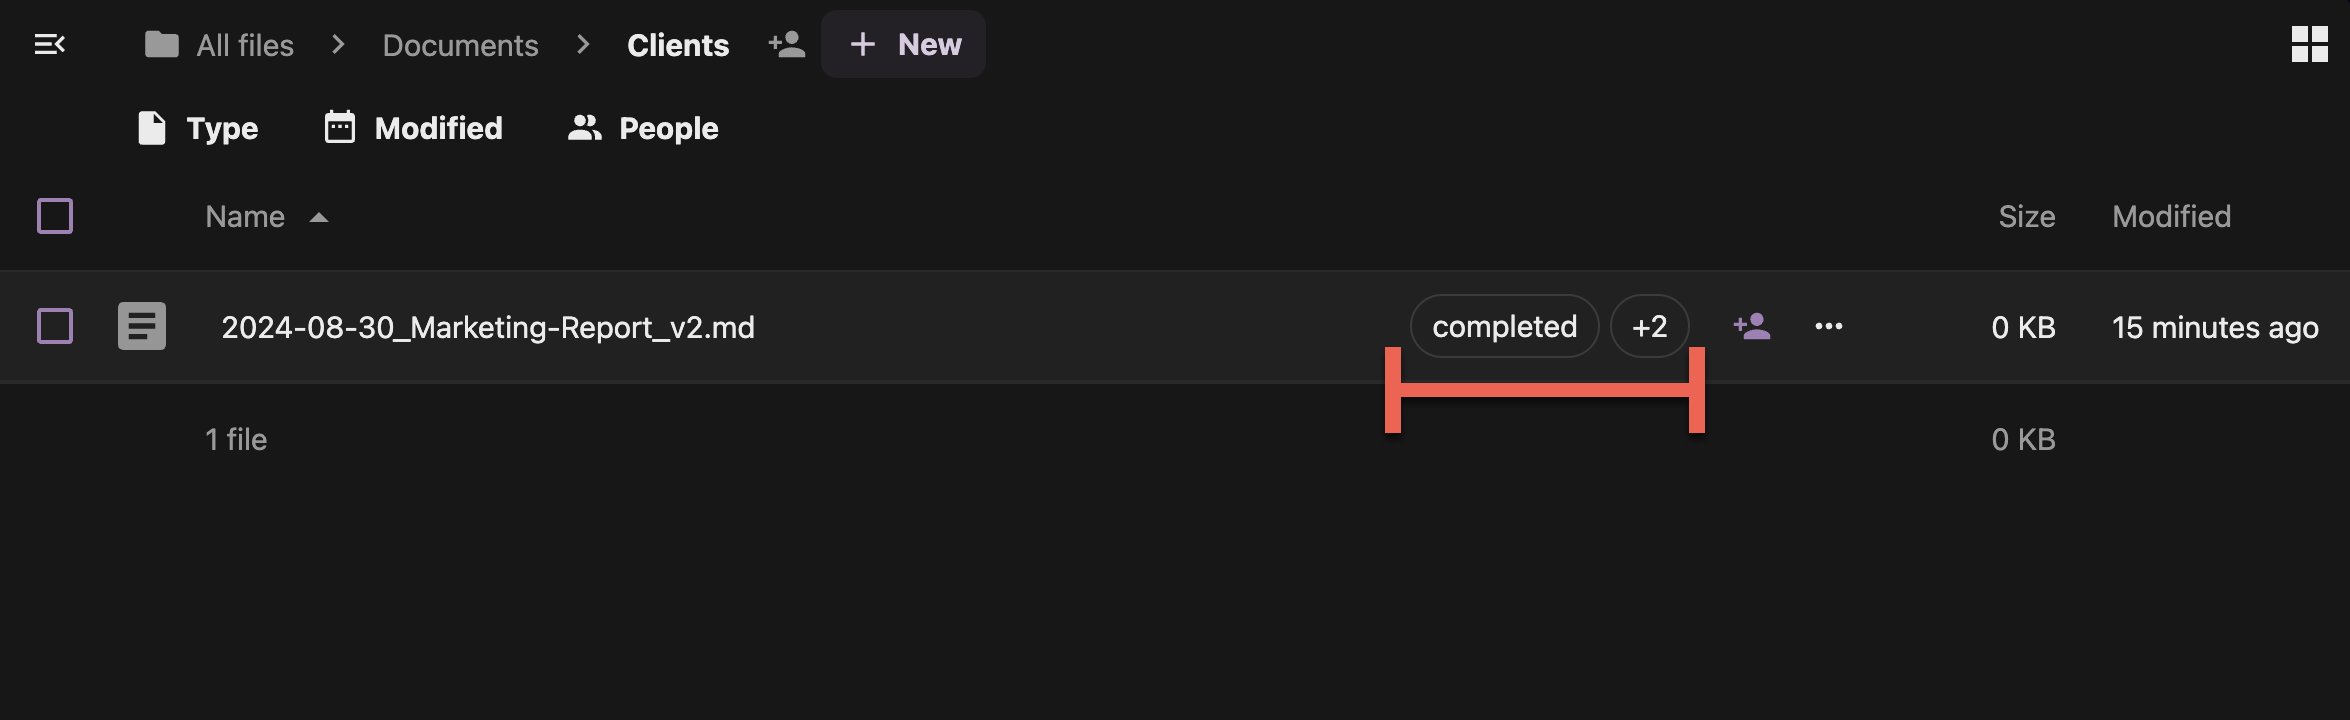
Step 1: Understanding Tags
Tag Examples:
- Status:
urgent,completed,in-review,archived - Type:
template,reference,client-work,internal - Project:
website-redesign,q4-planning,marketing-campaign - Priority:
high-priority,low-priority,routine
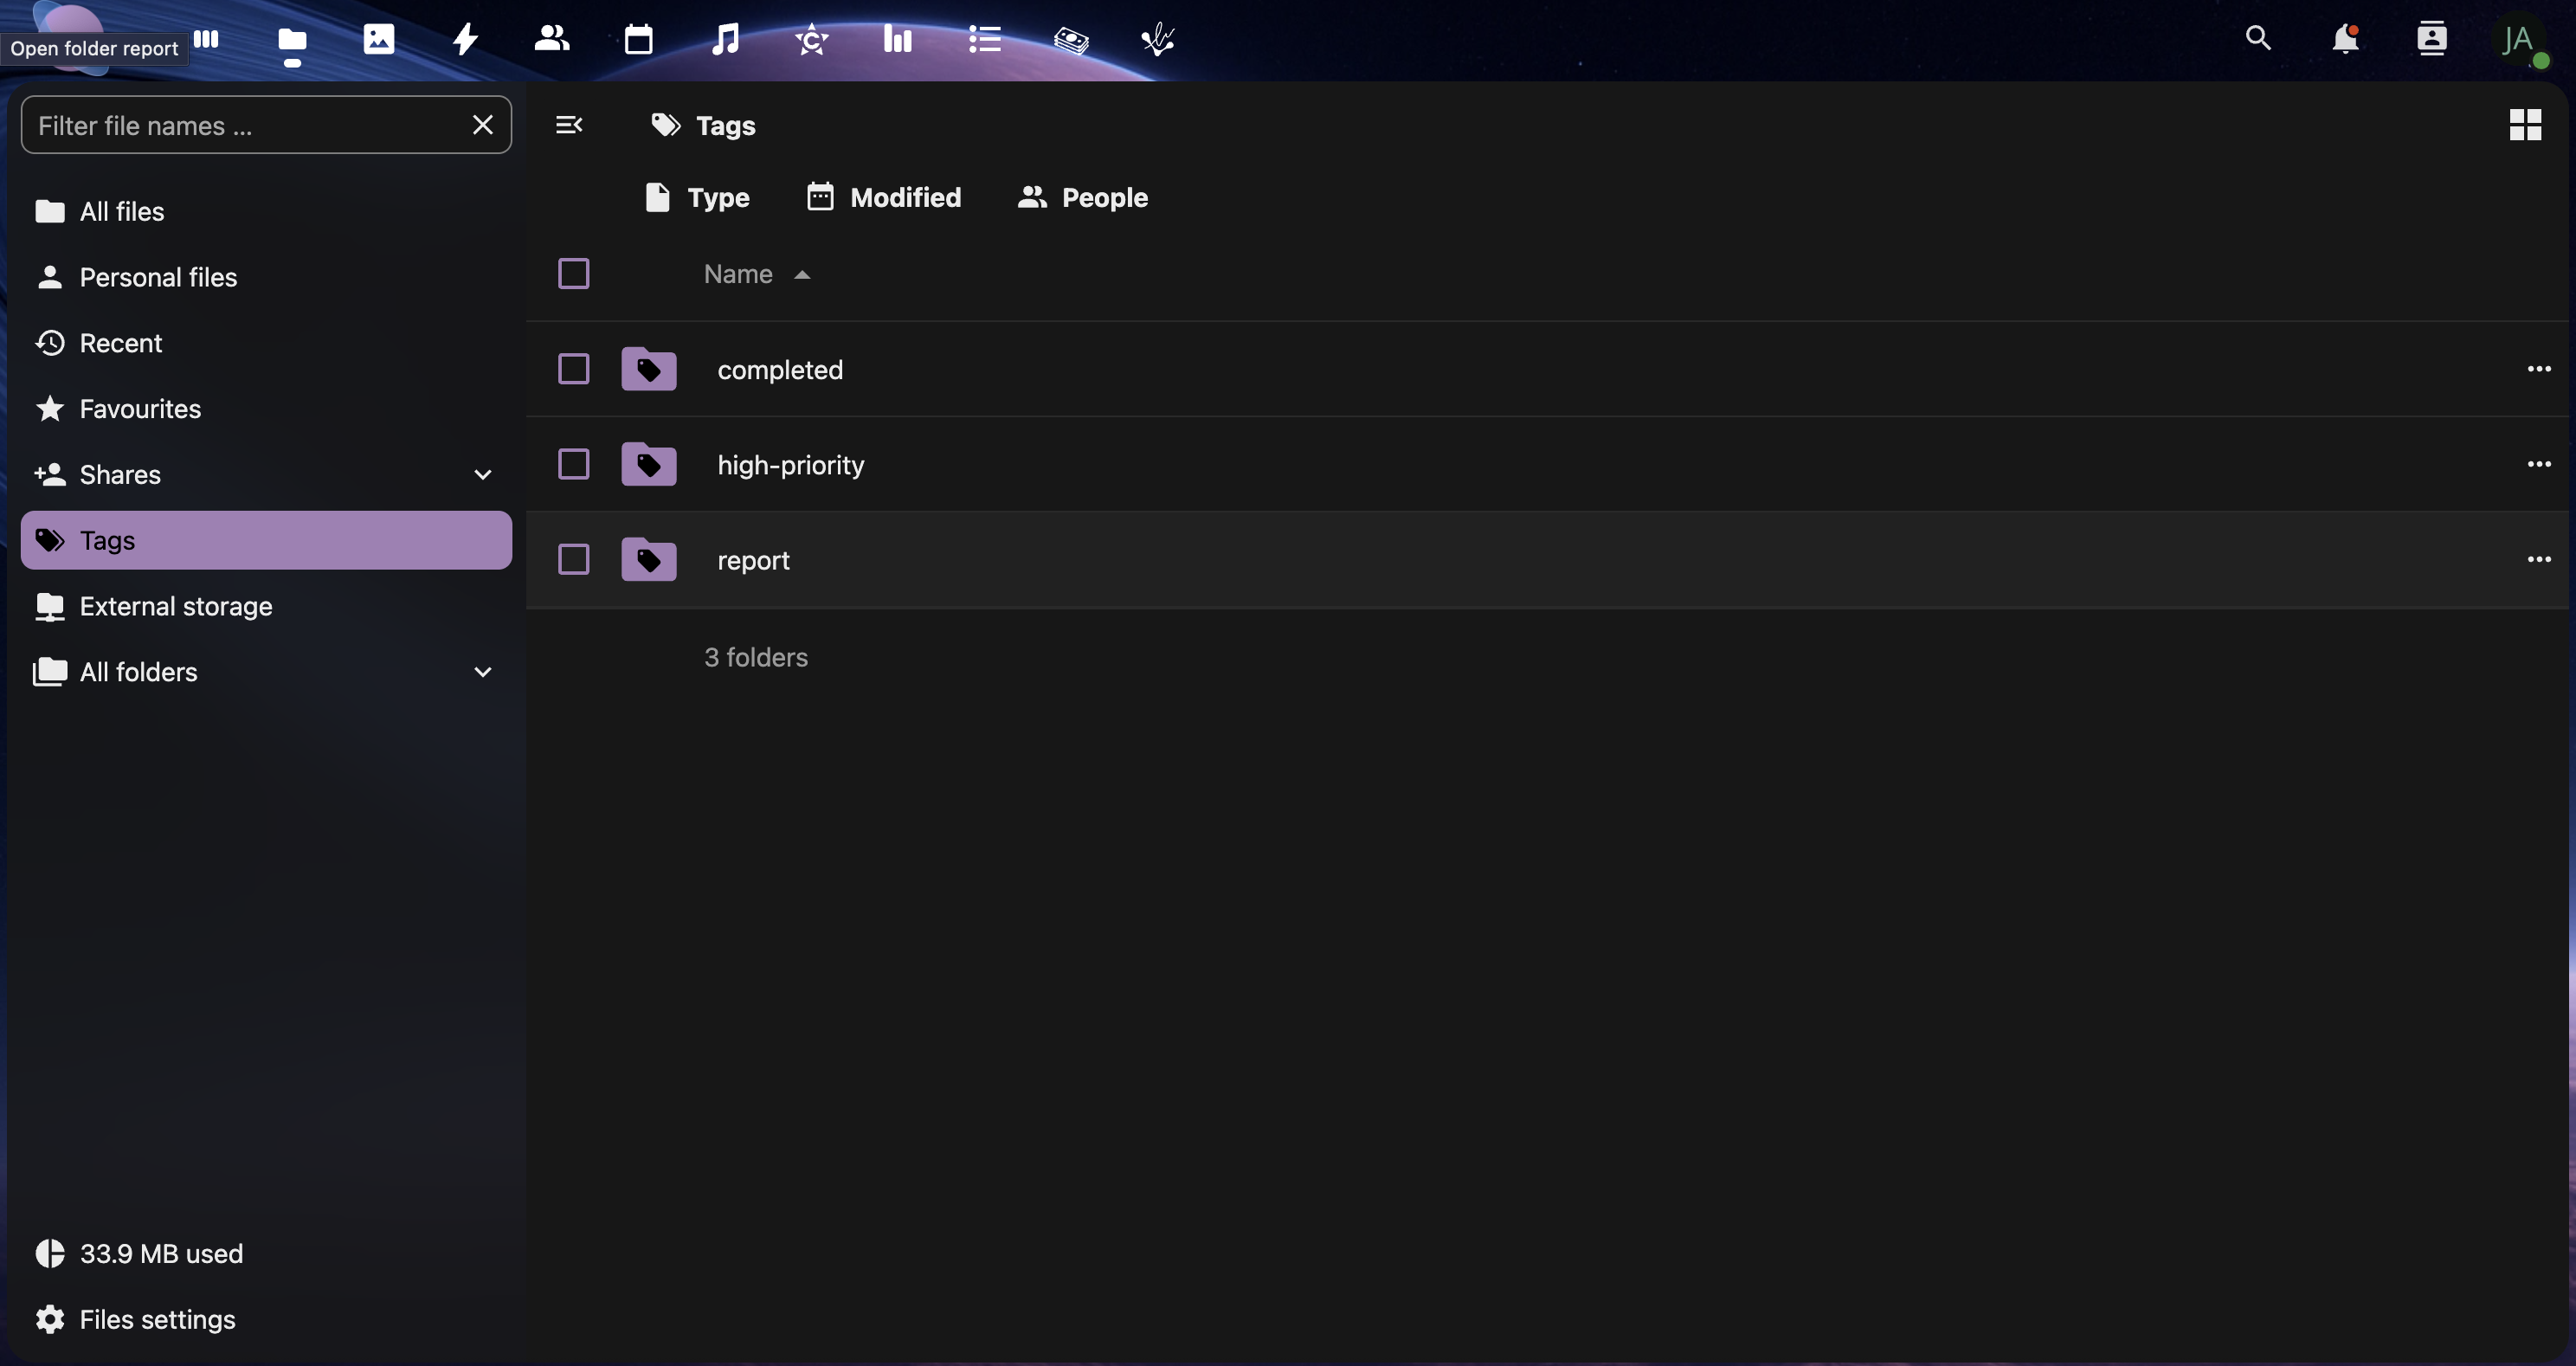
Step 2: Adding Tags to Files
- Right-click any file in your Junovy Cloud Storage
- Select "Details" from the context menu
- Look for the "Manage Tags" section in the details panel
- Type your tag and press Enter
- Add multiple tags by typing each one separately
- Save changes if prompted

Quick Tagging Tips:
- Start typing and NextCloud will suggest existing tags
- Use consistent tag names across your files
- Create tag categories (status, type, priority) for organisation
- Keep tag names short and descriptive
Step 3: Creating a Tag System
Develop a consistent tagging strategy for your organisation:
draft- Work in progressreview- Ready for feedbackapproved- Finalised contentarchived- Old but kept for reference
template- Reusable filesreference- Information resourcesclient-facing- External documentsconfidential- Sensitive information
- Use project codes or names as tags
- Example:
proj-website,client-acme,campaign-2024
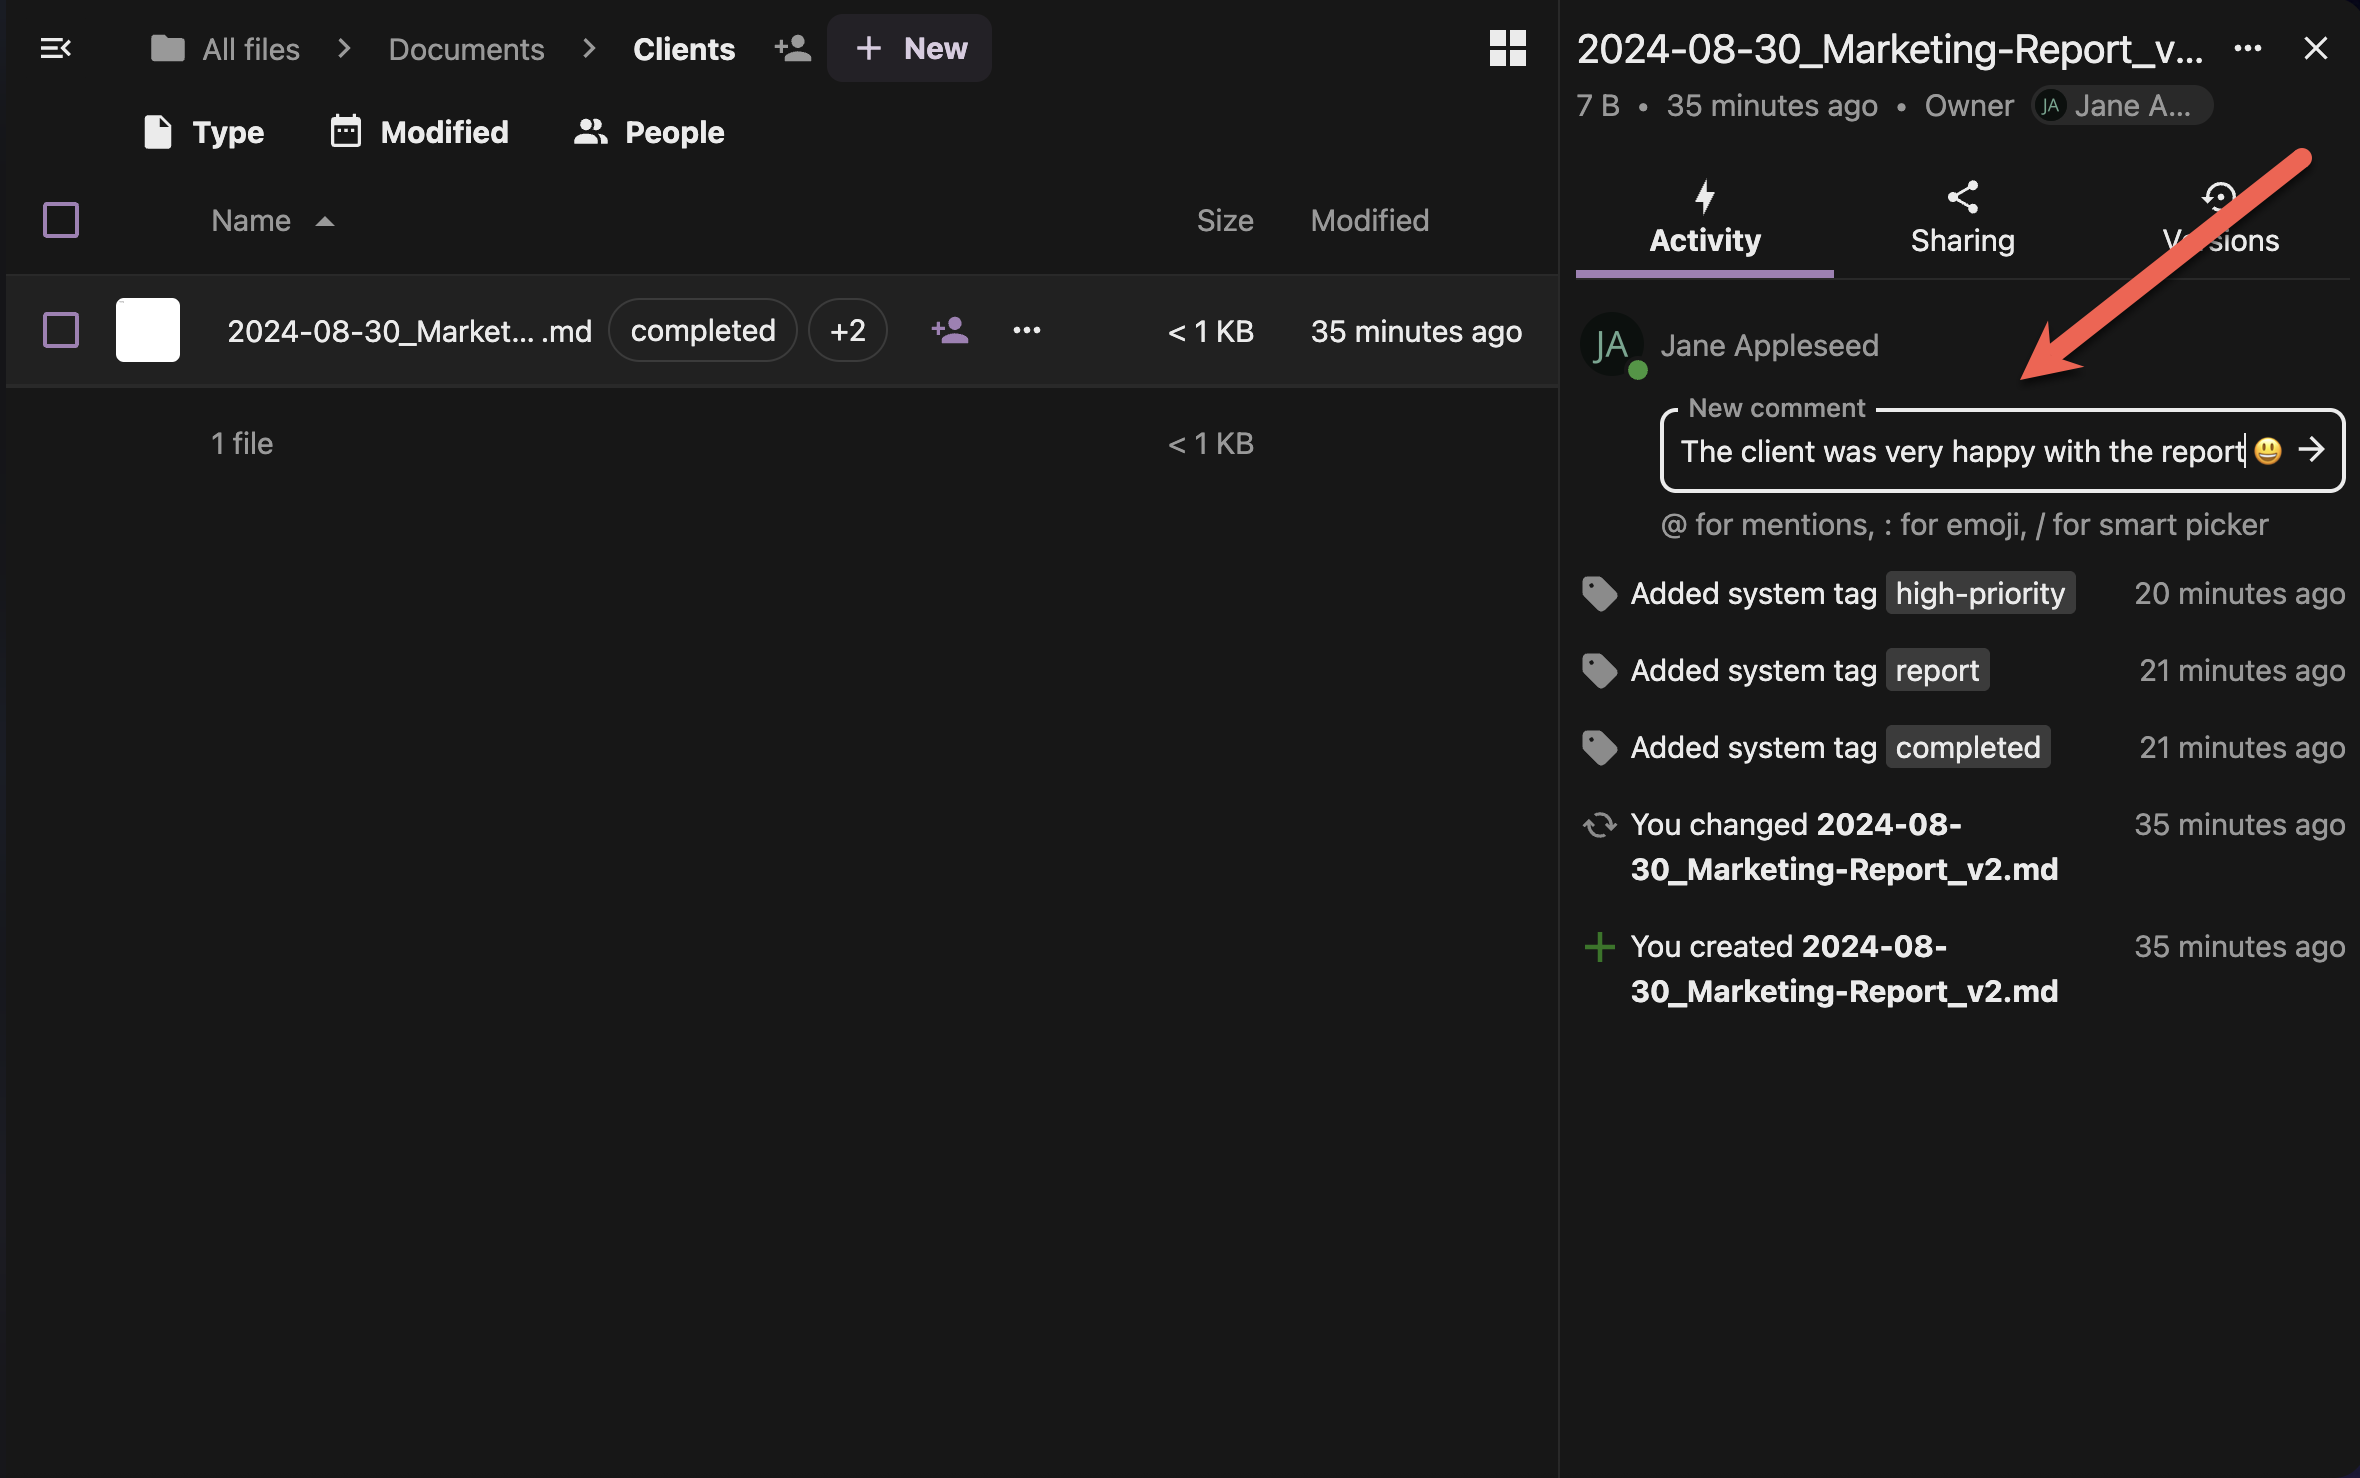
Step 4: Using Comments for Collaboration
Comments allow team members to discuss files without editing the content:
- Open the file details panel (right-click → View Details)
- On the "Activity" section
- Type your comment in the text box
- Mention teammates using @username for notifications
- Click the "Arrow Icon" or press ENTER to add the comment
Comment Best Practices:
- @mention specific team members for targeted feedback
- Ask specific questions rather than general comments
- Reference line numbers or sections when commenting on documents
- Use positive, constructive language for feedback
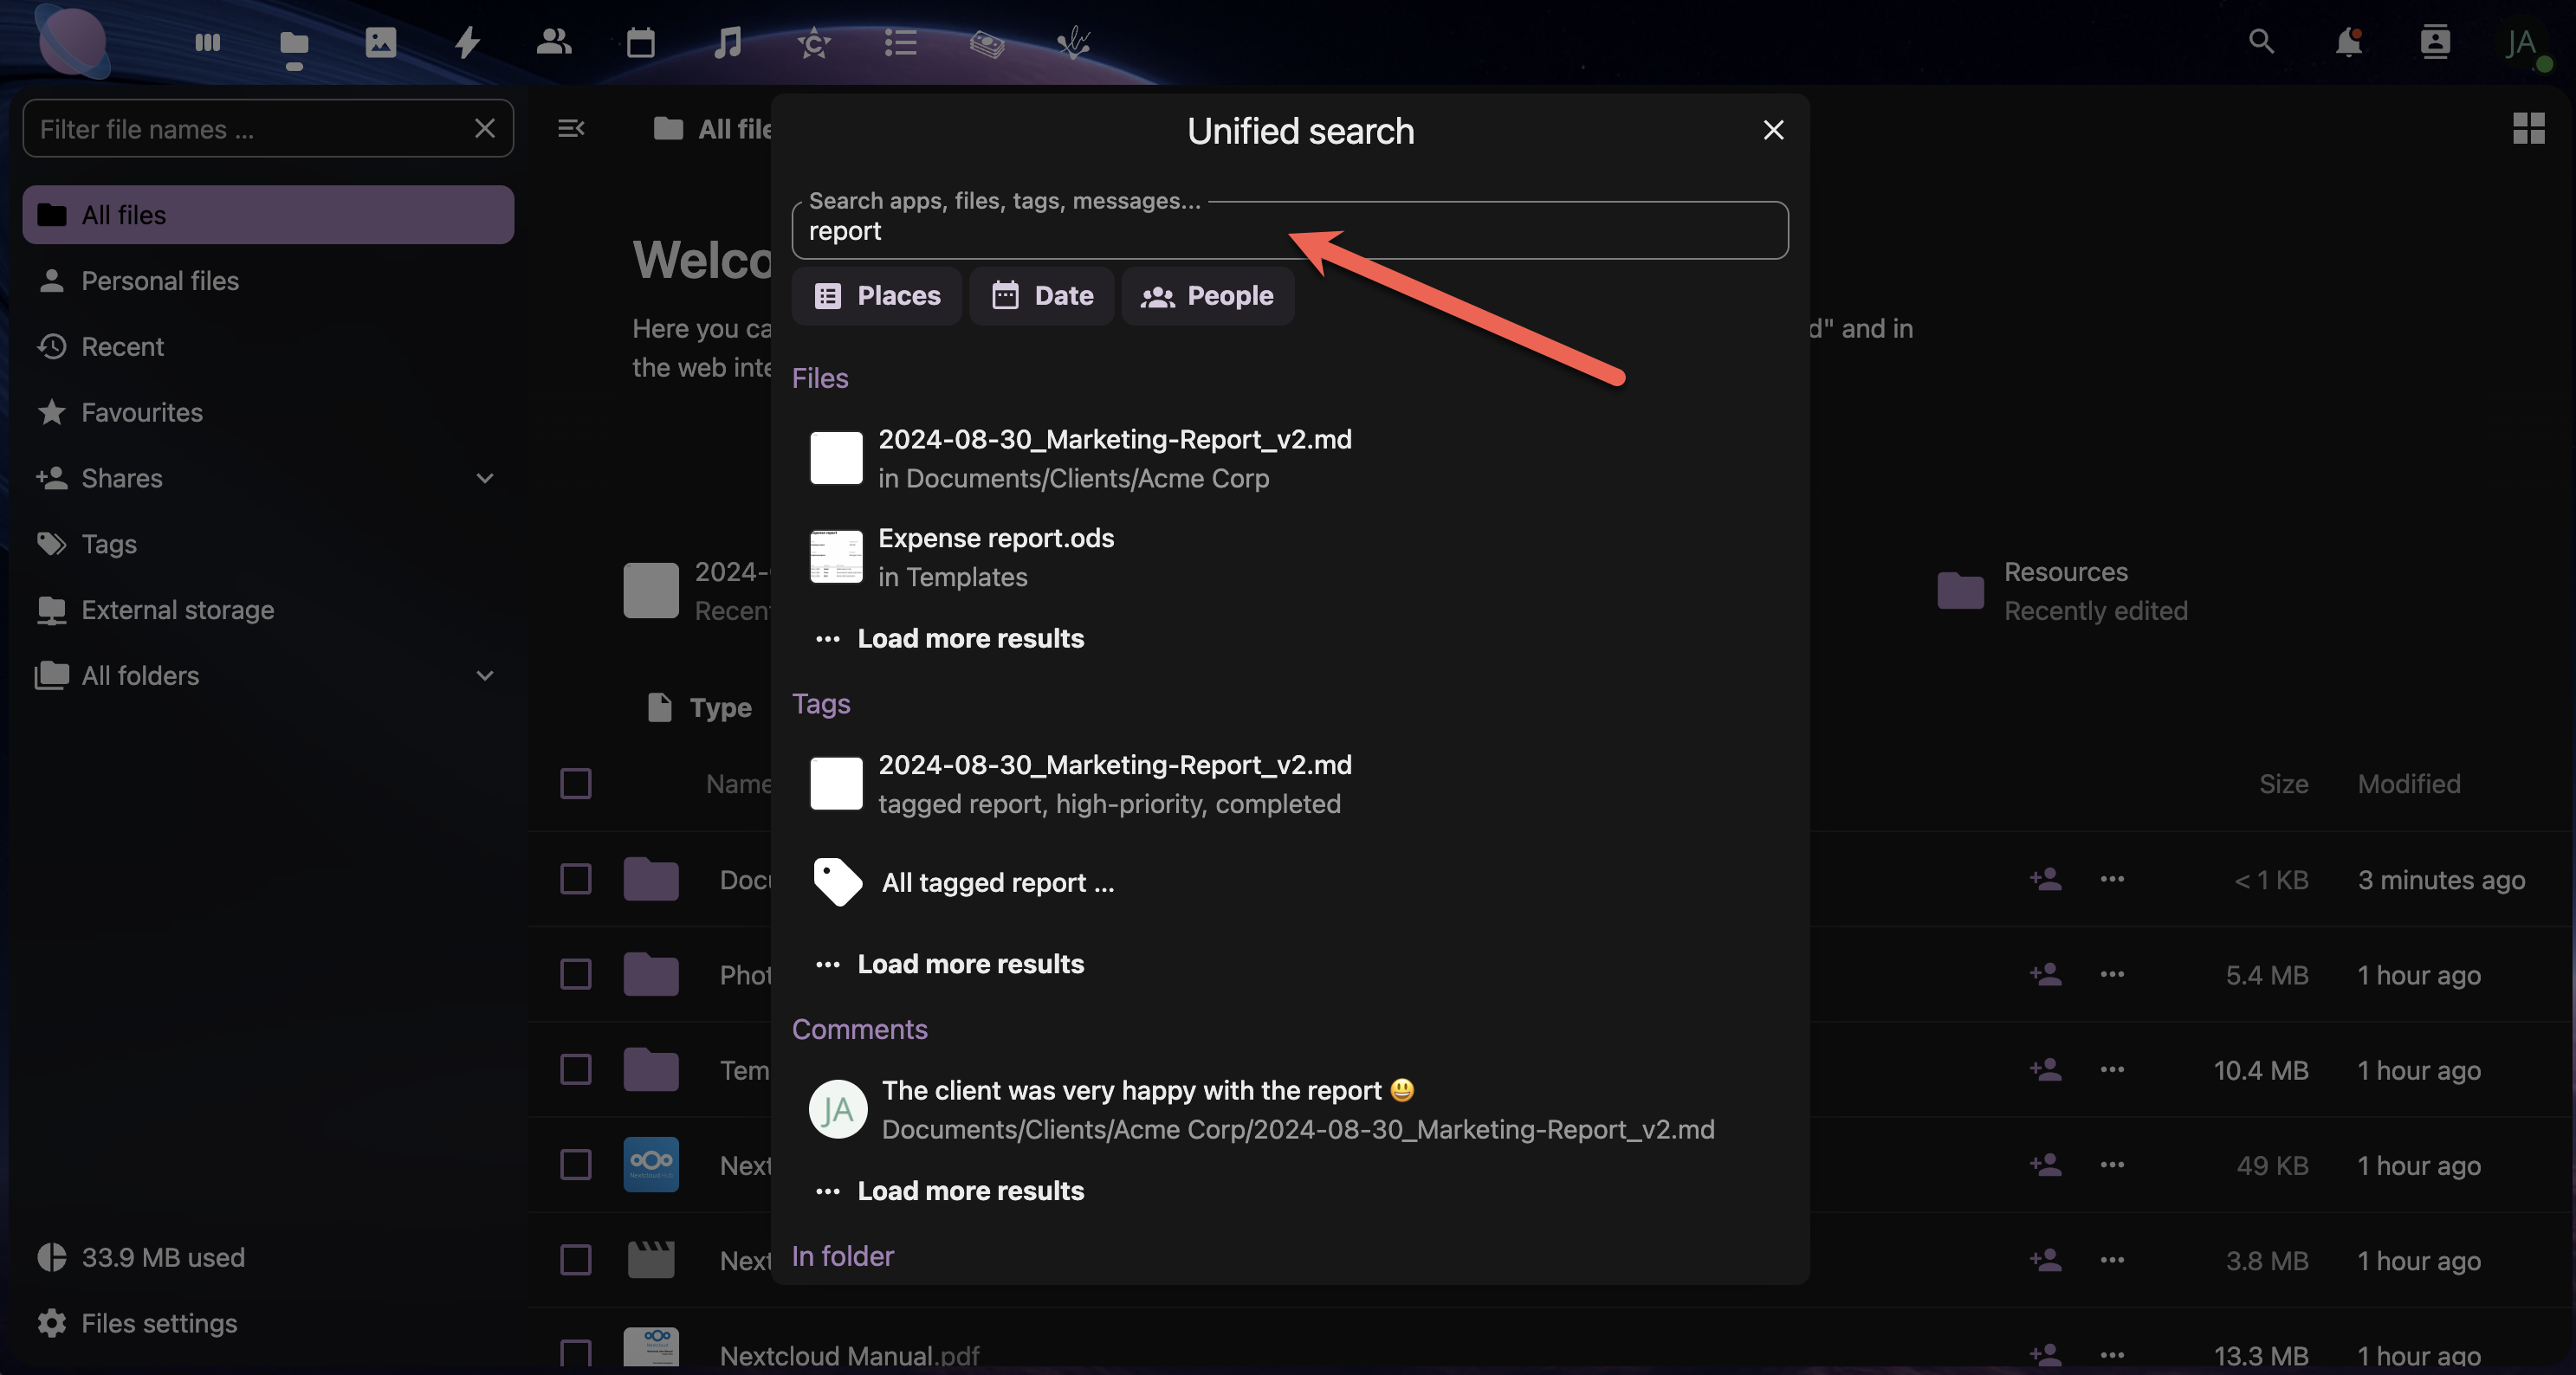
Step 5: Searching with Tags and Metadata
Use your organisational system to find files quickly:
Tag-Based Searching:
- Use the search bar at the top of your file view
- Type tag: followed by your tag name
- Example:
tag:urgentortag:client-acme - Combine tags with AND/OR operators
Advanced Search Options:
- Modified date:
modified:2024-08-30 - File type:
type:pdfortype:image - Size range:
size:>10MB - Author:
owner:username
To begin searching, click the search icon in the upper right-hand corner

Next, type the keywords or select from one of the options: Places, Date or People. Then, click to select the file.
Step 6: Organising with Favourites
Mark frequently accessed files as favourites for quick access:
- Hover over any file in your file list
- Click the star icon that appears
- Access favourites from the left sidebar
- Remove favourites by clicking the star again
Use Favourites For:
- Templates you use regularly
- Important reference documents
- Active project files
- Frequently shared resources
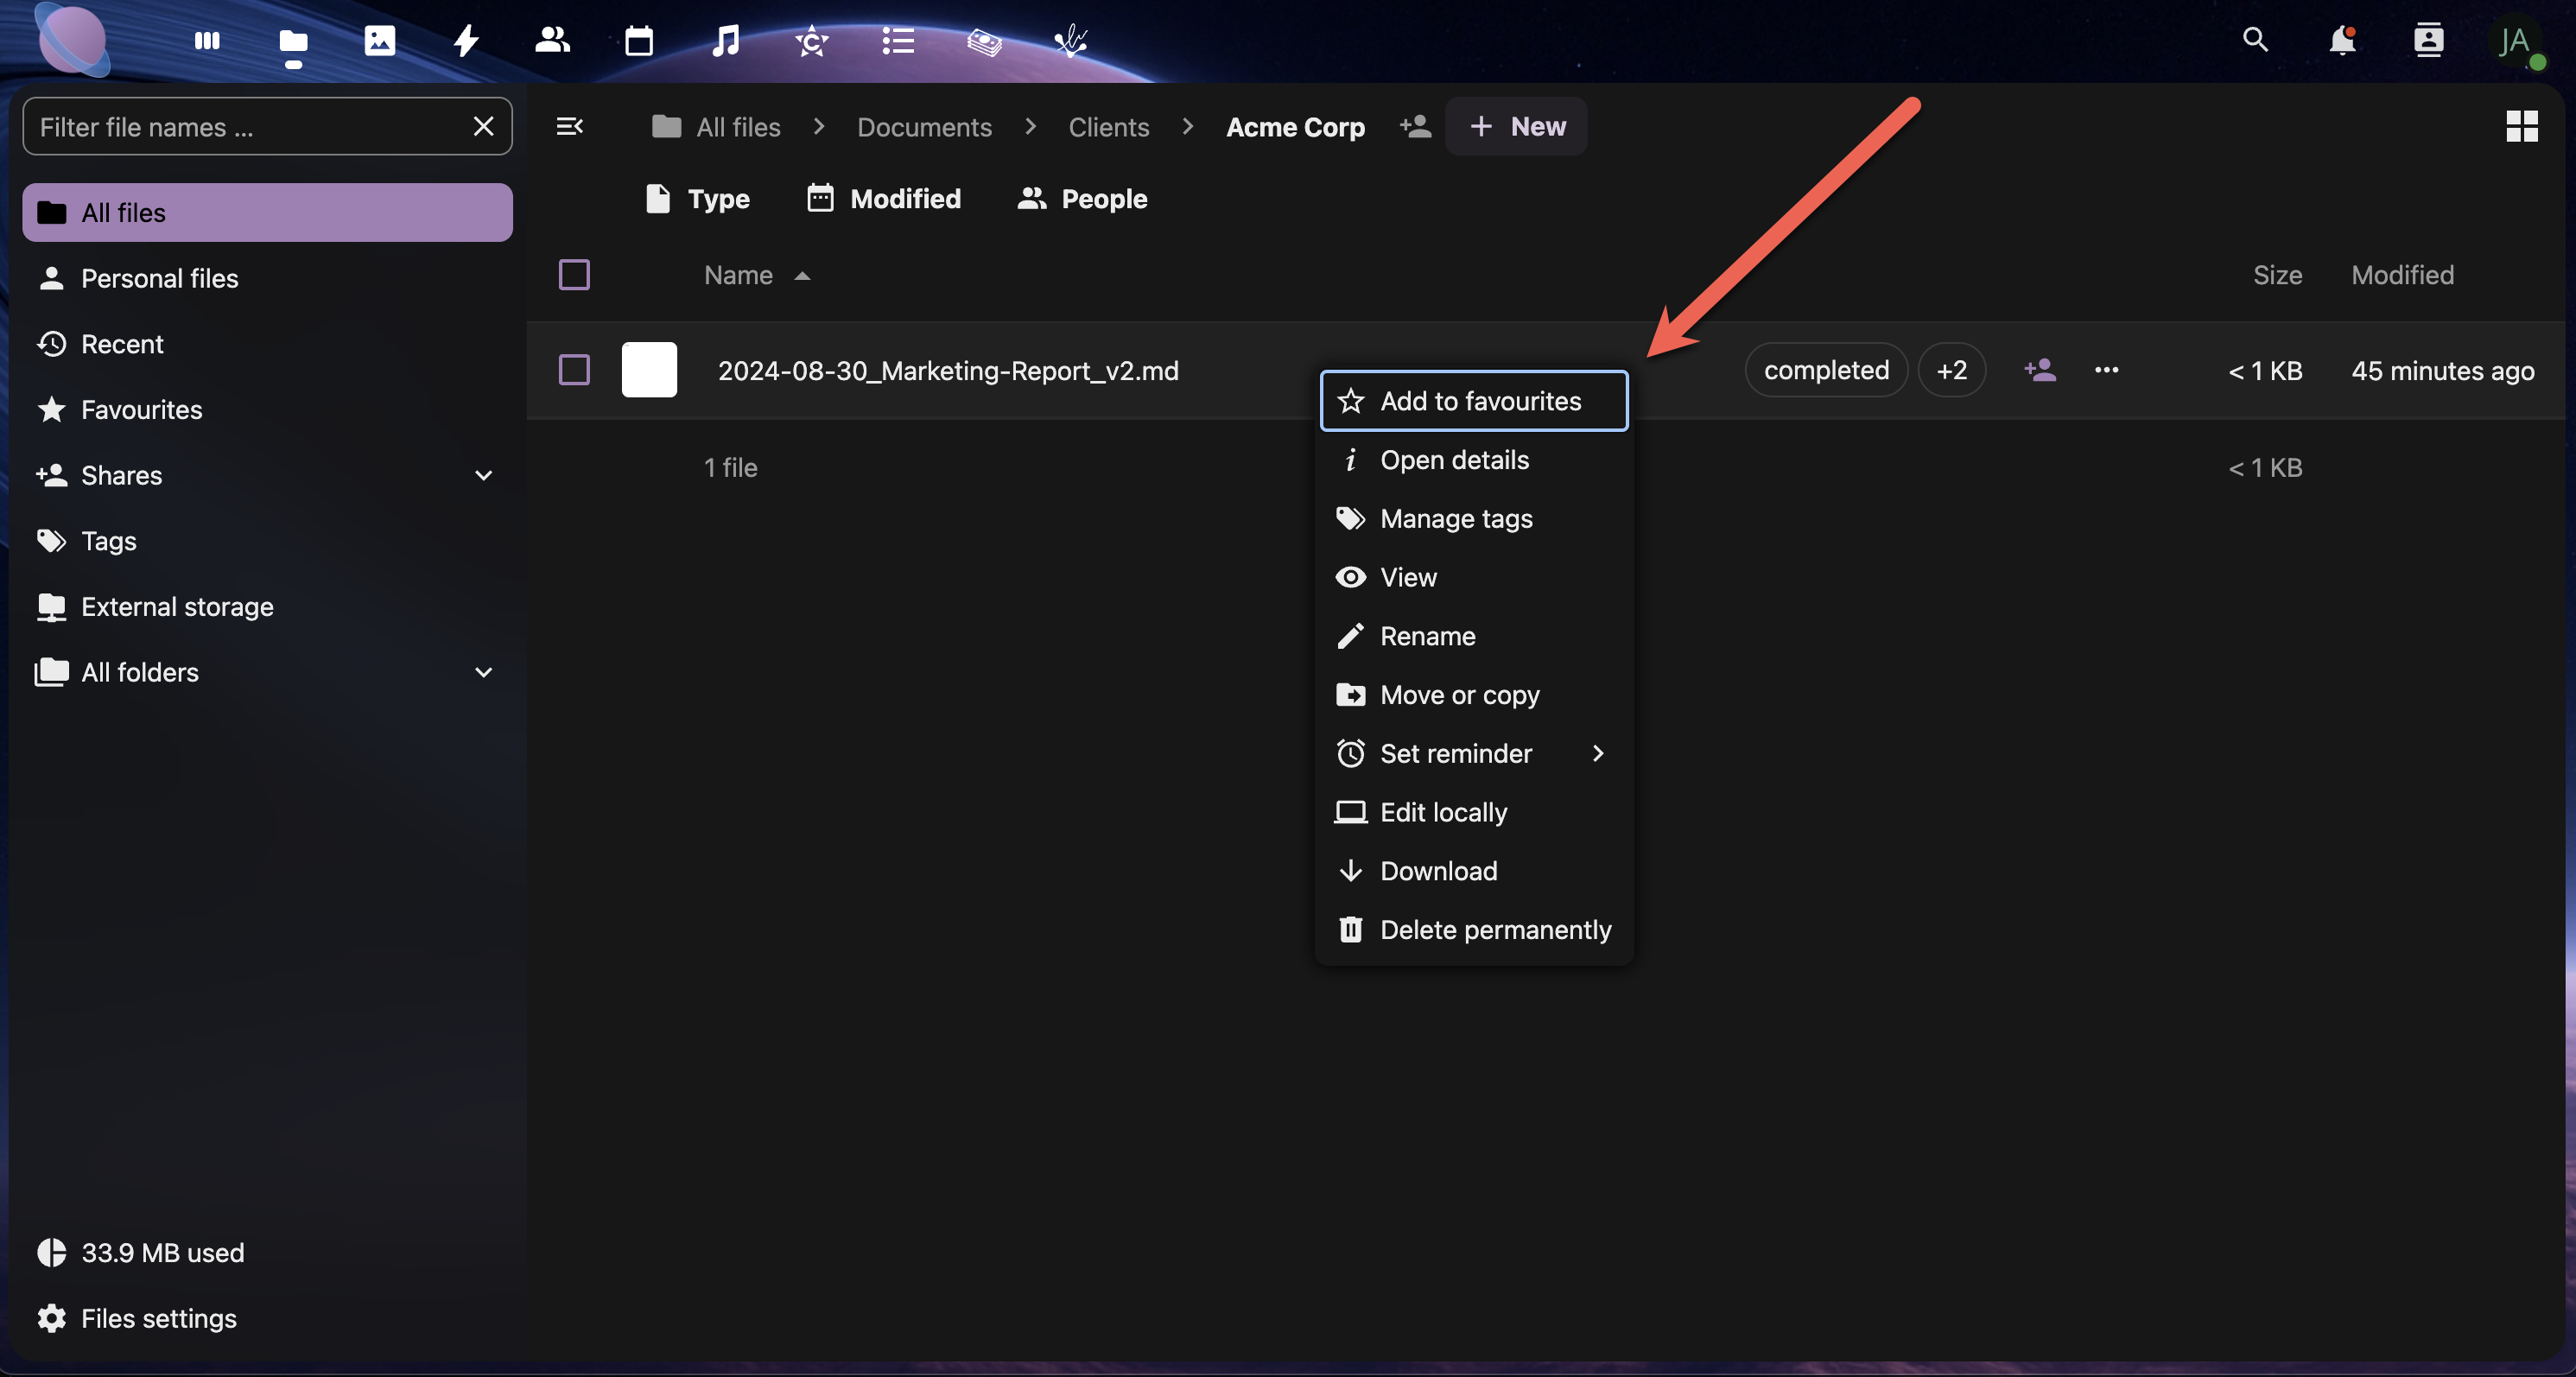
Right-click a file or click the more-options menu to show the "Add to favourites" option.
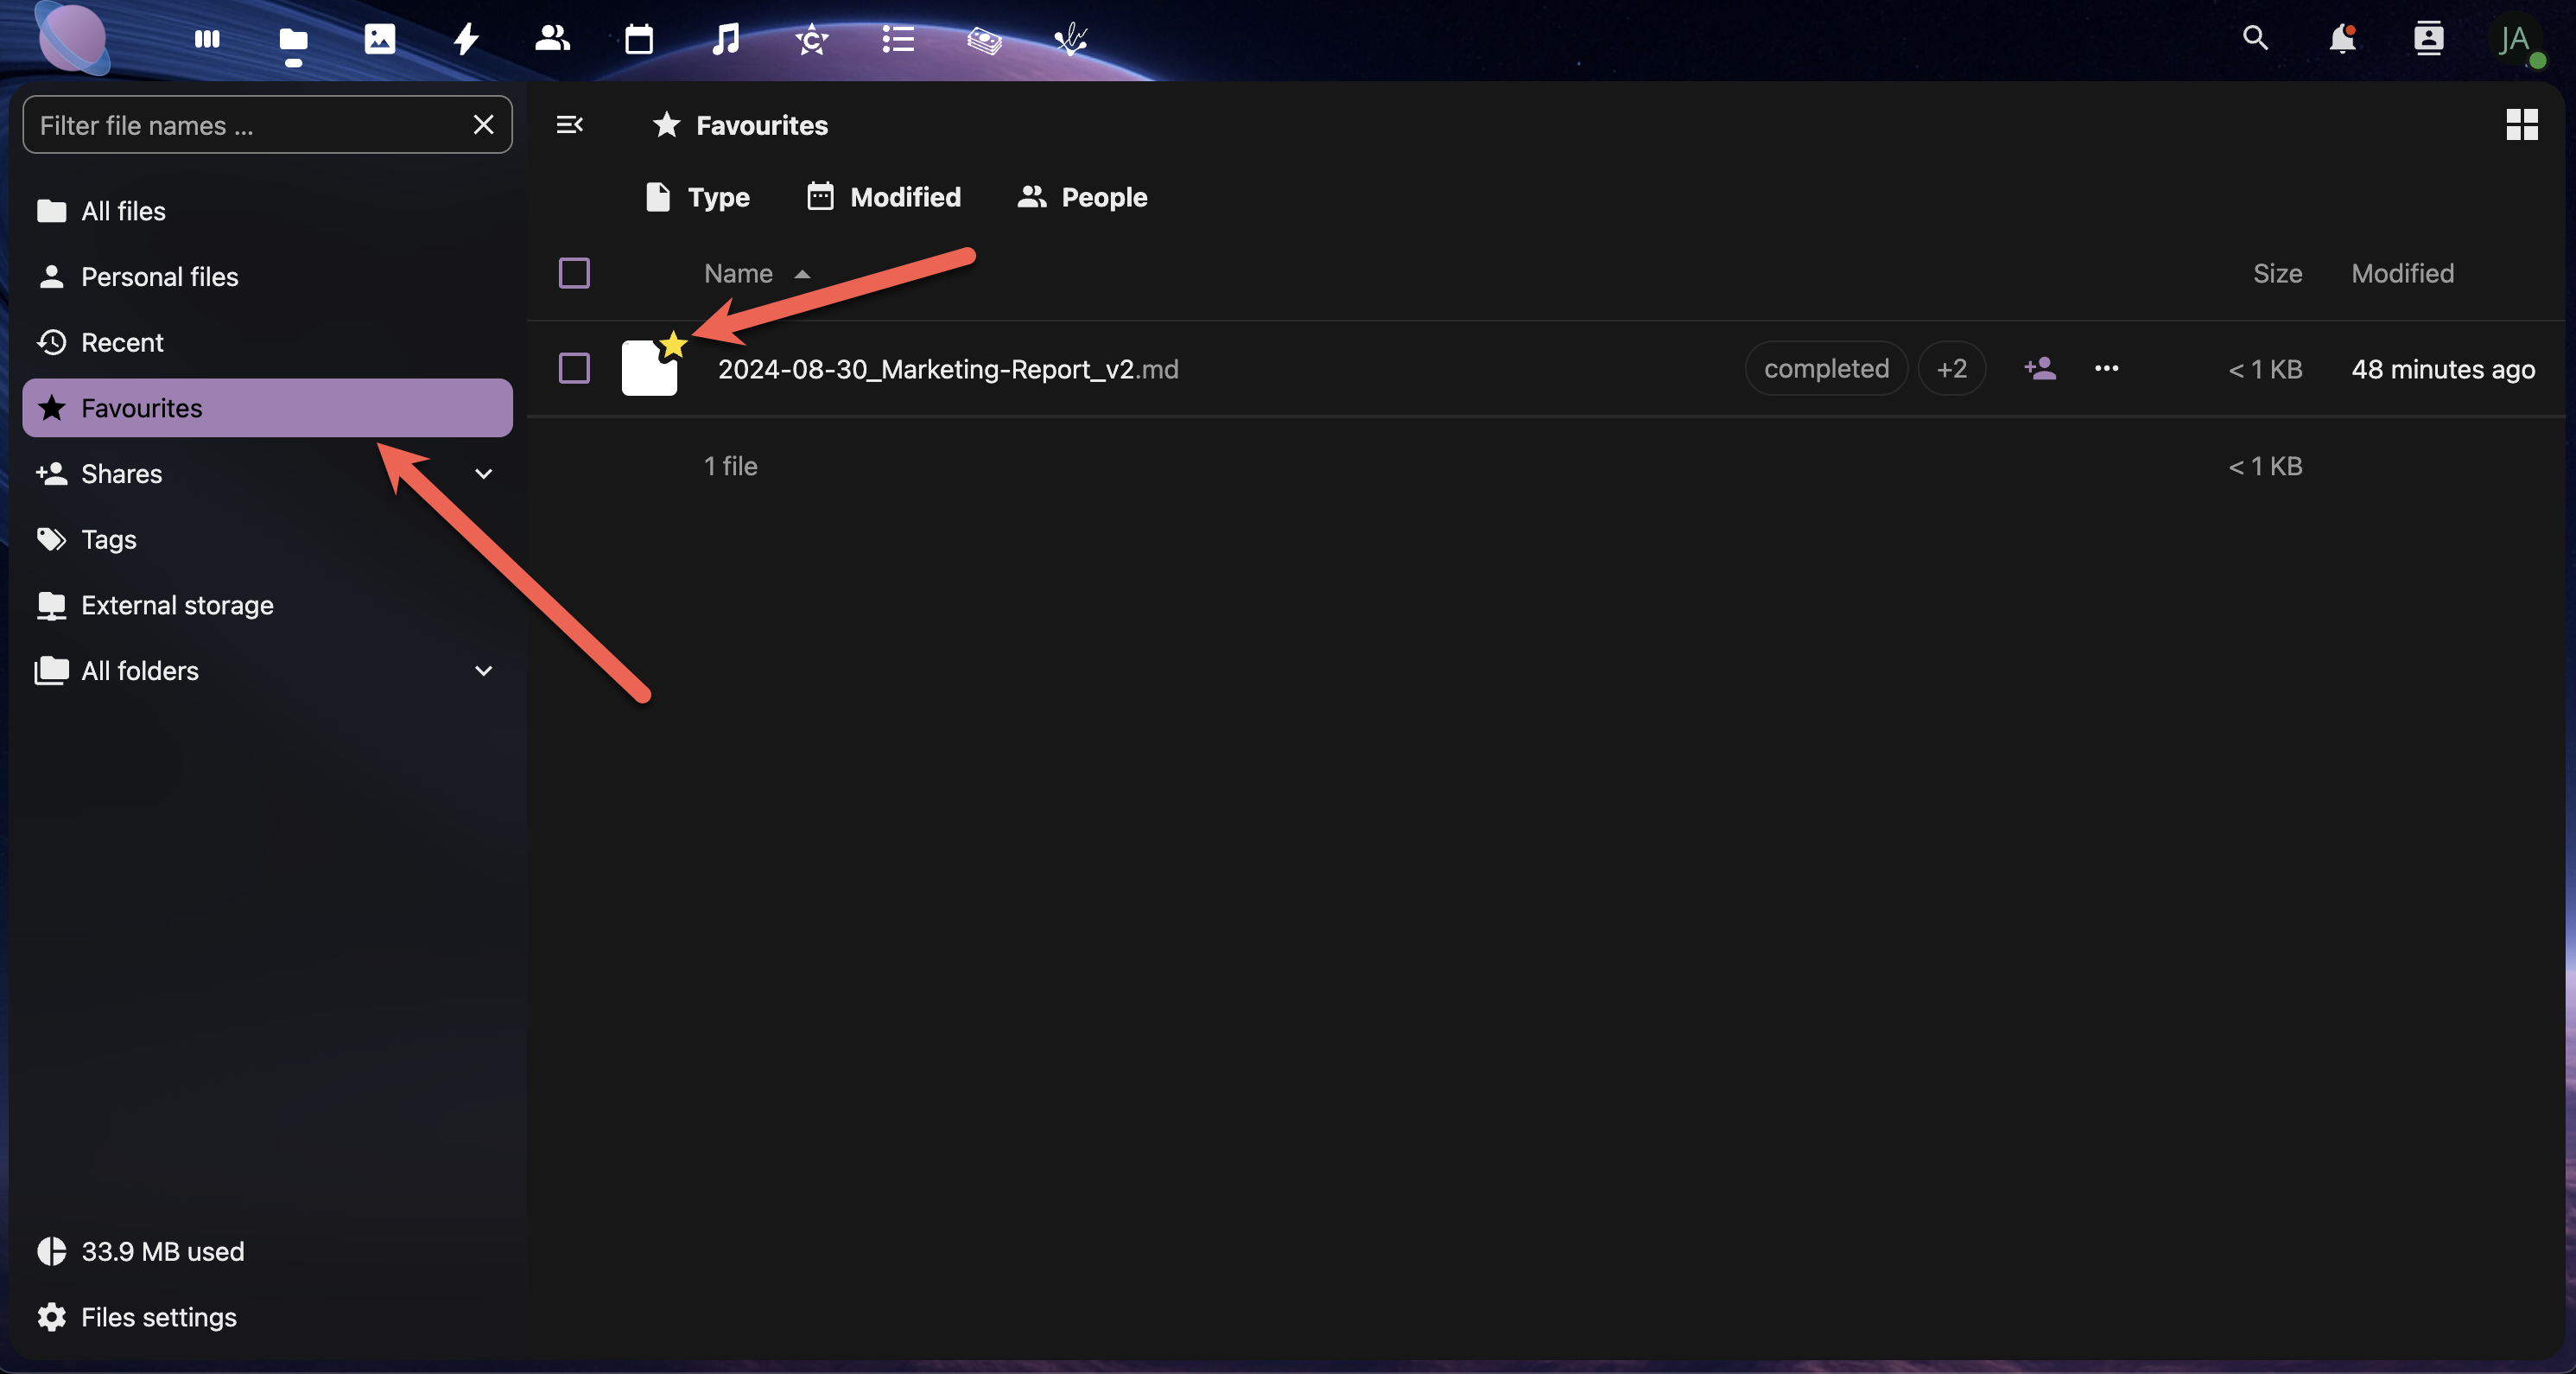
Once a file is added to favourites, it will show in the Favourites panel on the left-hand side panel. The file will also receive a yellow star icon.
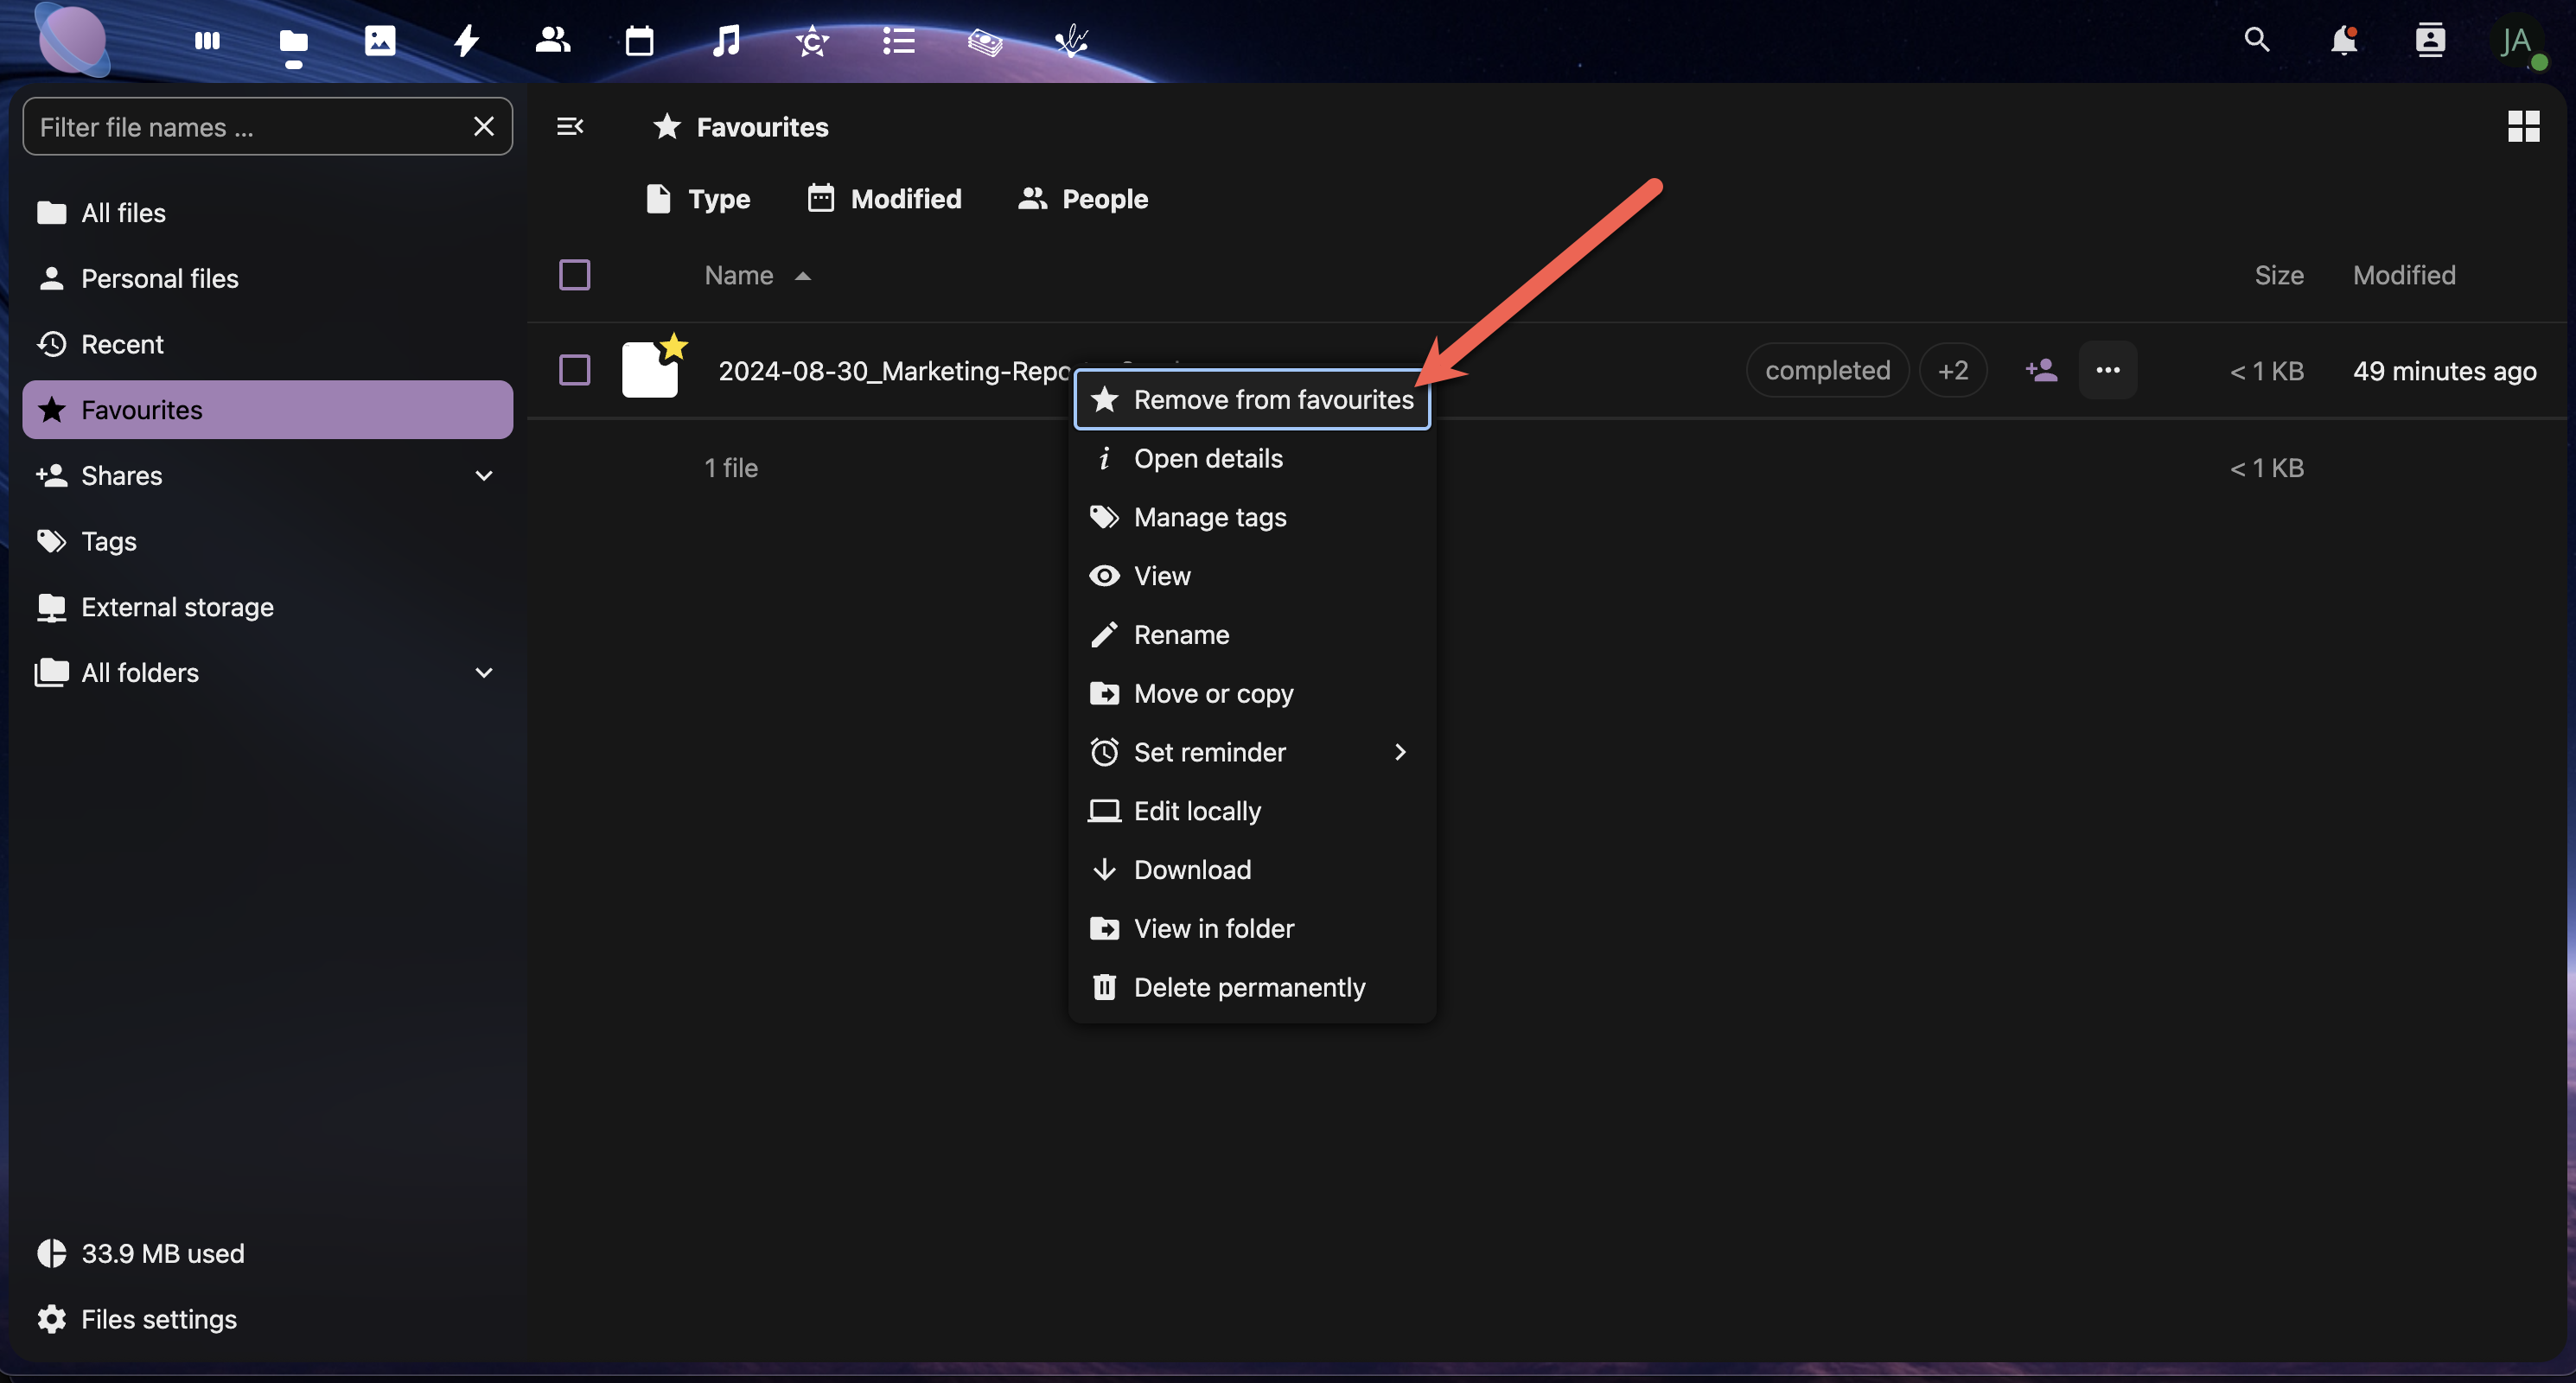
To remove a file from favourites, right-click the file or click the more-options menu to show the "Remove from favourites" option.
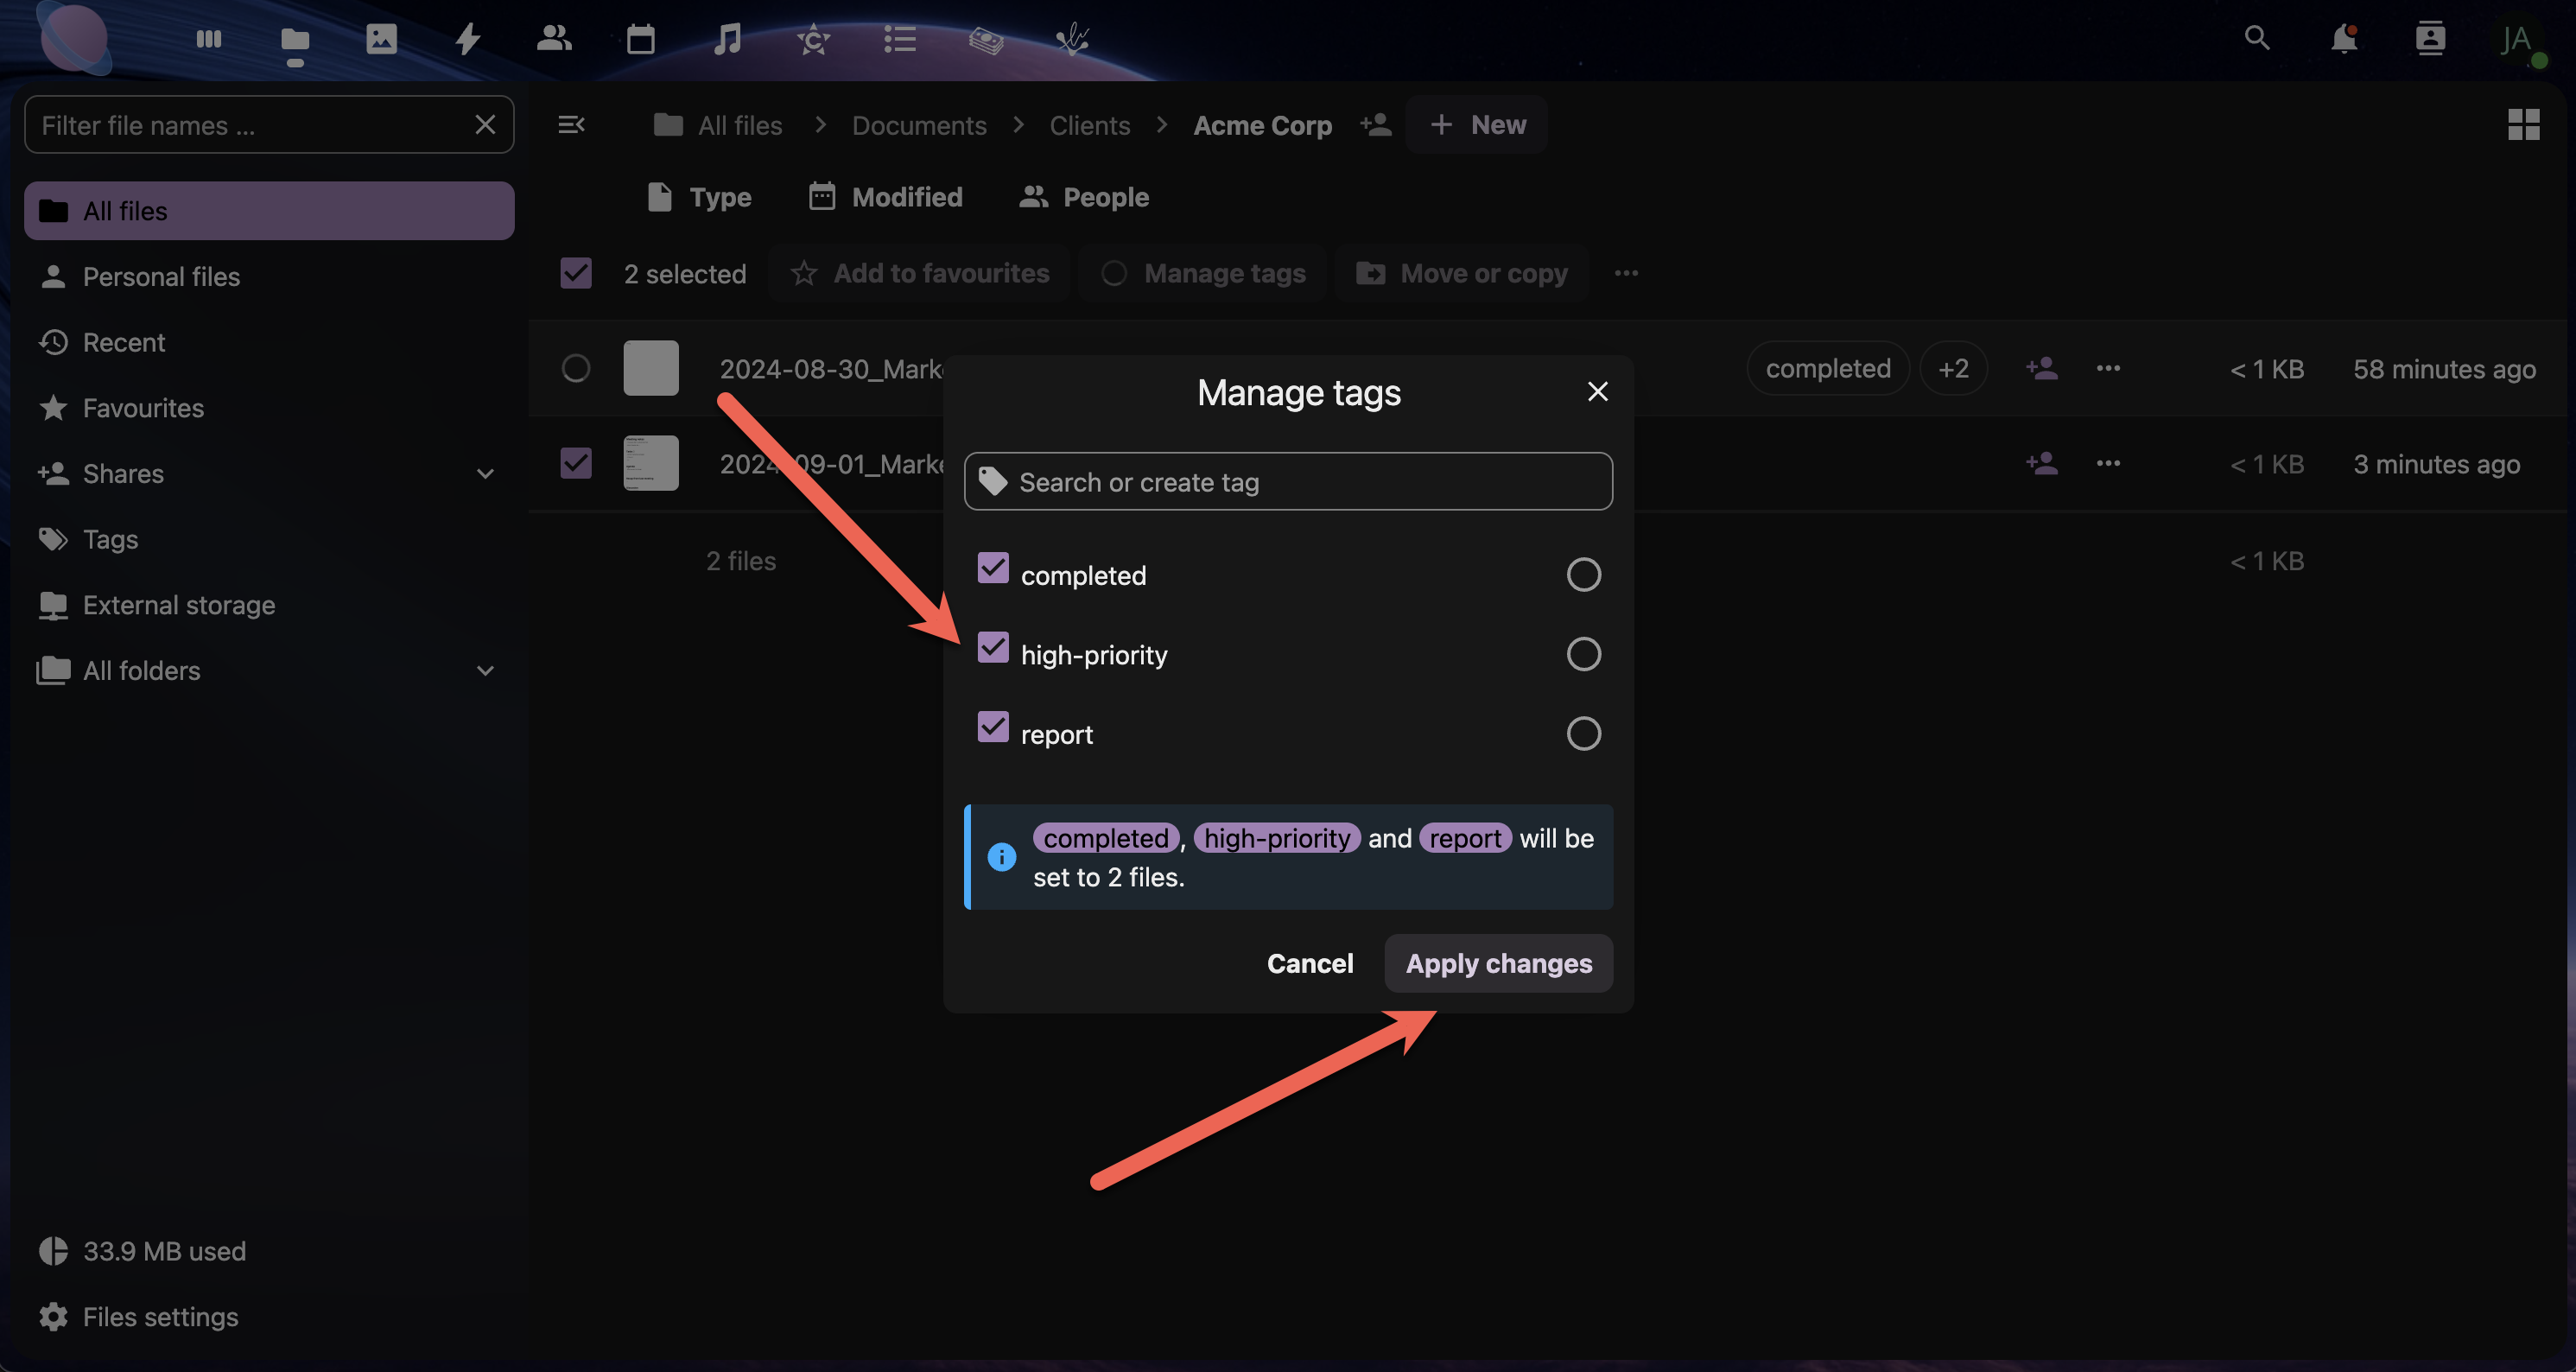
Step 9: Bulk Metadata Operations
- Select multiple files using Ctrl+click (Windows/Linux) or Cmd+click (Mac)
- Click the Manage tags button.
- Add tags that apply to all selected files
- Note: Comments are typically file-specific
Bulk Tagging Examples:
- Tag all files from a project:
proj-website-redesign - Mark old files for archiving:
archive-candidate - Identify file types:
template,reference,working-file

Creating Smart Organisation Rules
Rule Examples:
- All
templatetagged files go in Templates folder - Files tagged
reviewget weekly follow-up comments Confidentialtagged files require special sharing permissionsArchive-candidatefiles older than 1 year get moved to Archive
Best Practices Summary
✅ Tag Management:
- Use consistent, descriptive tag names
- Create tag categories (status, type, project)
- Regularly review and clean up unused tags
- Train team members on your tag system
✅ Comment Guidelines:
- Be specific and actionable in feedback
- Use @mentions to notify relevant team members
- Keep comment threads focused on the file topic
- Archive old comment threads when resolved
✅ Metadata Optimisation:
- Add descriptions to important documents
- Use keywords that complement your filename
- Keep descriptions concise but informative
- Update metadata when file purposes change
Next Steps
You now have a comprehensive system for organising files using folders, names, tags, comments, and favourites. The next page will show you how to use these organisational tools to set up effective sharing and collaboration workflows with your team members and clients.
Sharing and Collaboration Workflows
Now that you've mastered file organisation, it's time to leverage these systems for effective sharing and collaboration. This page shows you how to create secure, organised workflows that make working with team members and clients seamless.
Understanding NextCloud Sharing Options
NextCloud v31 offers several sharing methods, each suited for different collaboration needs:
Internal Sharing: Share with other Junovy Cloud Storage users Link Sharing: Create shareable links for external access Email Sharing: Send files directly via email Group Sharing: Share with predefined user groups Federated Sharing: Share with users on other NextCloud instances
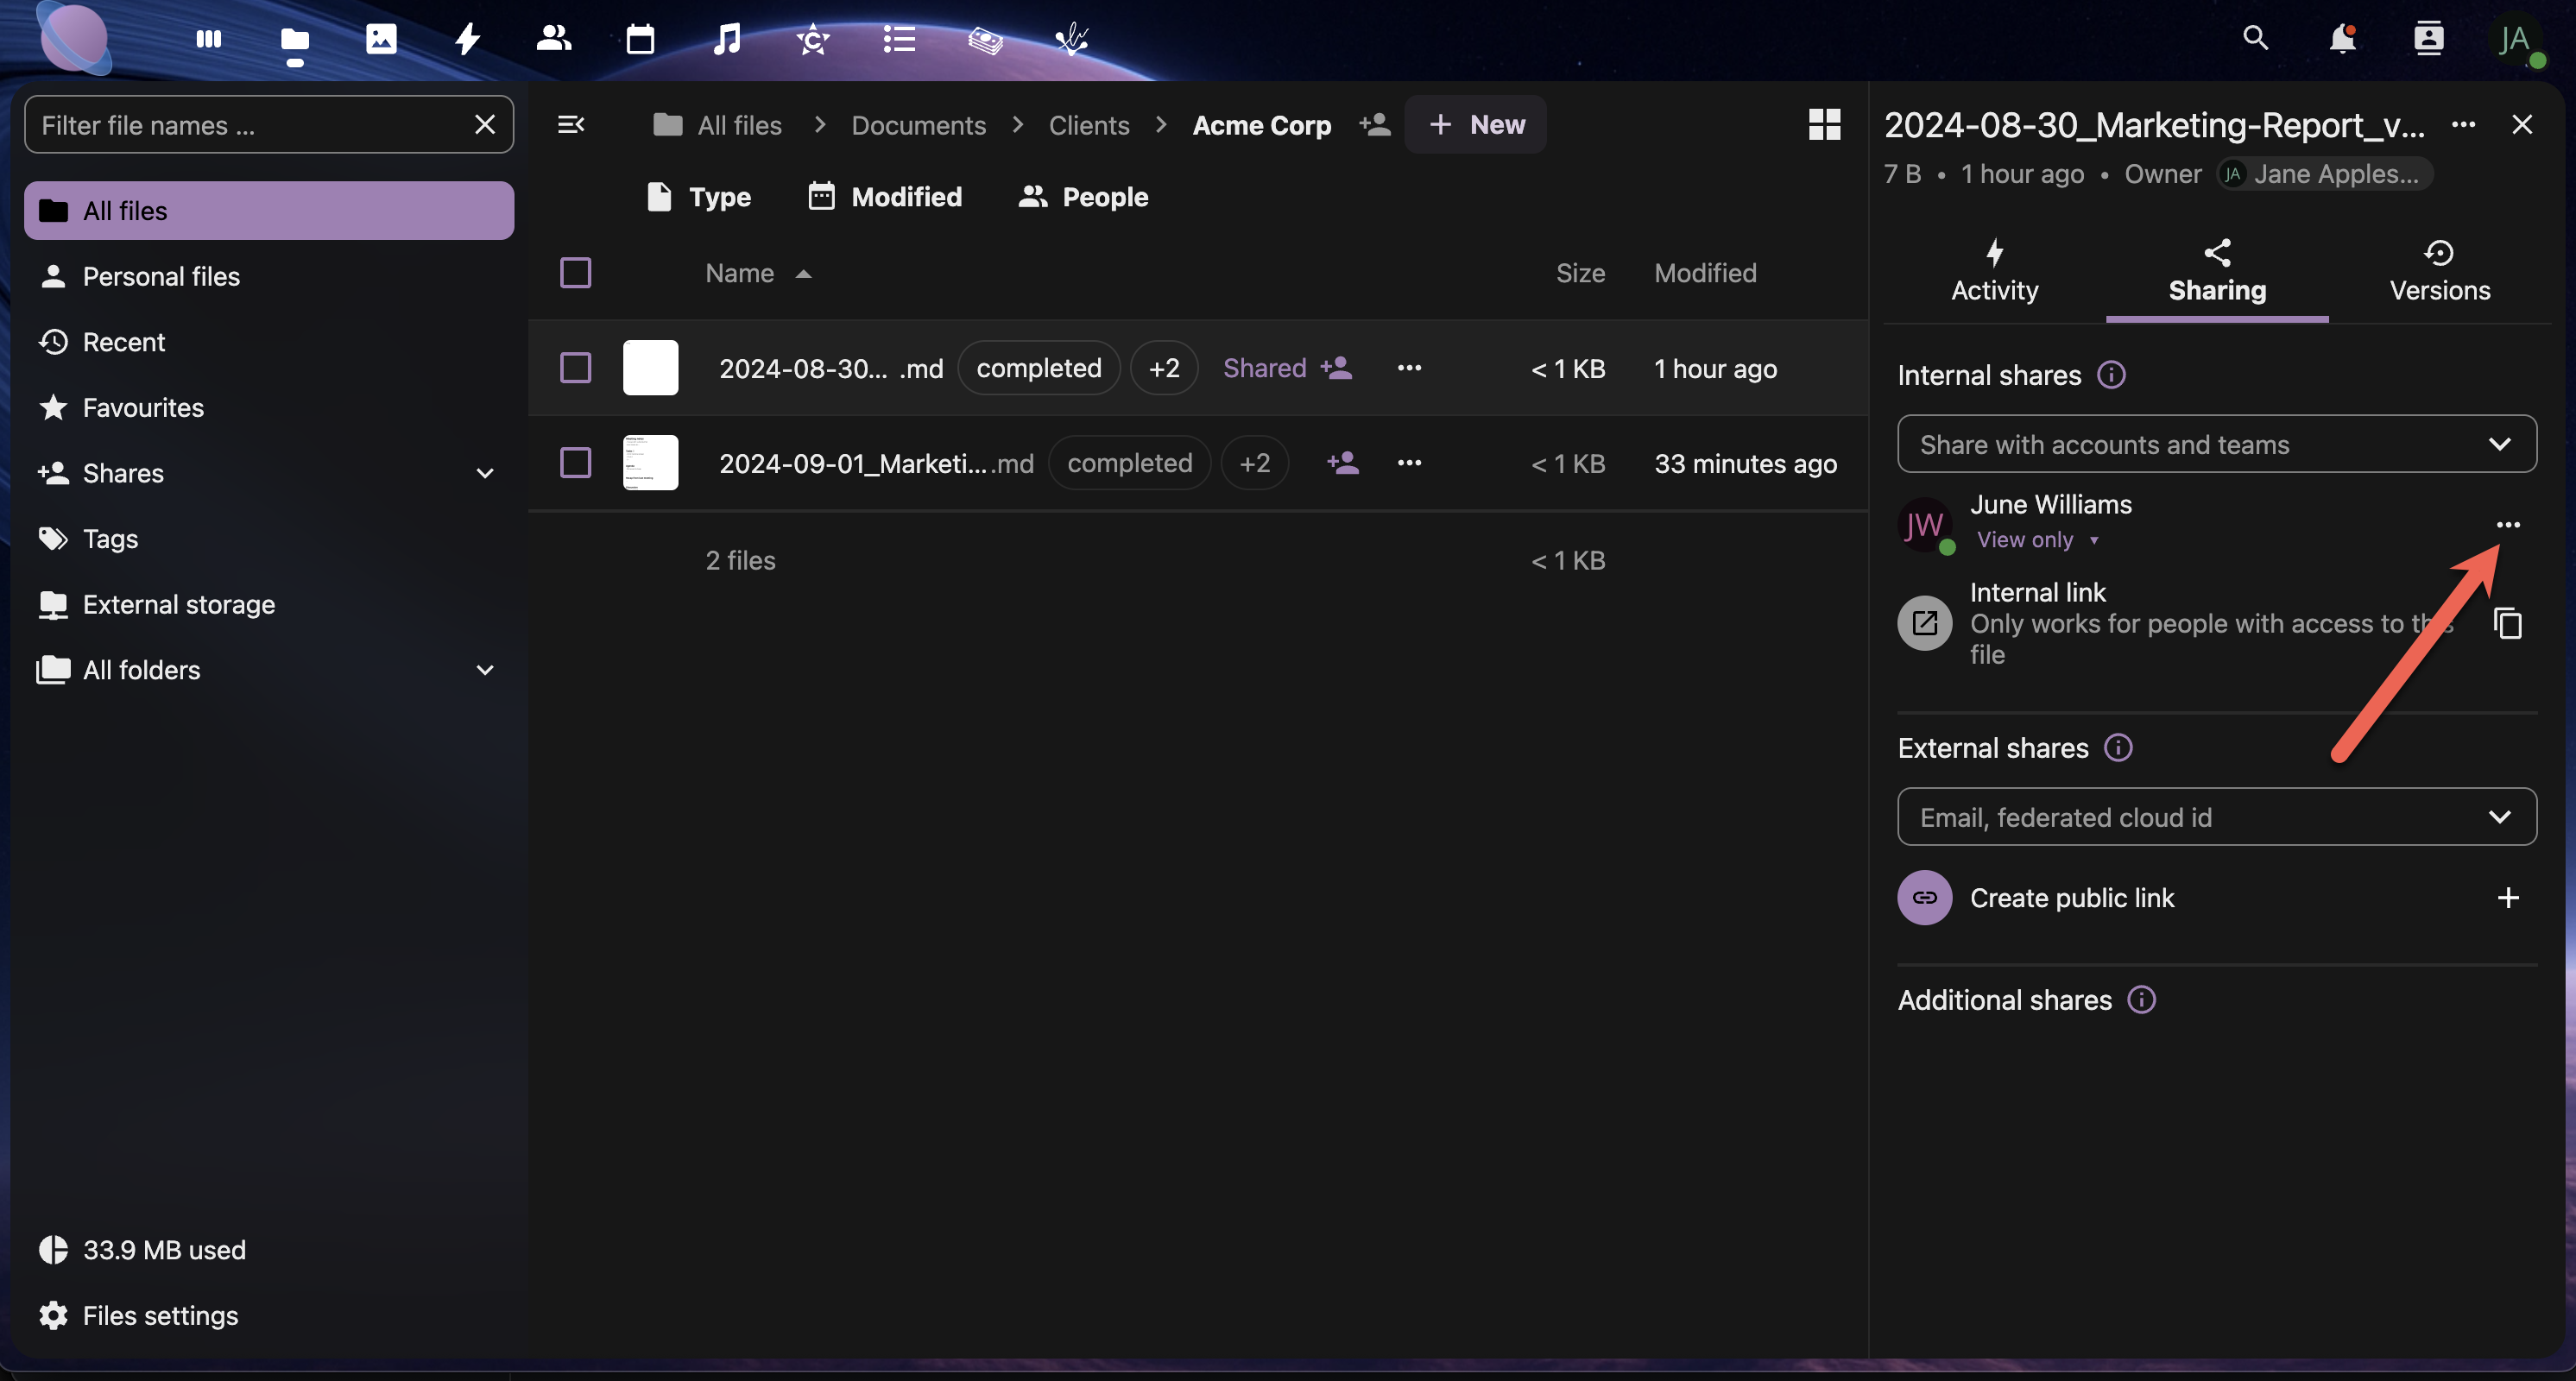
Clicking the Sharing Options icon, the Sharing menu will open.
Step 1: Set Up Your Collaboration Folders
Create dedicated spaces for different types of collaboration:
Recommended Folder Structure:
02 - Shared Projects/
├── Client-Collaboration/
│ ├── ACME-Website/
│ ├── Johnson-Co-Branding/
│ └── Templates-for-Clients/
├── Team-Workspaces/
│ ├── Marketing-Team/
│ ├── Development-Team/
│ └── Management-Reports/
└── External-Partners/
├── Freelancer-Handoffs/
└── Vendor-Resources/
- Create your collaboration folder structure
- Apply consistent tagging to shared folders
- Set clear naming conventions for shared content
- Document permissions for each collaboration space
Step 2: Internal Team Sharing
Sharing with Individual Users:
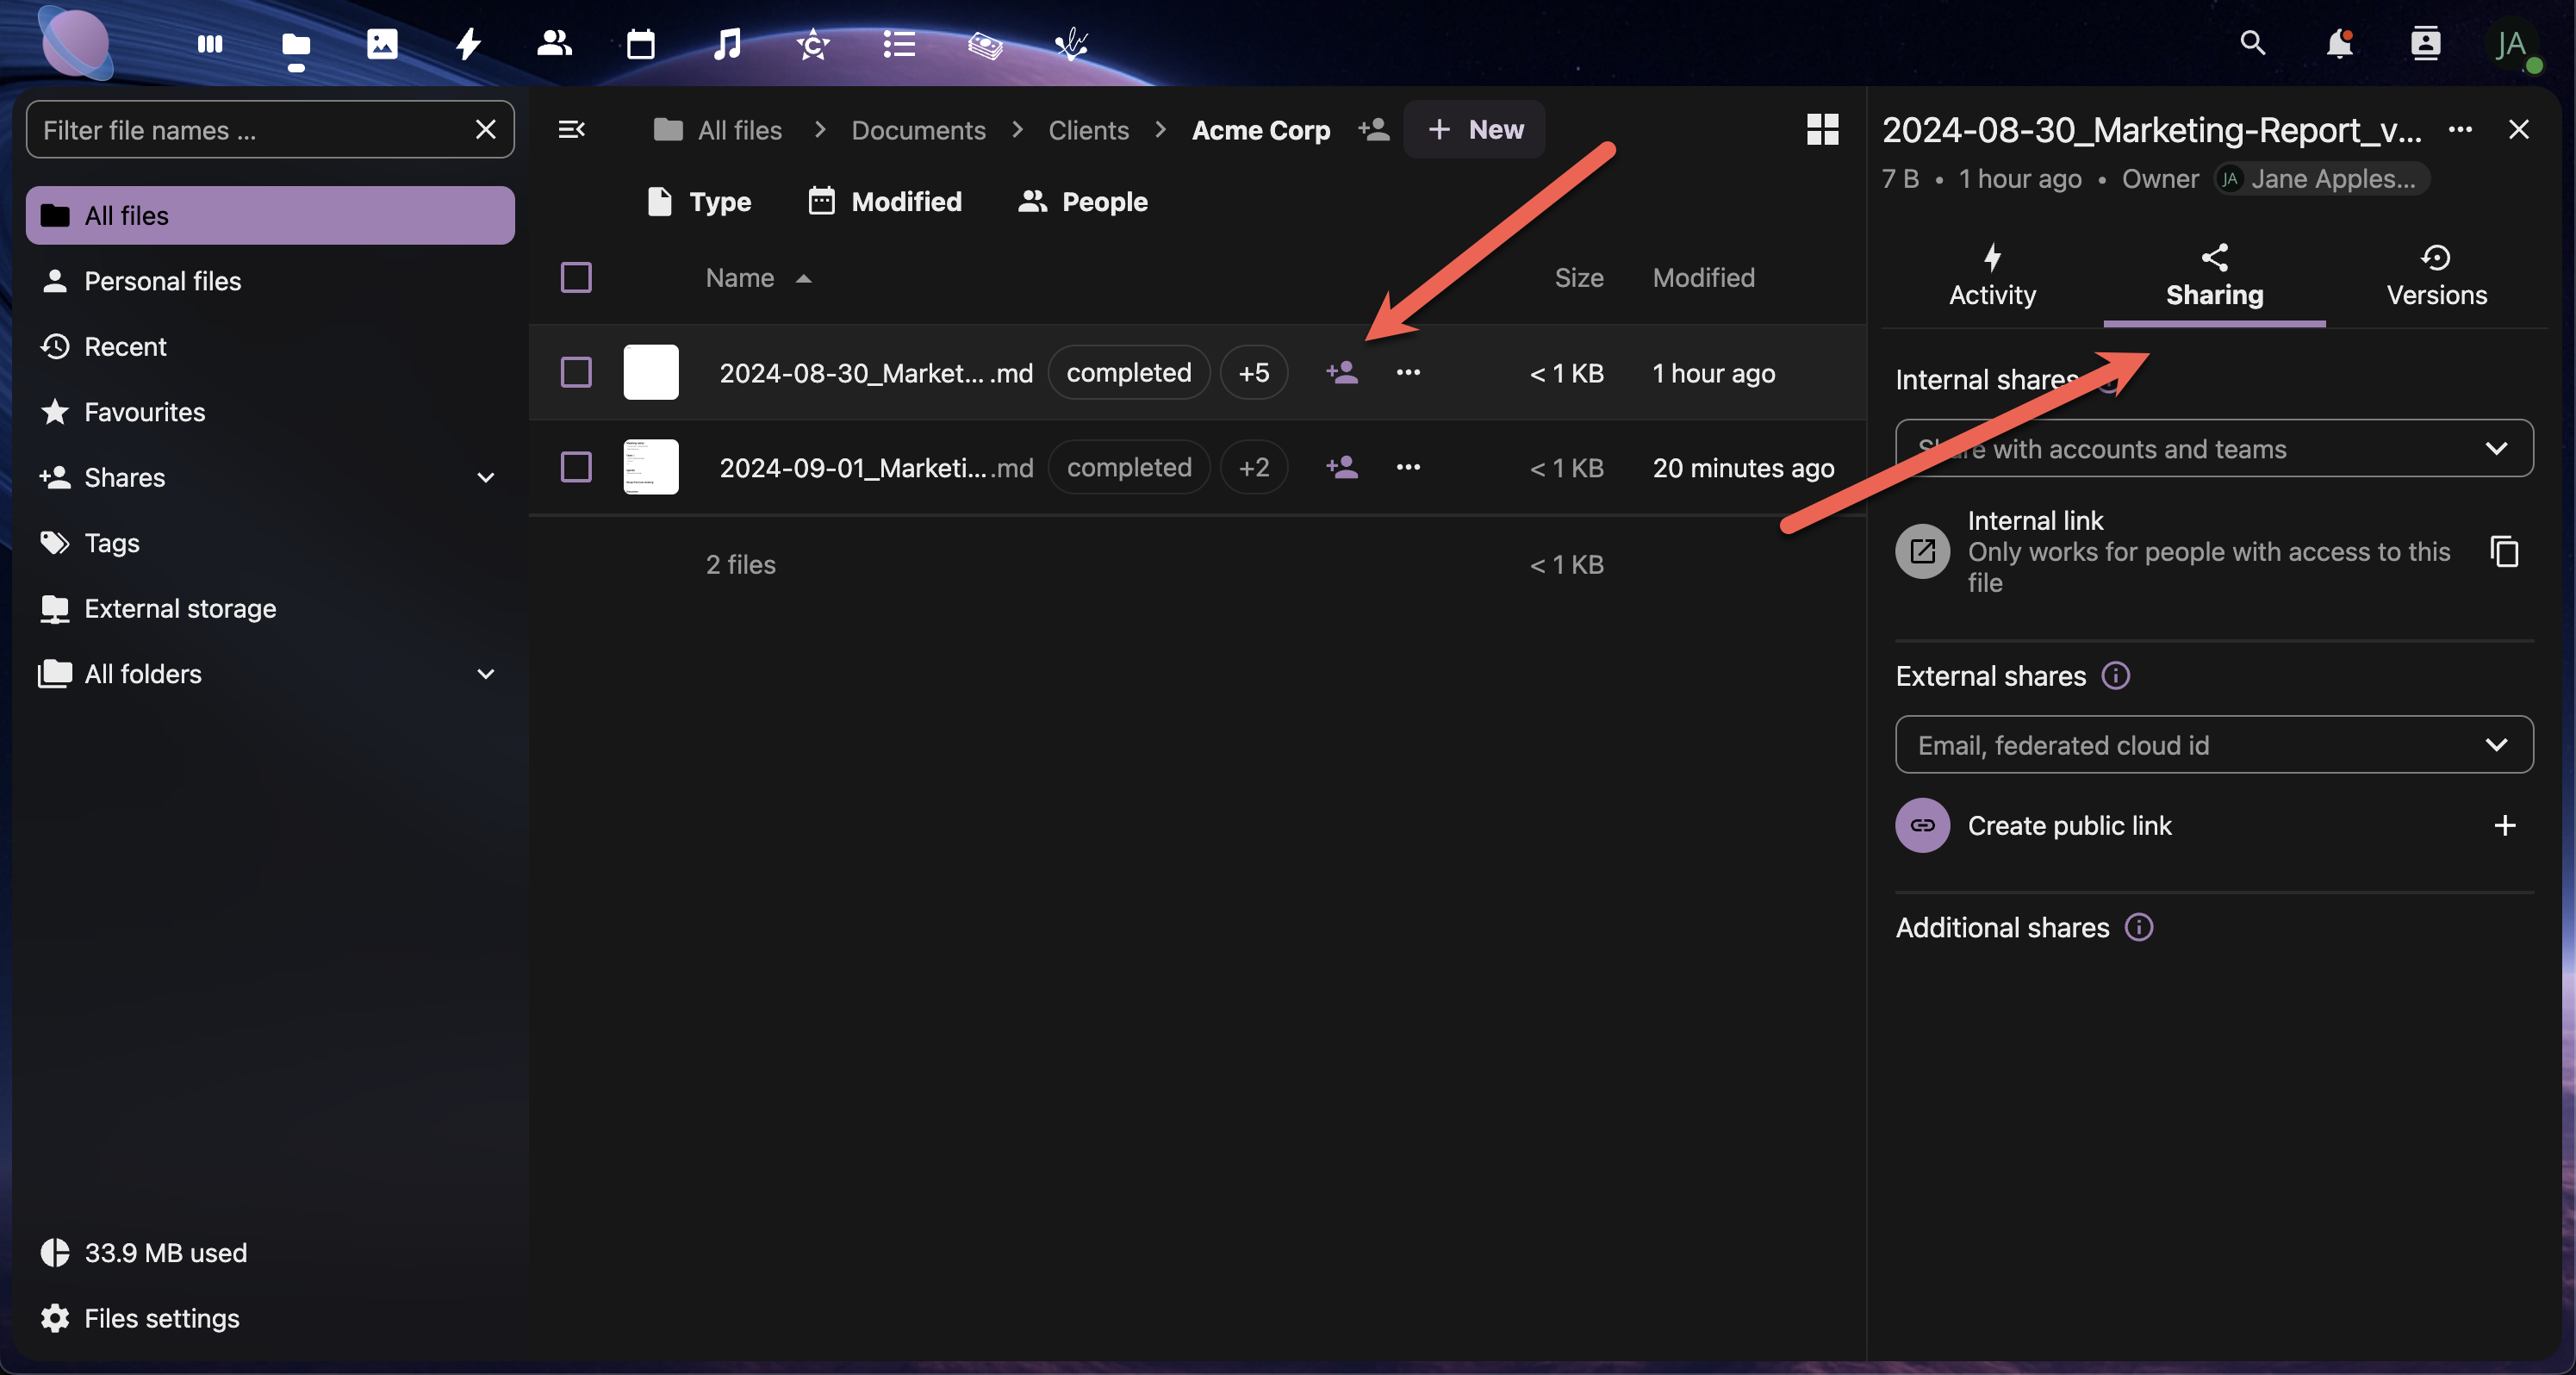
- Right-click the file or folder you want to share
- Select "Share" from the context menu
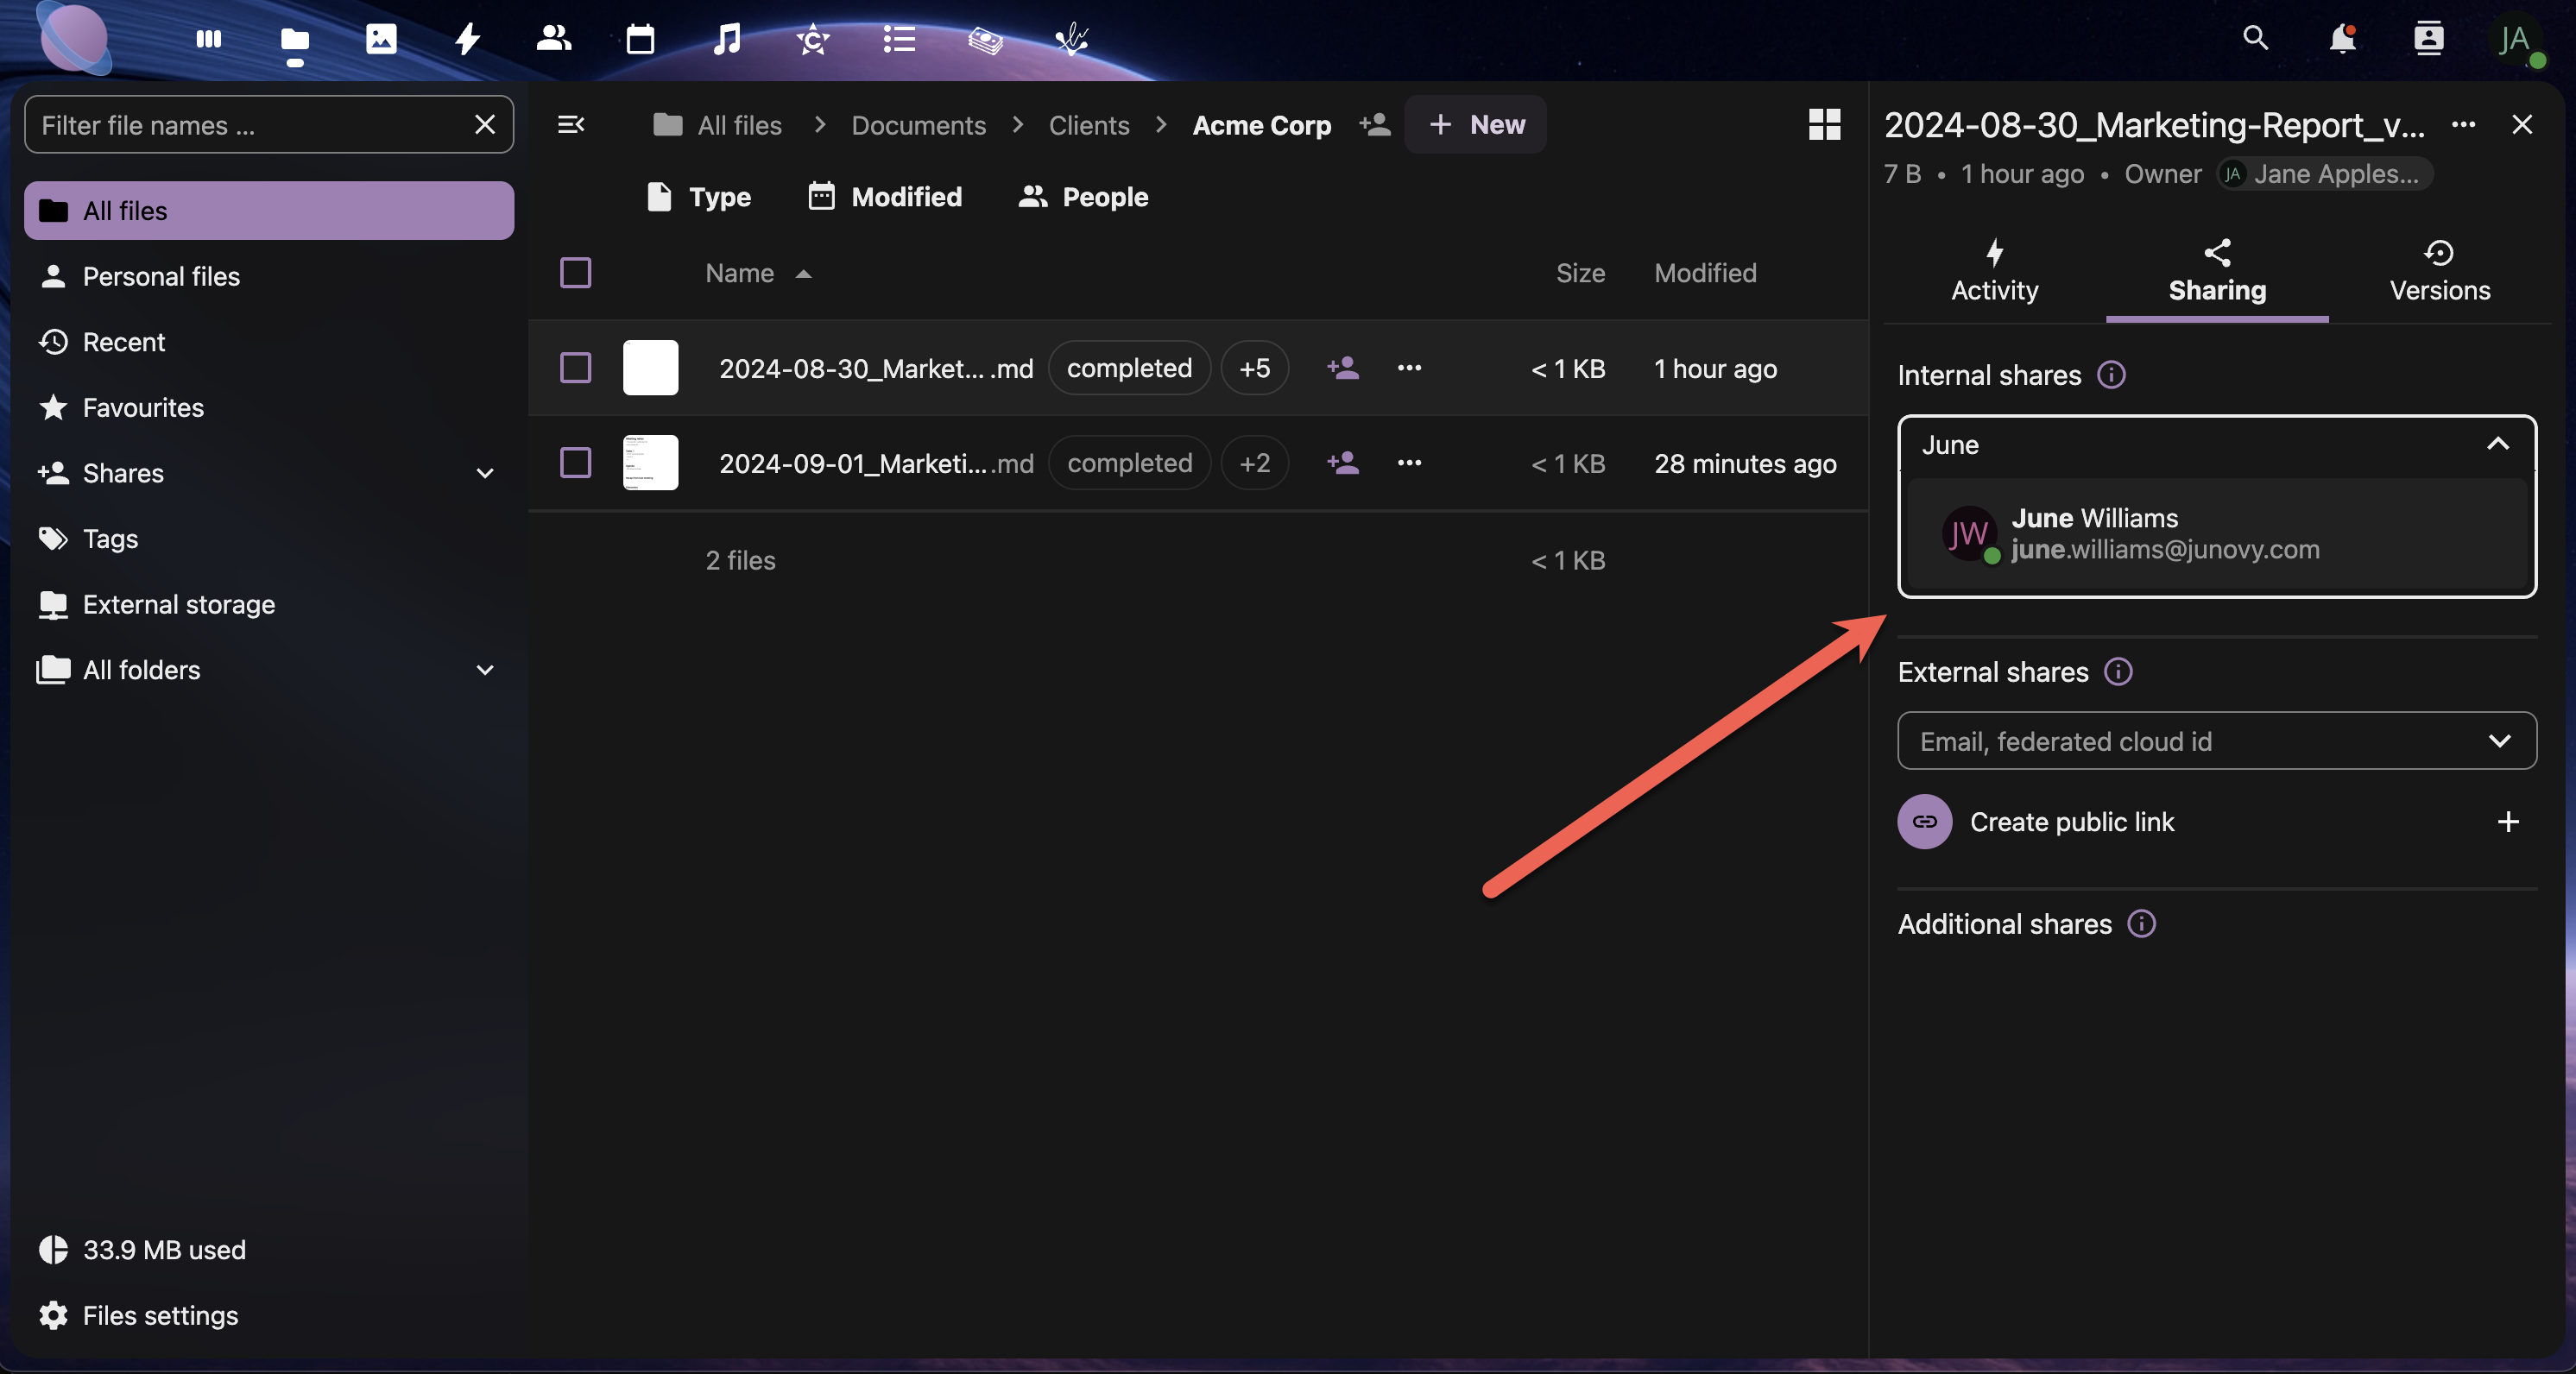
- In the "Share with users" field, start typing a colleague's name
- Select their name from the dropdown
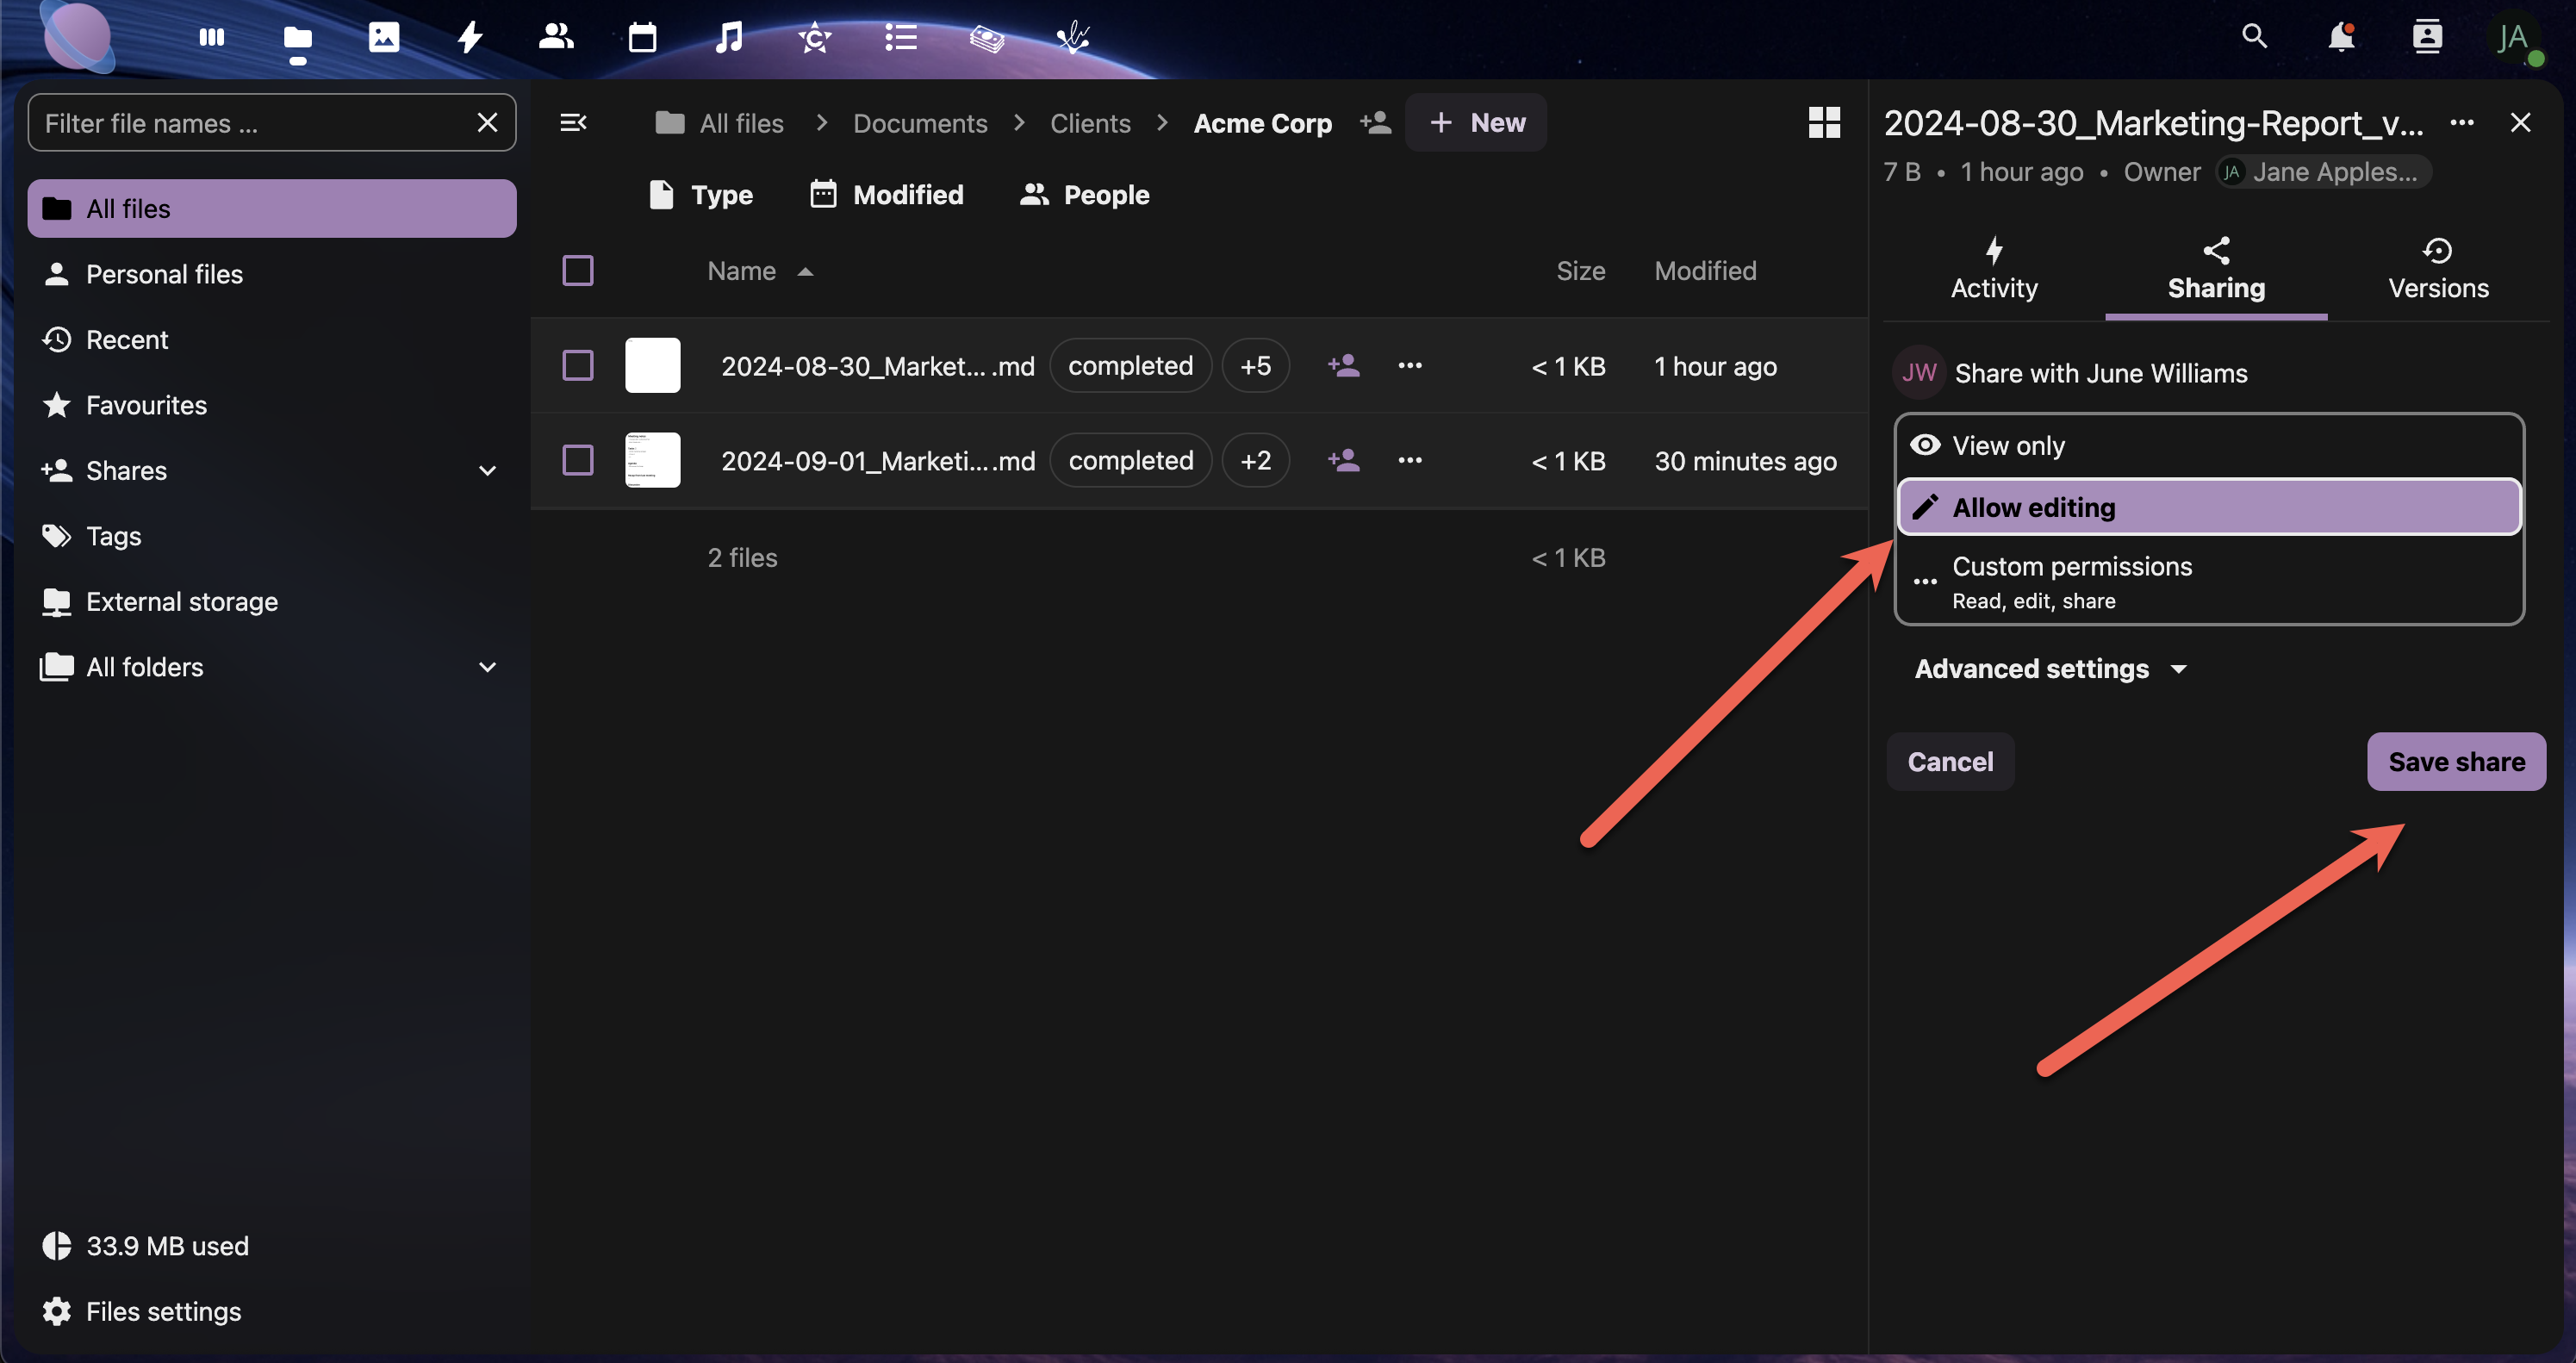
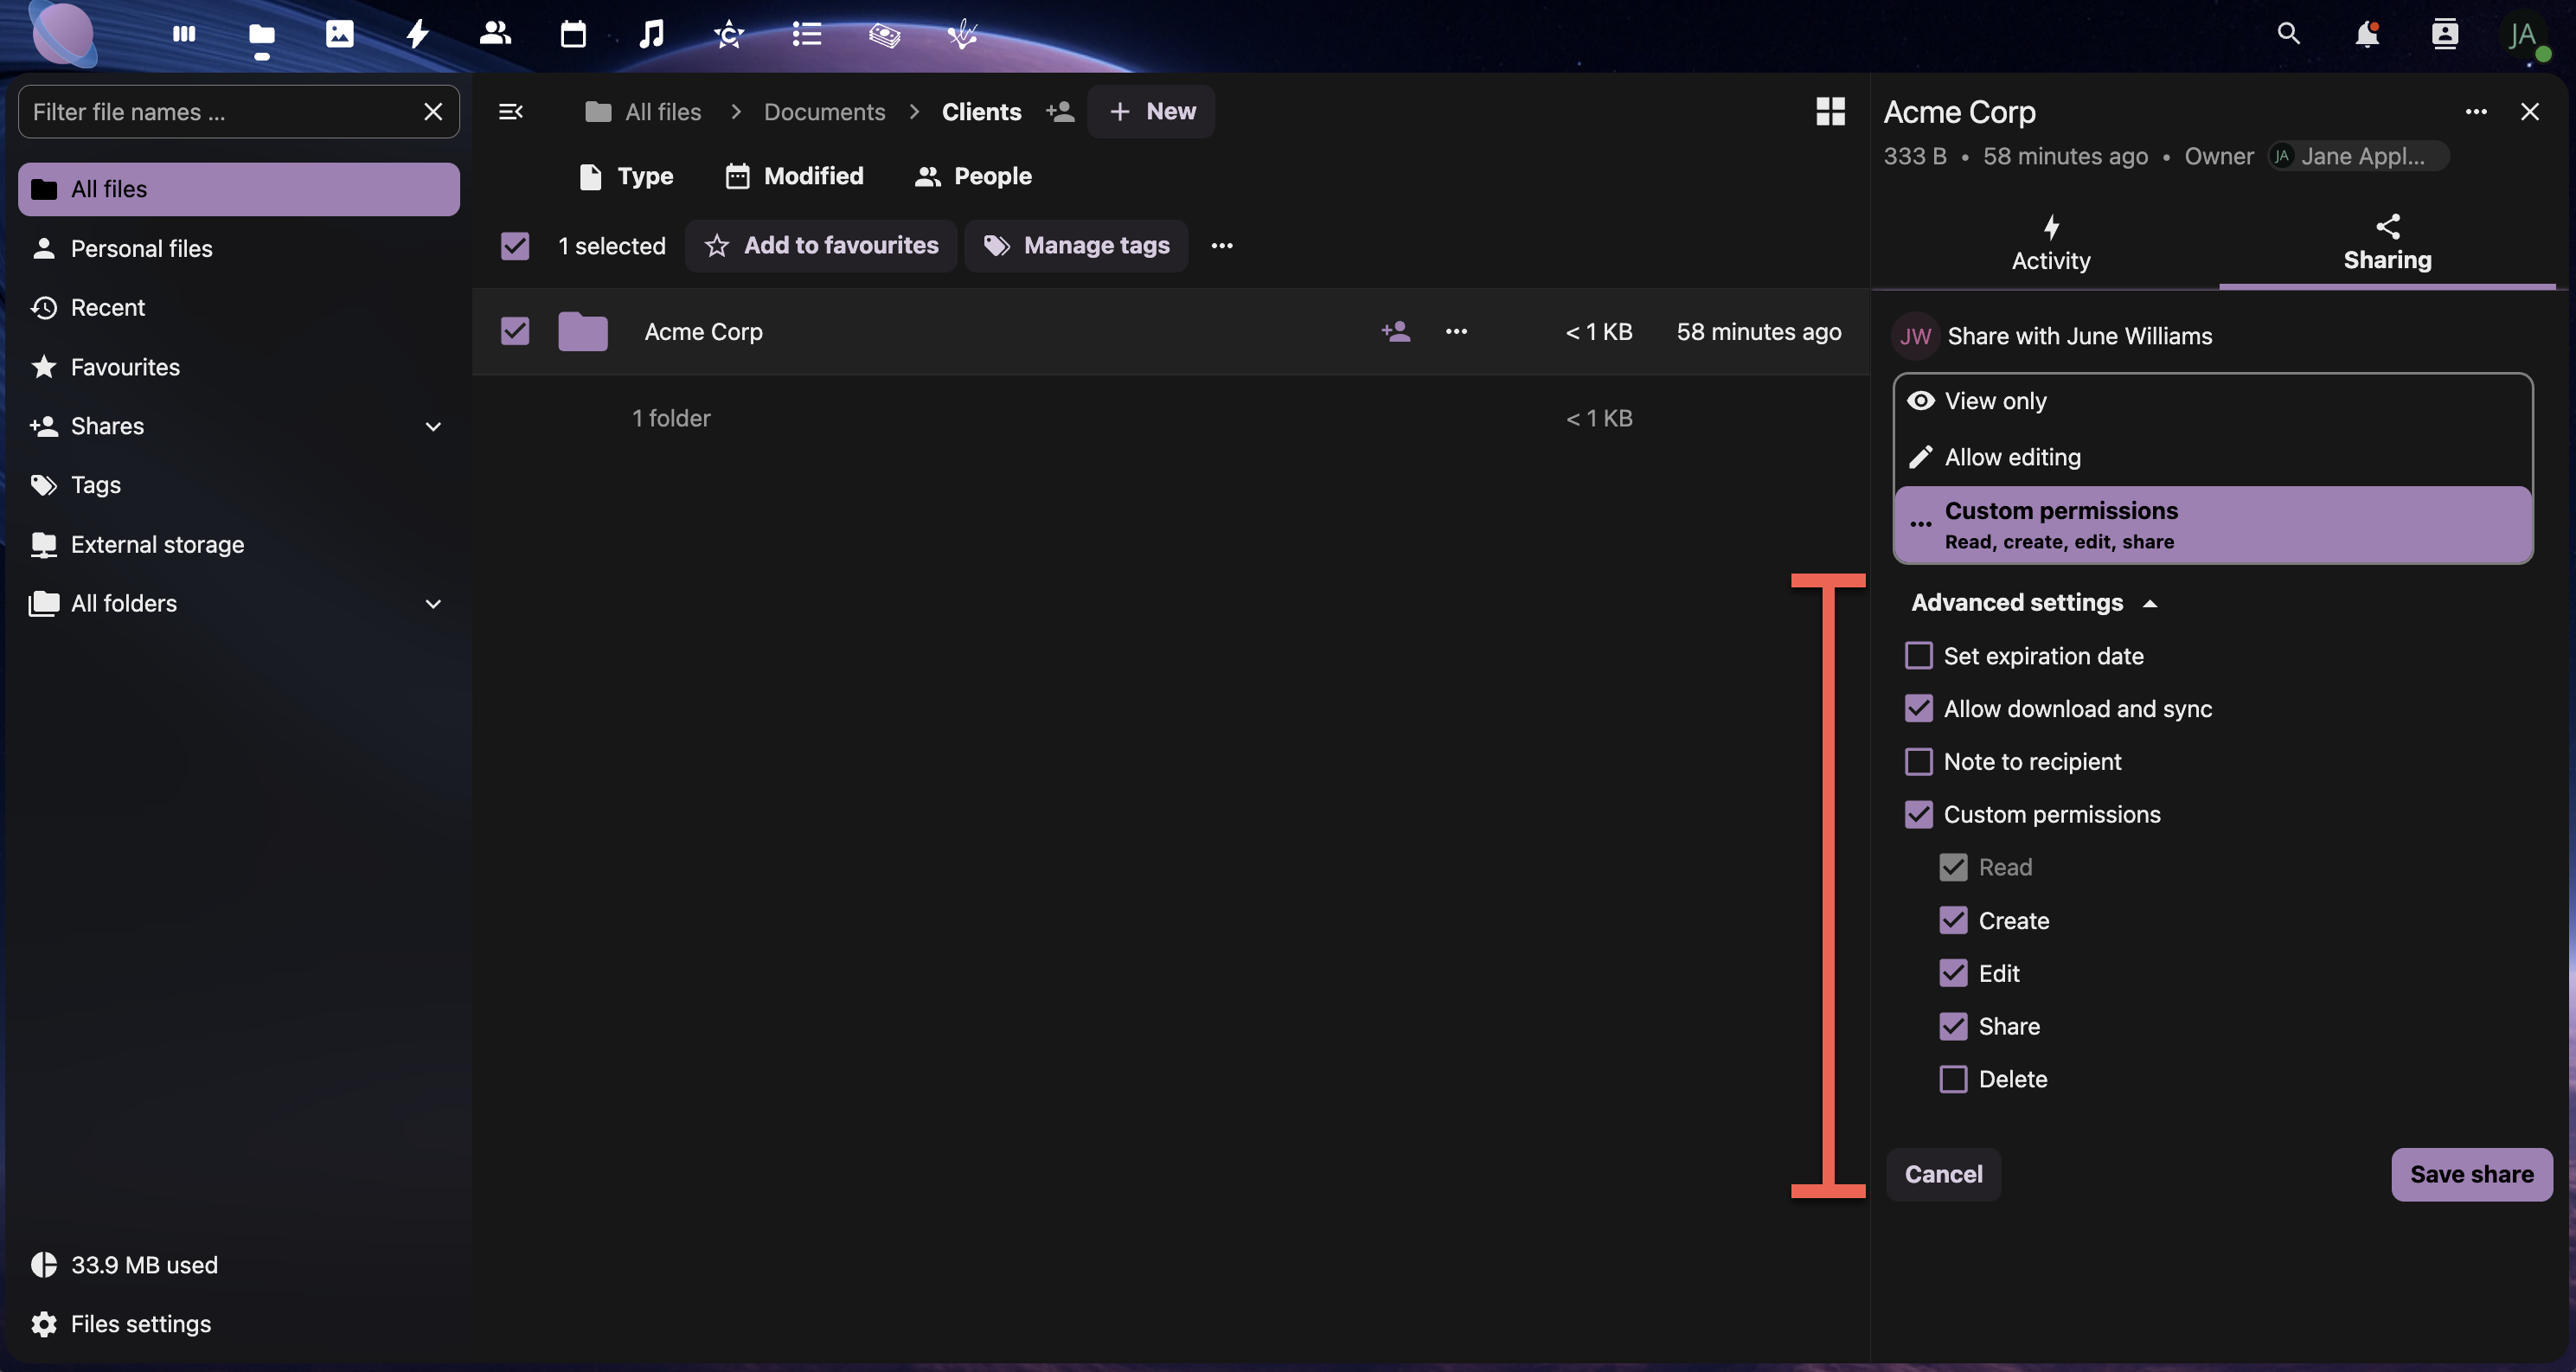
- Choose permissions:
- View only - Can see and download
- Allow editing - Can modify files
- Custom permissions - Can share with others and change permissions
- Click "Share"
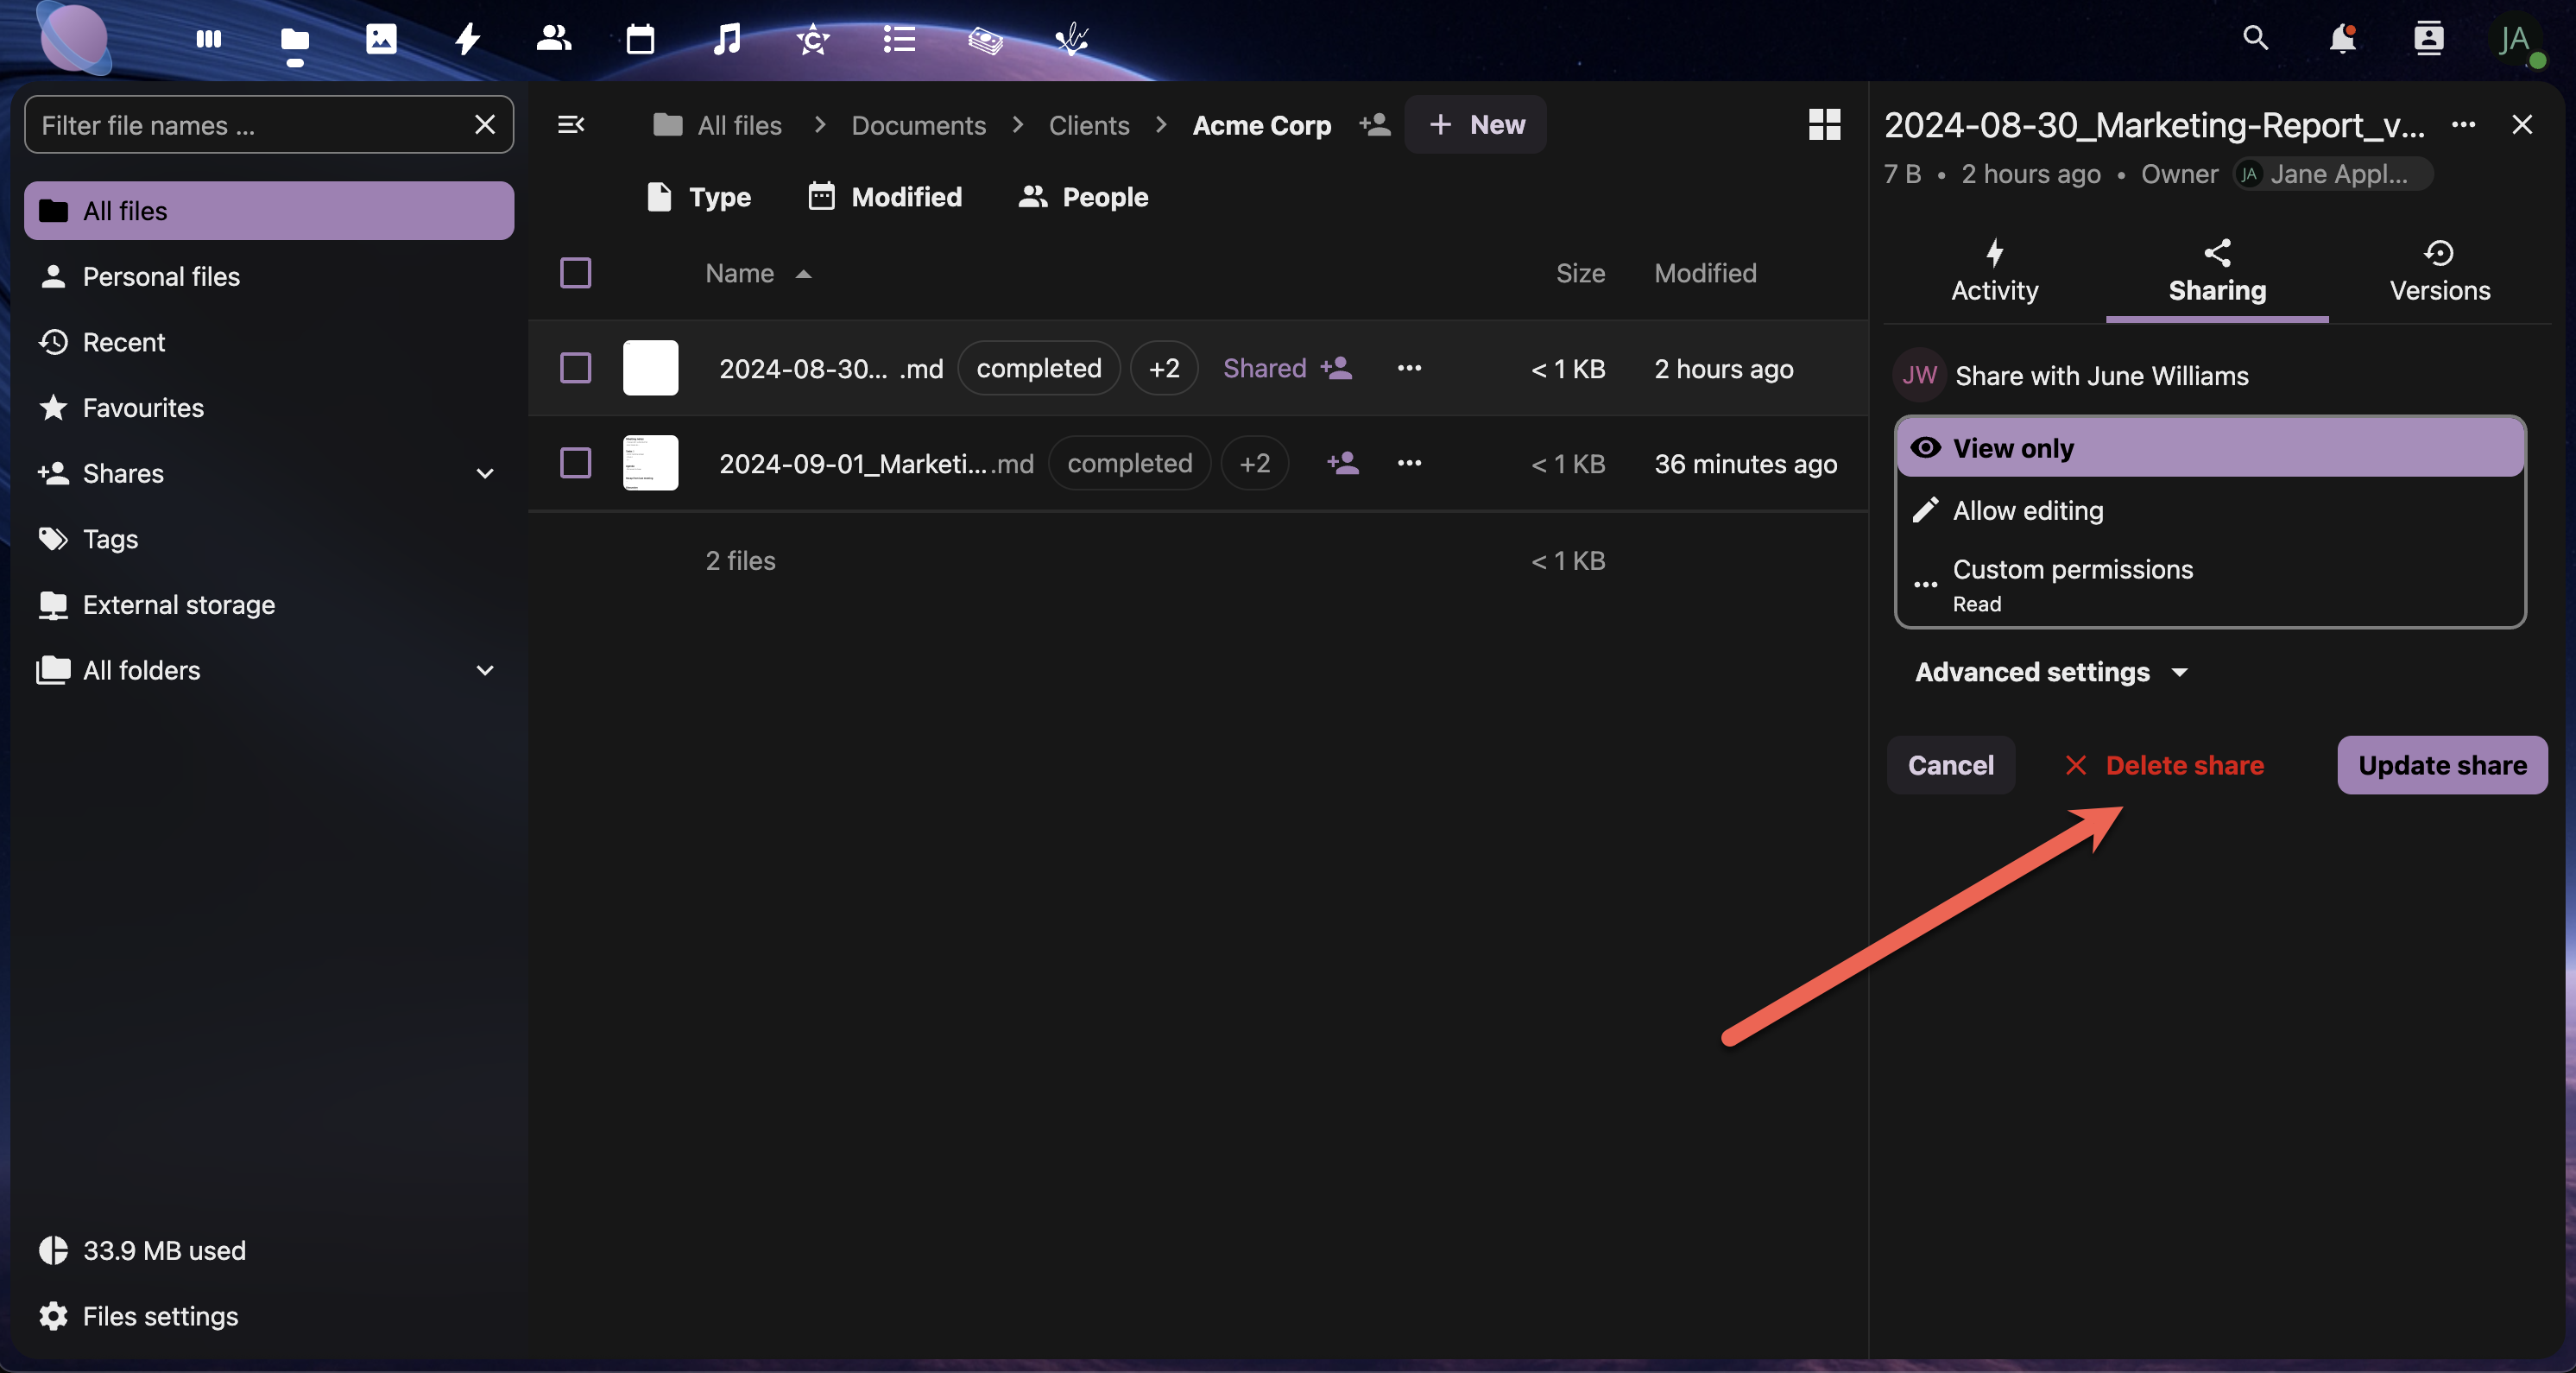
Once the user is selected, choose between View only, Allow editing, or Custom Permissions. Then click Save share.
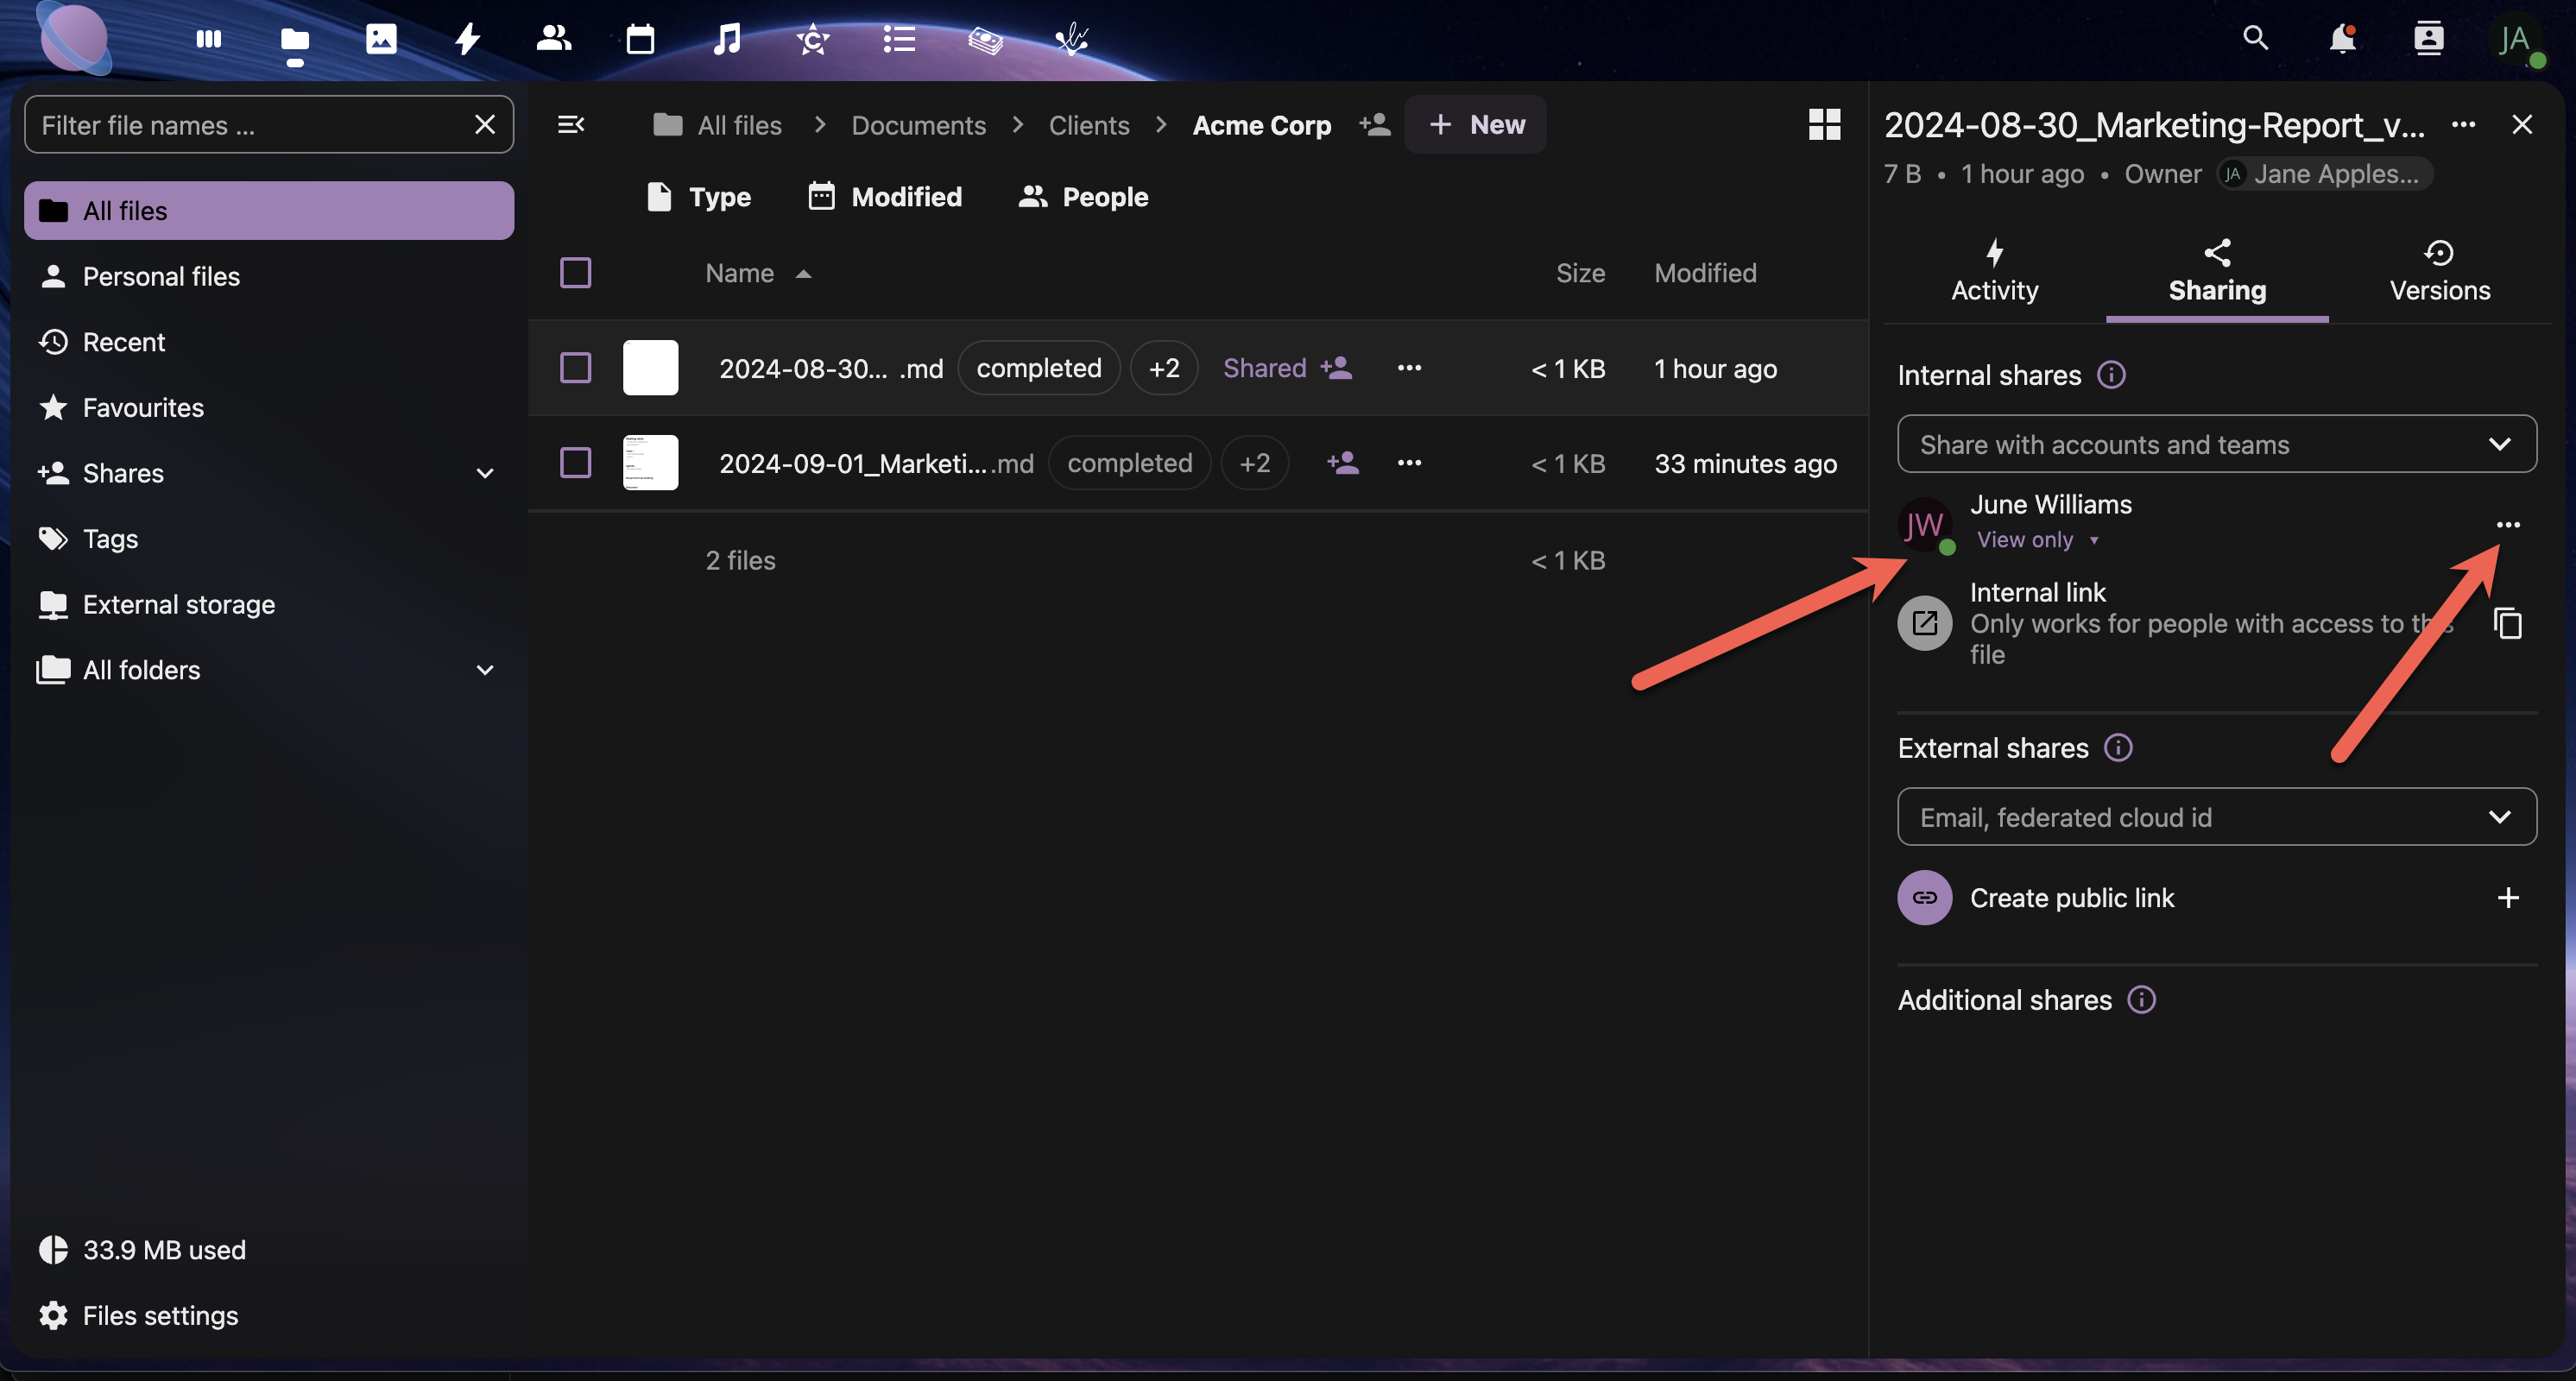

Removing A Share
This will open up the Sharing panel. Click the Delete share button to remove the share.
Step 3: Client Collaboration Workflows
Create secure, professional workflows for external client collaboration:
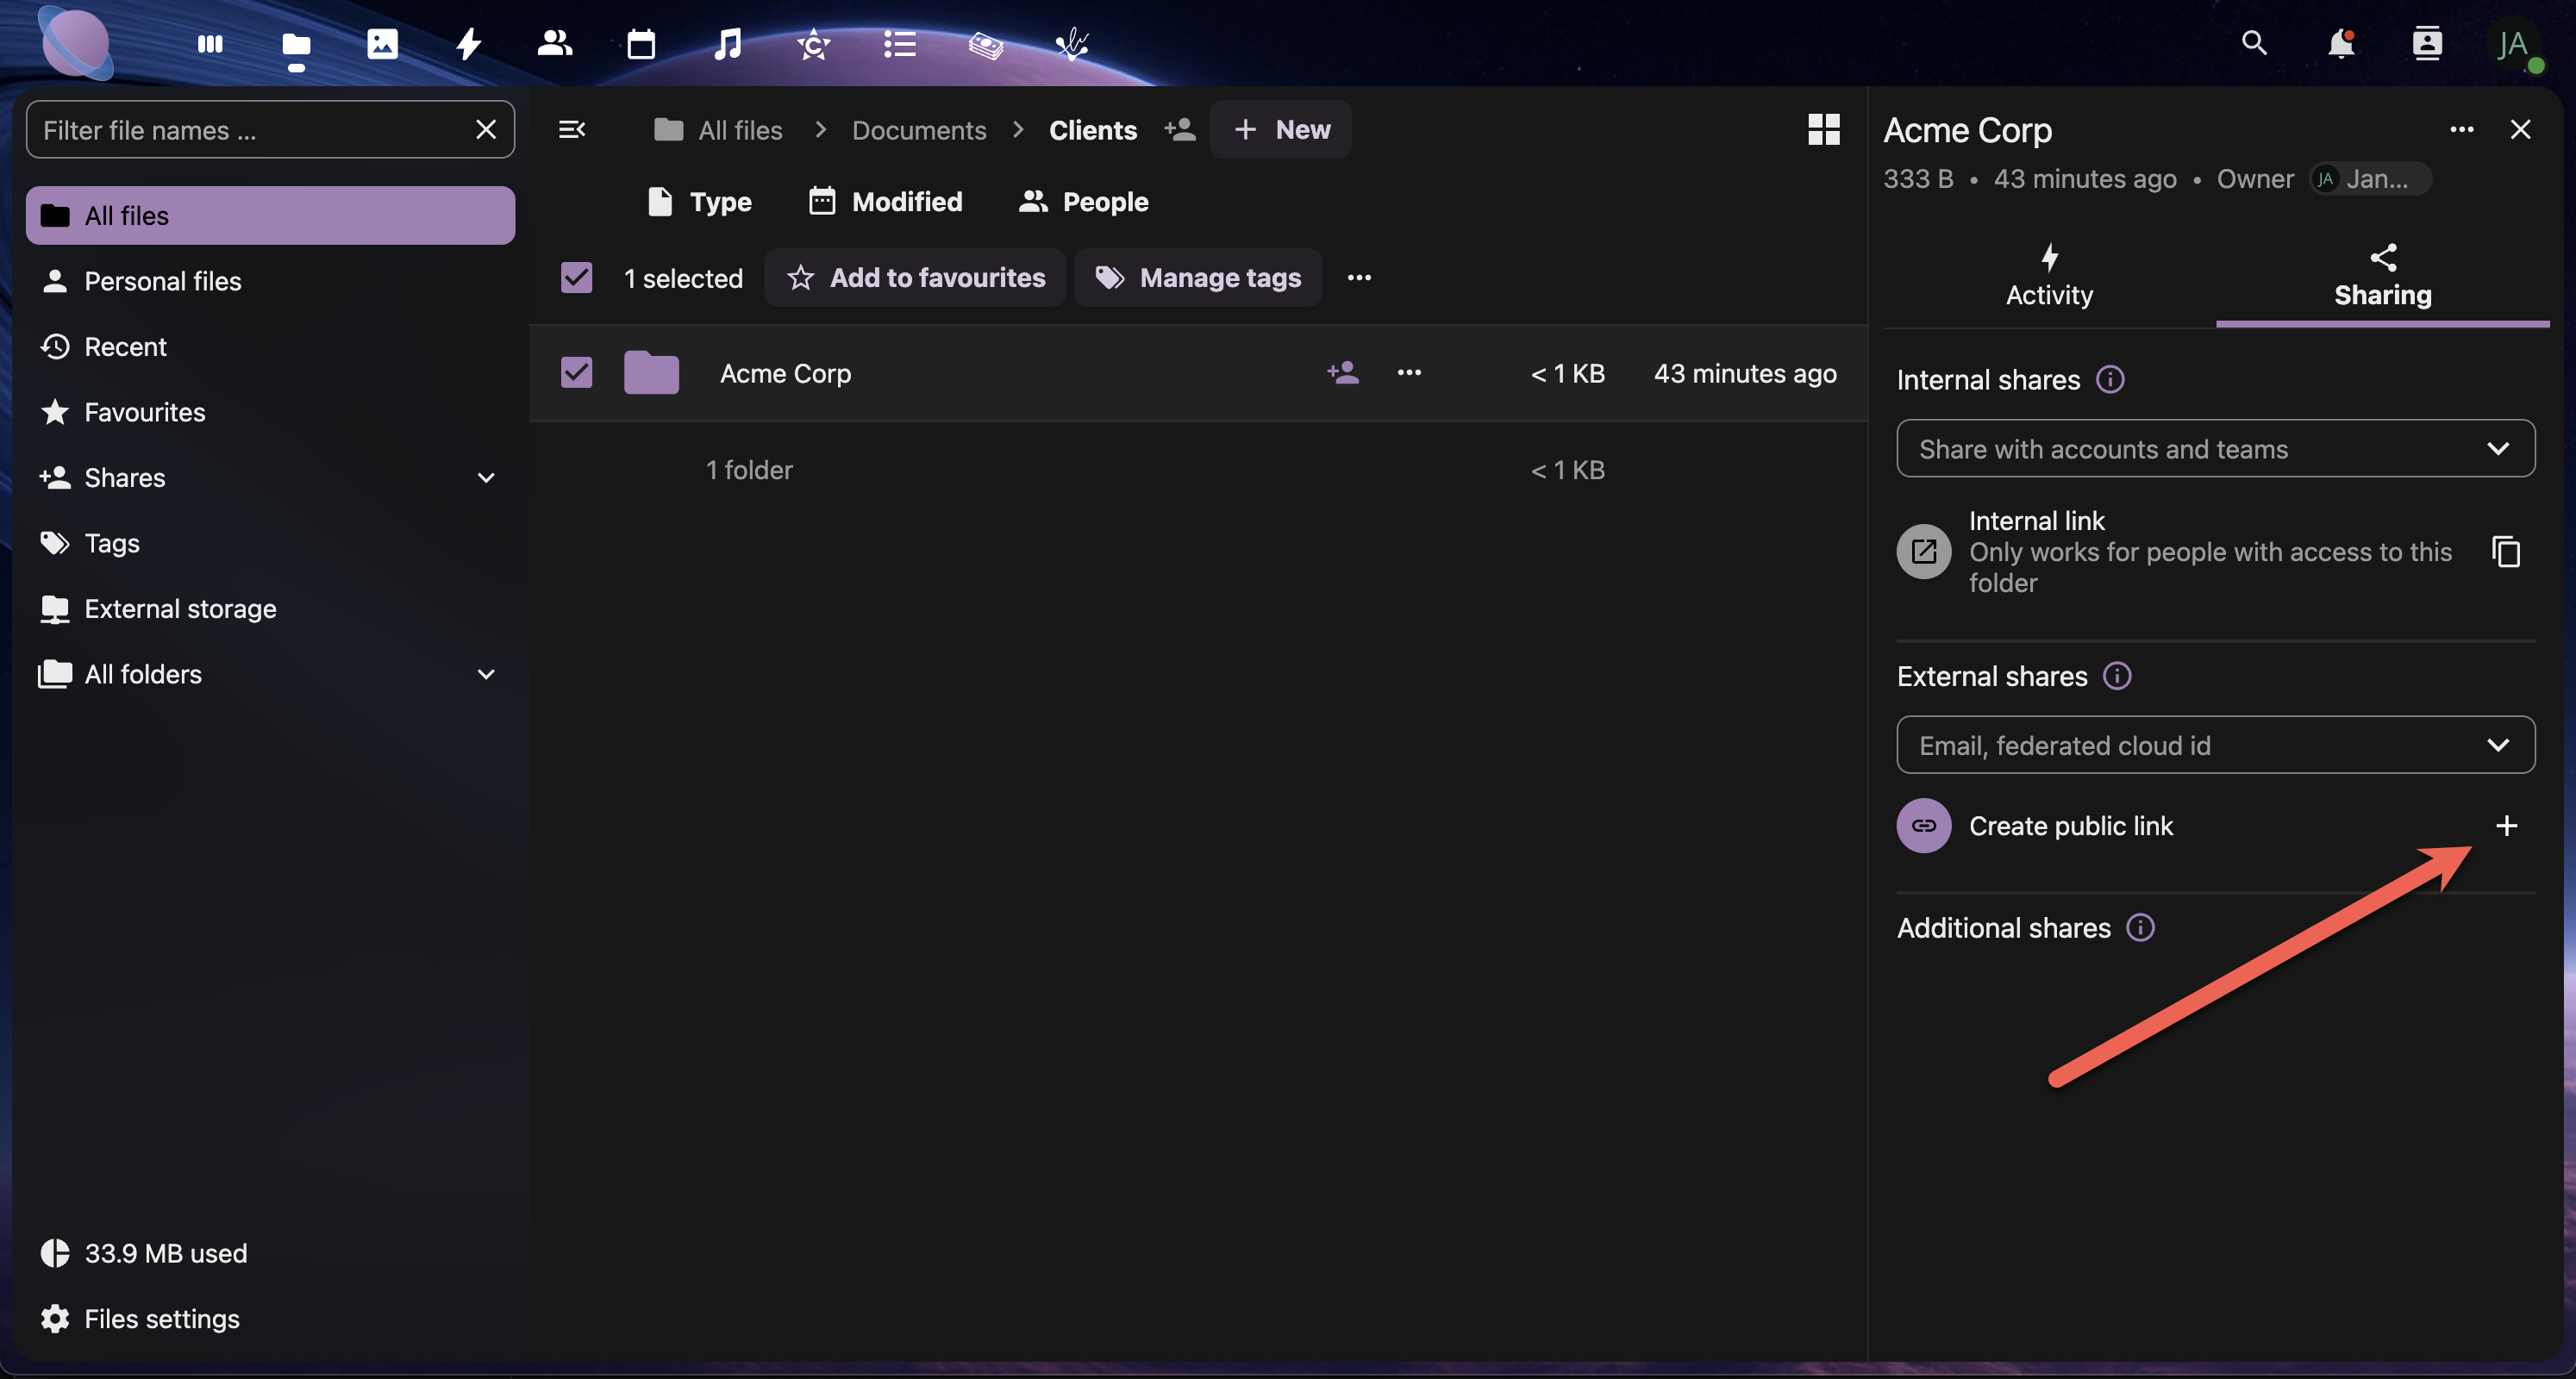
Option A: Secure Public Link Sharing
- Select the folder you wish to share.
- Select "Sharing" → "Create Public Link"
- Configure link settings:
- Password protection (recommended for clients)
- Expiration date (set project timeline)
- Permission level (usually "View and download")
- Allow upload (if clients need to provide files)
- Copy the link and send it securely to your client
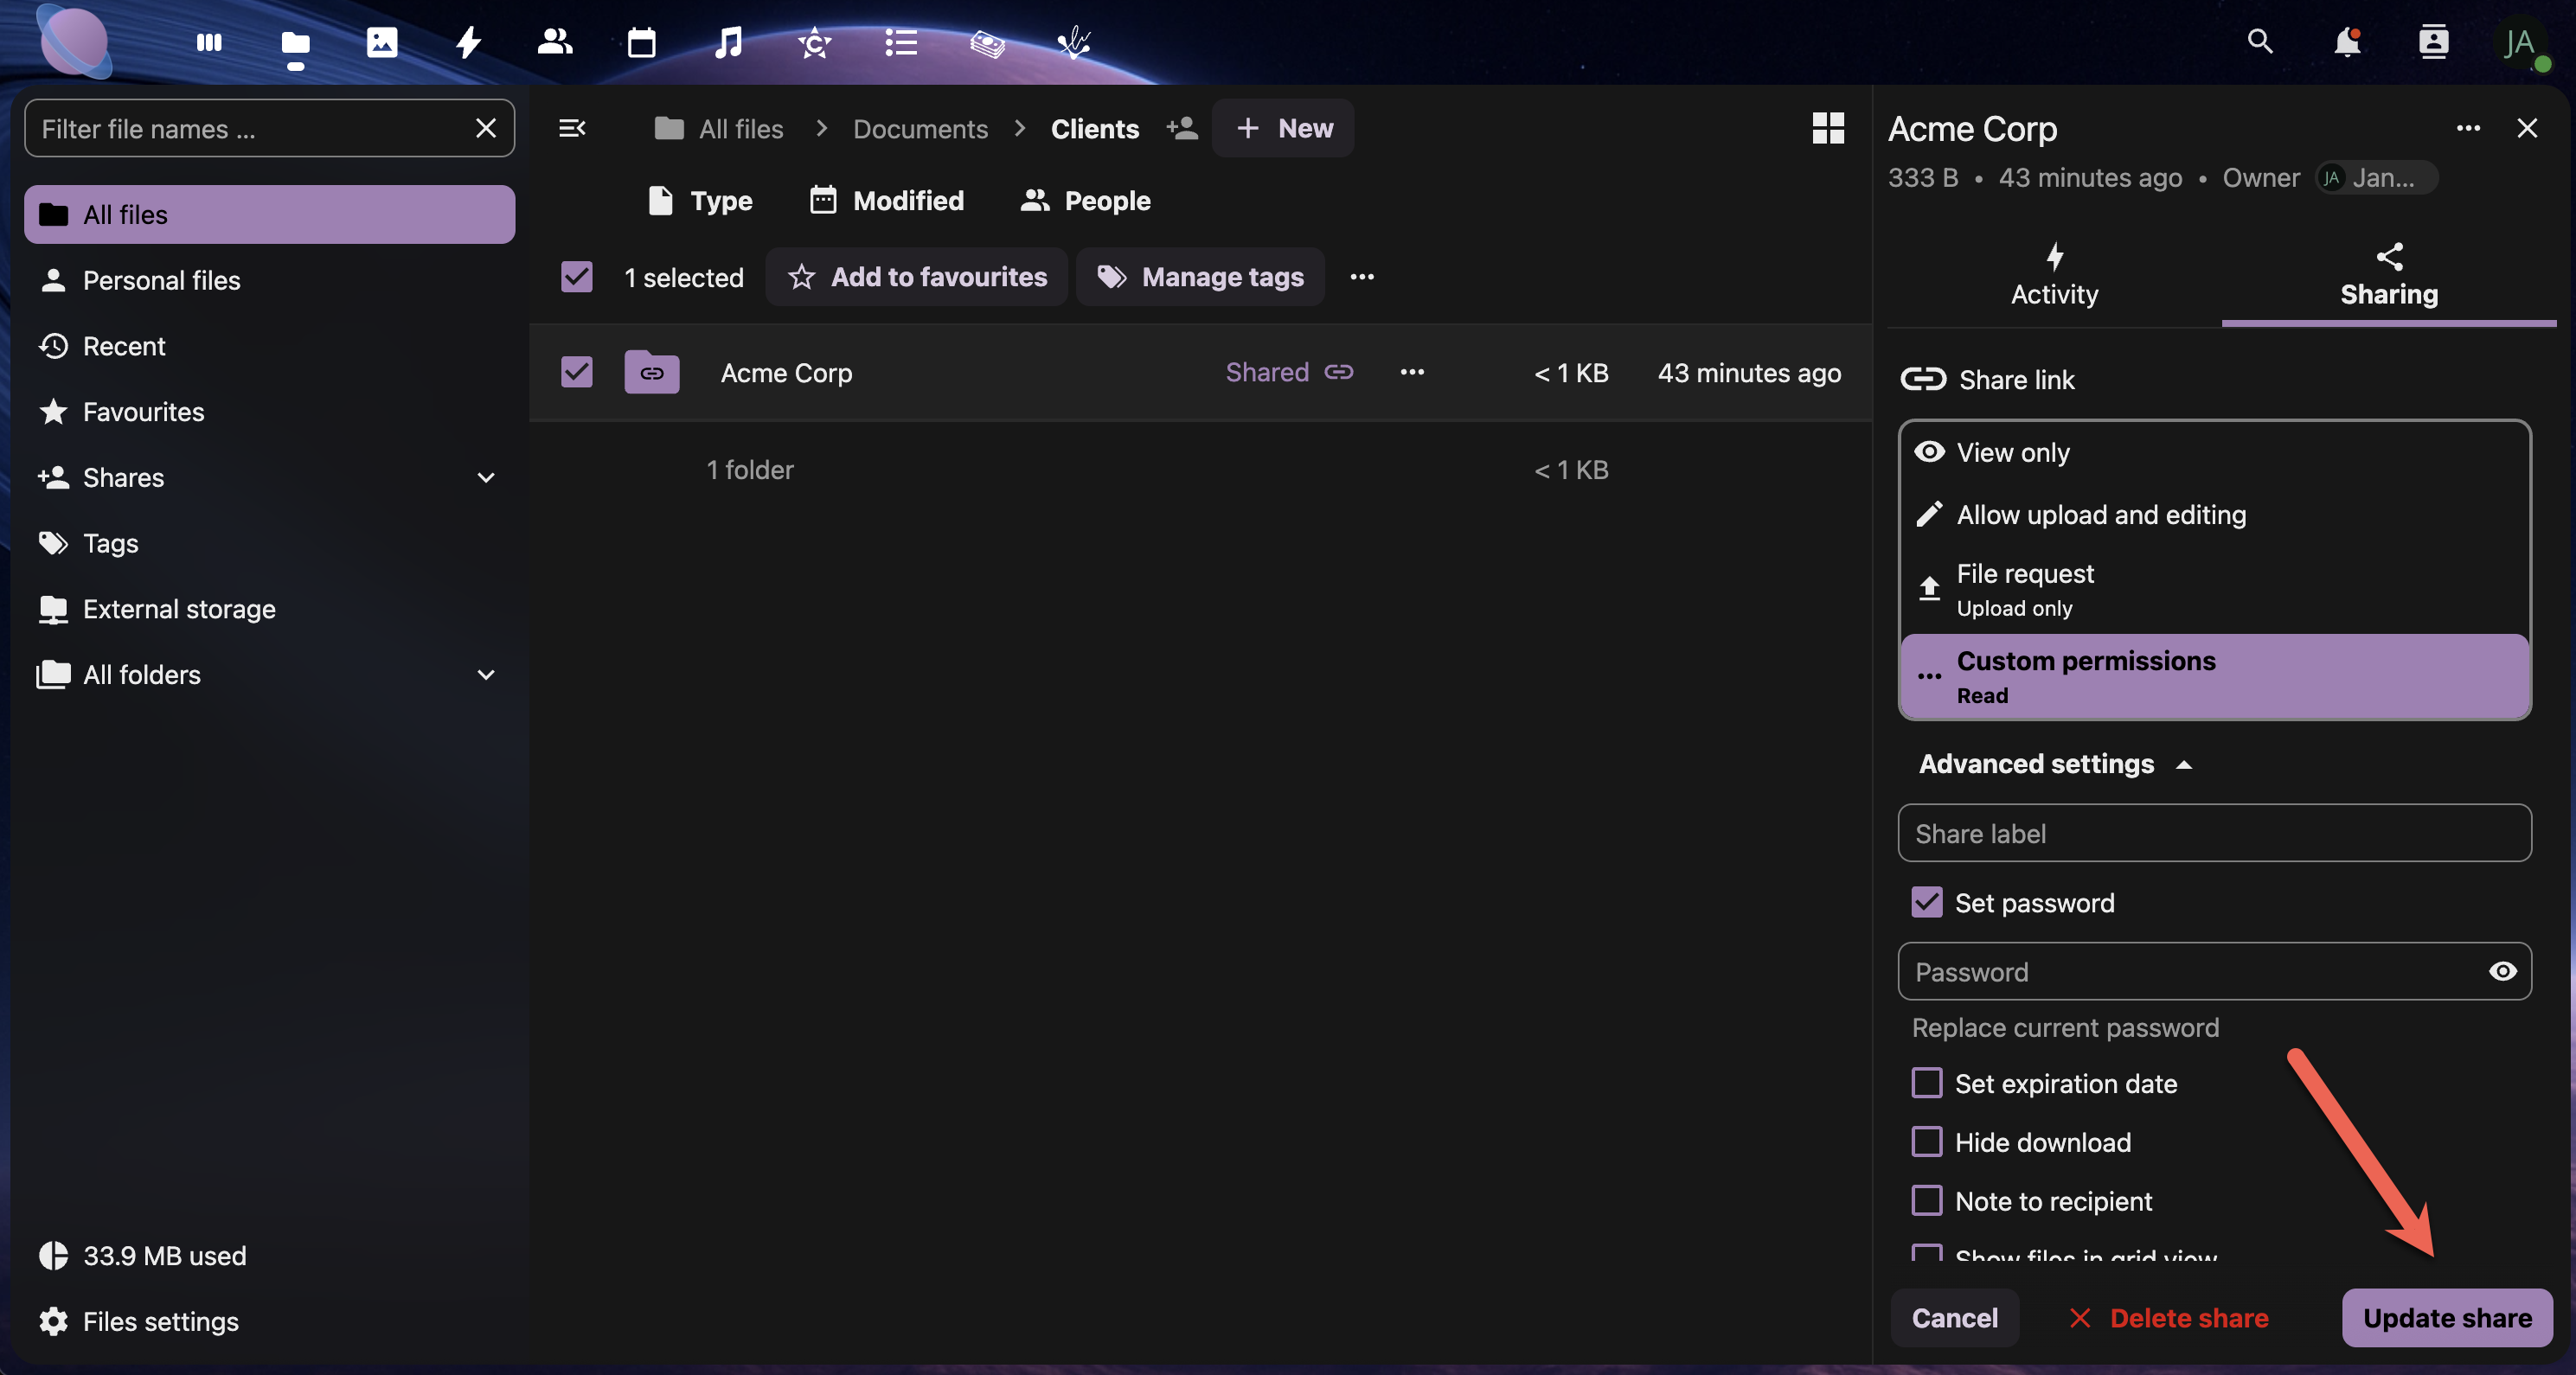
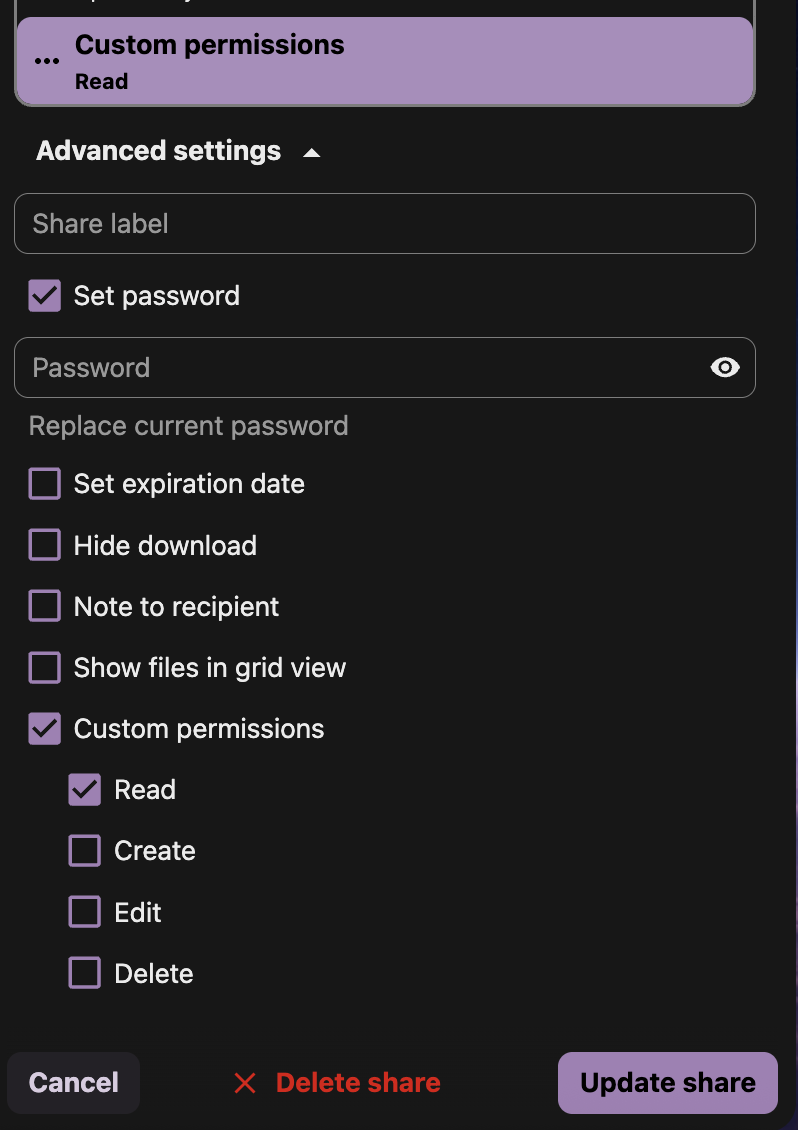
A public link can be generated with specific permissions.
Next, select which options should be allowed with the public link. These options are explained in detail on the Custom Permissions for Public Shares. Please read this before sharing files publicly.
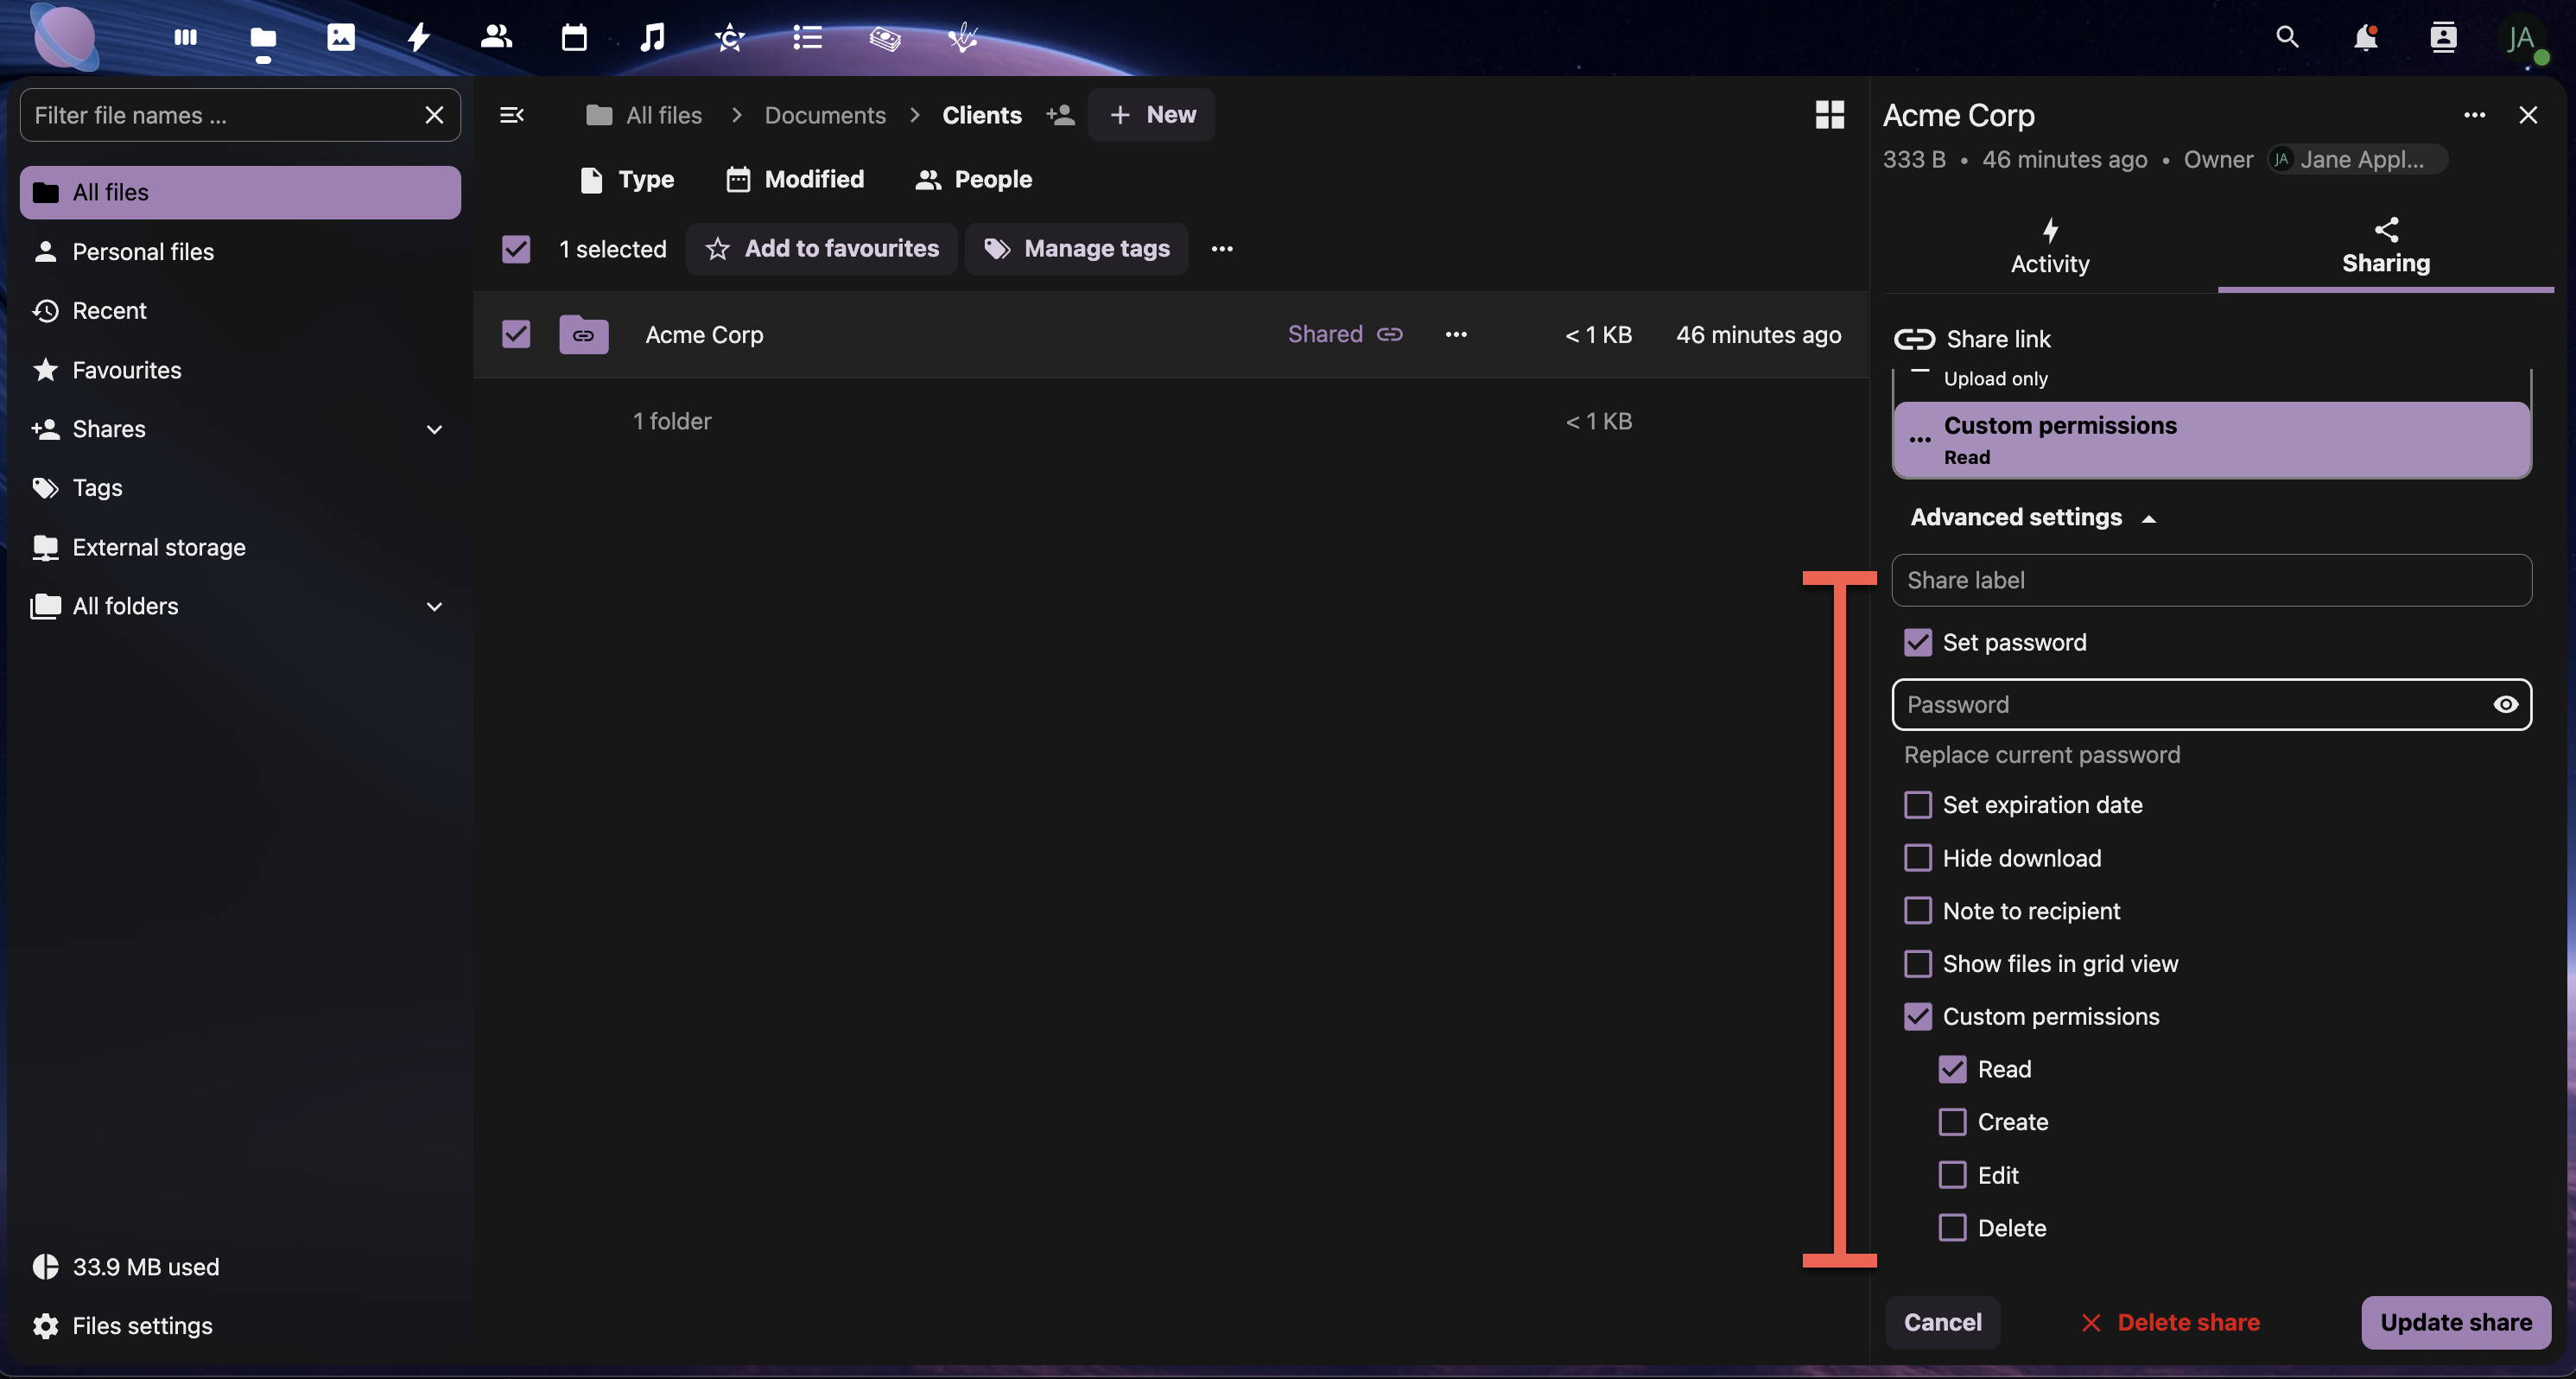
Once complete, select Update share.
Option B: Direct Client Access
- Create a client-specific folder (e.g., "ACME-Client-Portal")
- Share via email directly from NextCloud
- Set appropriate permissions (typically view-only)
- Include a welcome message explaining how to use the shared space
Client Folder Best Practices:
- Organise by project phase: Planning → Design → Development → Final
- Include a README file with instructions and contact information
- Use clear, professional folder names that clients will understand
- Regularly clean up old or irrelevant files
Step 4: Permission Management
Set appropriate permissions for different collaboration scenarios:
Permission Levels in Junovy Cloud Storage:
Read (View):
- View files and folders
- Download content
- Use for: Final deliverables, reference materials
Write (Edit):
- All read permissions plus
- Upload files
- Edit existing files
- Use for: Active collaboration, shared workspaces
- All write permissions plus
- Share with other users
- Change permissions
- Use for: Project managers, team leads
Delete:
Step 5: Collaborative File Editing
Set up workflows for real-time collaboration on documents:
For Office Documents:
- Enable collaborative editing in your NextCloud apps
- Share documents with edit permissions
- Use version comments when saving significant changes
- Establish editing protocols (who edits when, how to handle conflicts)
For Design Files:
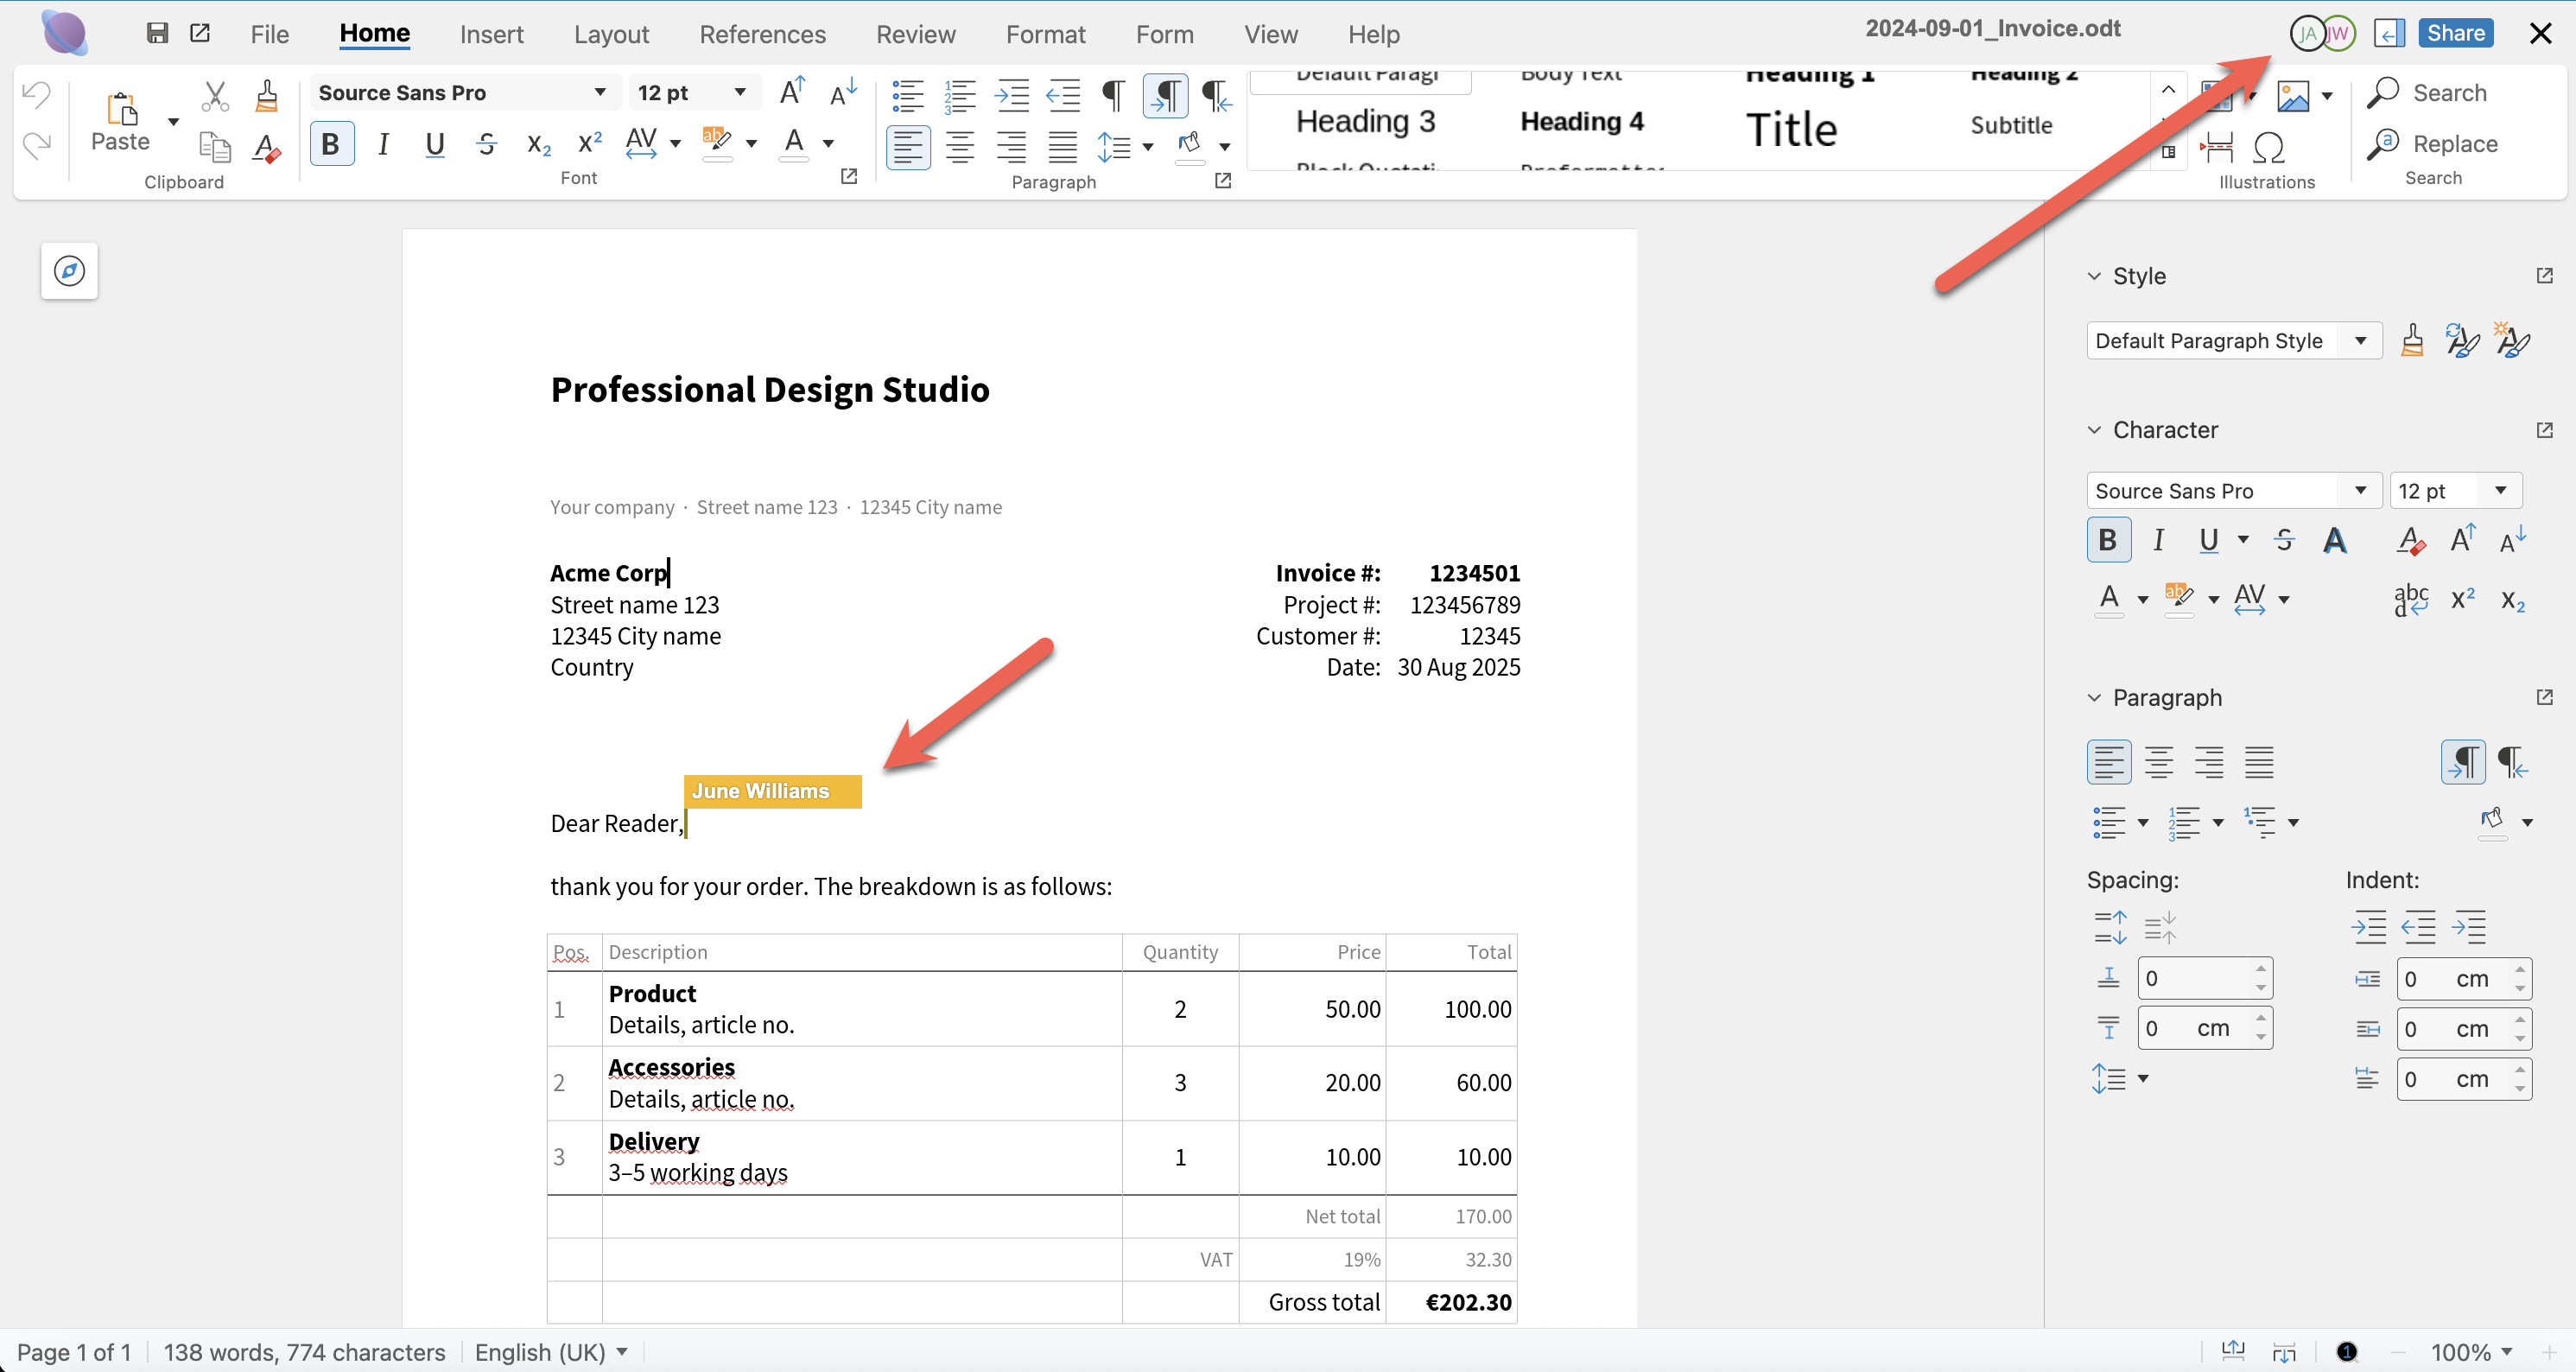
When more than two users have a file open, the other user's cursor will display with their name. If the document has been opened by more than one user, this will be shown in the upper right-hand corner of the screen.
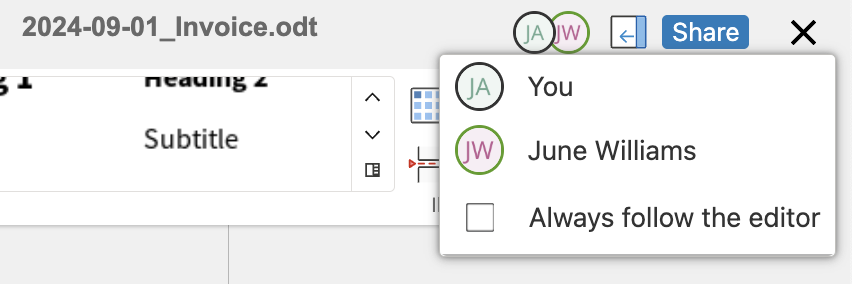
Clicking the user icons, display a list of users who are currently viewing or editing the document.
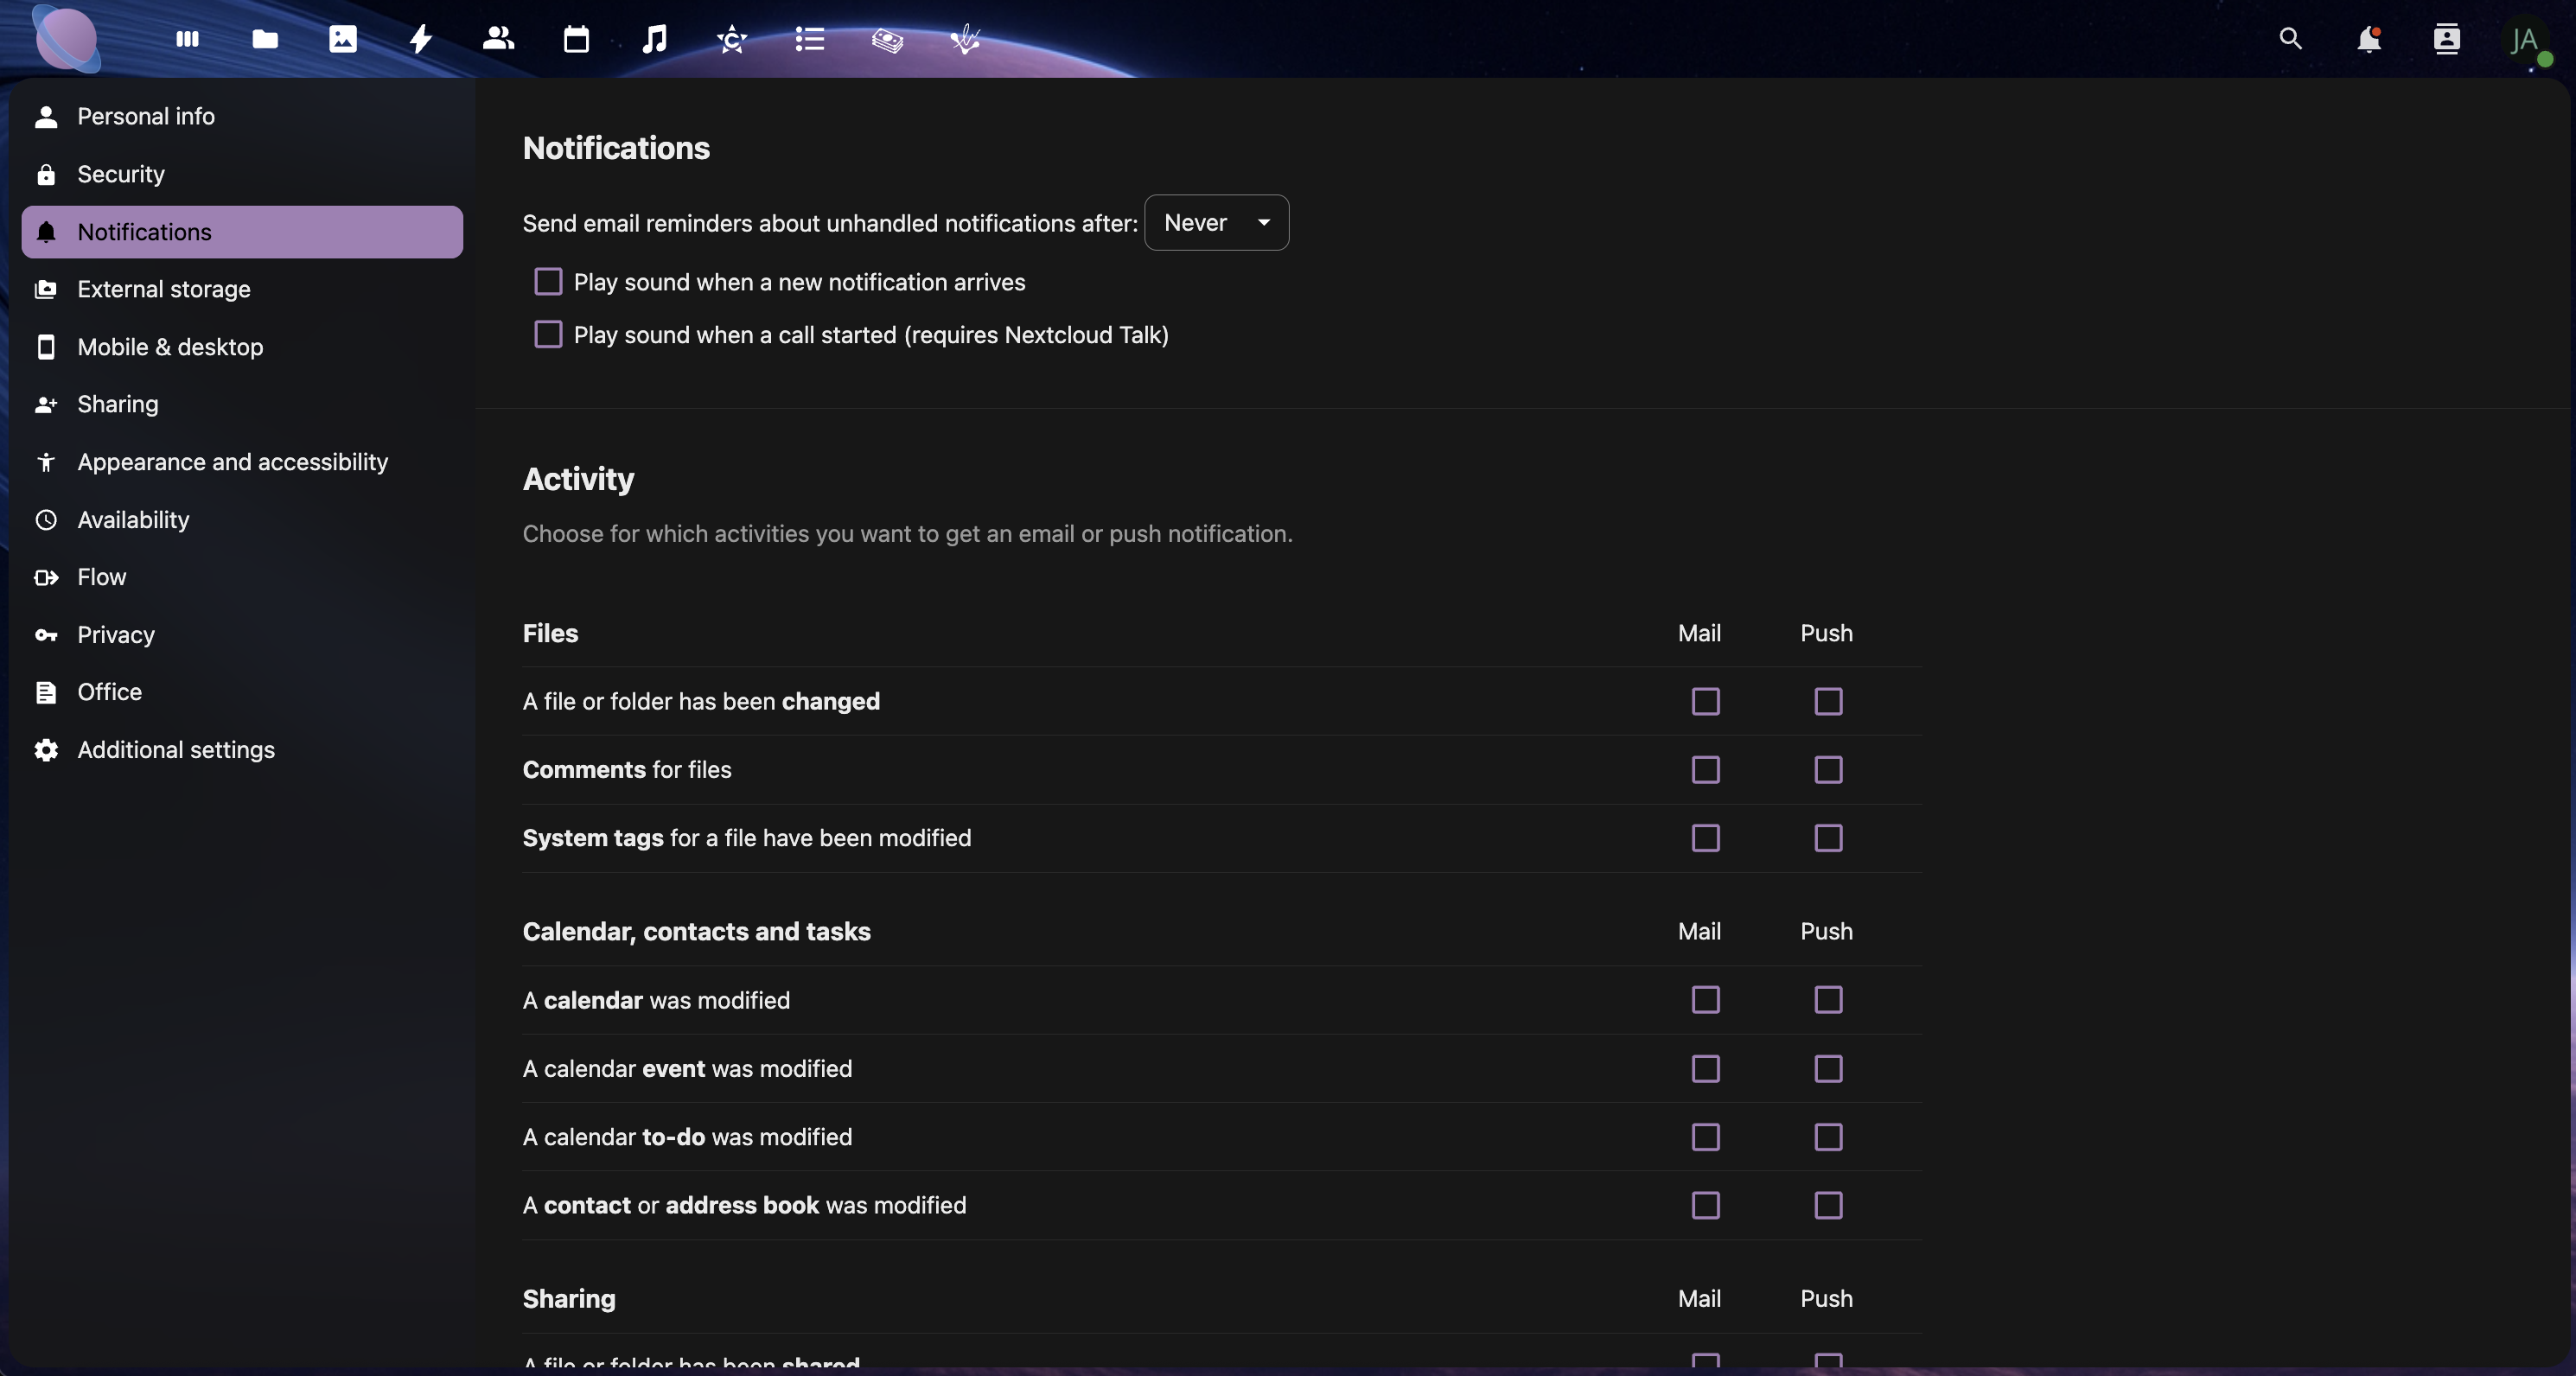
Step 6: Notification and Communication
Stay informed about shared file activity:
Setting Up Notifications:
- Go to Settings → Personal → Activity
- Configure notifications for:
- File changes in shared folders
- New comments (if comments app enabled)
- Share invitations and acceptances
- File uploads to your shared folders
Communication Protocols:
- Use file names to communicate status (DRAFT-, REVIEW-, FINAL-)
- Organise by urgency using folder prioritisation
- Send notification emails for important updates
- Schedule regular reviews of shared spaces
Step 7: External Sharing Security
Implement security best practices for external collaboration:
Security Checklist:
✅ Always use passwords for external links
✅ Set expiration dates on temporary shares
✅ Review permissions regularly and remove unnecessary access
✅ Use view-only permissions unless editing is required
✅ Monitor sharing activity through the activity feed
✅ Create separate folders for different external parties
Advanced Security Options:
- IP restrictions (if available in your NextCloud setup)
- Two-factor authentication requirements for shared access
- Watermarking for sensitive documents (premium feature)
- Audit trails for compliance requirements
Step 8: Workflow Templates
Create reusable sharing workflows for common scenarios:
Project Kickoff Template:
- Create project folder with standard substructure
- Share with internal team (edit permissions)
- Create client portal folder (view permissions)
- Set up progress tracking folder for milestones
- Document sharing protocols in project README
Client Delivery Template:
- Organise final deliverables in clear folder structure
- Create shareable link with password protection
- Include delivery documentation and usage instructions
- Set appropriate expiration (typically 30-90 days)
- Archive project files after successful delivery
Step 9: External File Shares
NextCloud's External Storage feature allows you to connect and access files from external services directly within your Junovy Cloud Storage interface. This powerful feature is available as an add-on for Business subscriptions and higher.
What Are External File Shares?
Supported External Storage Types:
- FTP/SFTP - Connect to FTP servers and web hosting accounts
- SMB/CIFS - Access Windows network shares and corporate file servers
- Google Drive - Mount your existing Google Drive storage
- Dropbox - Access Dropbox files without leaving NextCloud
- OneDrive - Connect Microsoft OneDrive accounts
- Amazon S3 - Mount S3 buckets for cloud storage
- WebDAV - Connect to other WebDAV-compatible services
Business & Enterprise Subscription Requirement
Important: External file shares are available as an add-on feature for Business and Enterprise subscriptions. If you're interested in connecting external storage services to your Junovy Cloud Storage, please contact our support team to discuss adding this feature to your account.
Setting Up External File Shares (Business & Enterprise Add-on)
Once the external storage add-on is enabled on your account:
External Share Use Cases
Development Workflows:
- Mount client FTP servers for direct website file management
- Access version control repositories through SFTP
- Connect to staging servers for seamless file deployment
Business Integration:
- Access existing Google Drive or OneDrive files without migration
- Connect to company network drives (SMB/CIFS) for legacy file access
- Mount backup storage (S3) for additional file redundancy
Client Collaboration:
- Provide clients access to their existing cloud storage within your project workspace
- Connect to client FTP servers for asset gathering and delivery
- Integrate with client's preferred cloud storage platforms
Managing External Shares
Best Practices for External Storage:
- Use descriptive mount names like "Client-FTP-Server" or "Company-Google-Drive"
- Set appropriate permissions (read-only for reference materials)
- Monitor connection status regularly to ensure availability
- Document external connections for team members
- Consider security implications of connecting external services
Performance Considerations:
- External files may load slower than local NextCloud storage
- Large file operations work best with stable internet connections
- Consider syncing frequently used external files to local storage
Security and External Storage
Security Best Practices:
✅ Use service accounts rather than personal accounts for business connections
✅ Apply least-privilege access (read-only when possible)
✅ Monitor external storage activity through NextCloud logs
✅ Regularly review connected services and remove unused connections
✅ Ensure external services meet your security and compliance requirements
Data Sovereignty: Remember that external file shares store data on third-party services. Consider data location and compliance requirements when connecting external storage, especially for sensitive business information.
Collaboration Workflow Examples
Marketing Campaign Workflow:
Campaign-Q4-Launch/
├── 01-Strategy/ (Team: Edit, Client: View)
├── 02-Creative/ (Designers: Edit, Others: View)
├── 03-Approval/ (Client: Edit for feedback)
└── 04-Final/ (All: View only)
Website Development Workflow:
Website-Project/
├── Discovery/ (Team + Client: Edit)
├── Design/ (Designers: Edit, Client: View + Comment)
├── Development/ (Developers: Edit, Client: View)
└── Launch/ (All: View, Client: Download)
Best Practices Summary
✅ Organisation:
- Use consistent folder structures across all shared projects
- Apply your tagging system to shared content
- Create clear README files for external collaborators
- Maintain separate spaces for different types of collaboration
✅ Security:
- Always password-protect external shares
- Set appropriate expiration dates
- Review and audit permissions regularly
- Use the minimum permissions necessary for each role
✅ Communication:
- Establish clear workflows and protocols
- Use descriptive file names to communicate status
- Set up relevant notifications for team members
- Document your sharing protocols for team consistency
Next Steps
With your sharing and collaboration workflows established, you're ready to learn about advanced features like automation, backup strategies, and mobile workflows. The next chapter will cover these power-user features to maximise your Junovy Cloud Storage efficiency.
Custom Permissions for Public Shares
When sharing files or folders via public link, Junovy Cloud Storage offers granular permission controls to ensure recipients have exactly the access they need. Here's what each permission does:
Permission Options Explained
Read
- Allows recipients to view and download files
- Default permission for most public shares
- Use for: Sharing final deliverables, portfolios, or reference materials
Create
- Allows recipients to upload new files to shared folders
- Recipients cannot modify existing files
- Use for: File collection from clients, team submission folders
Edit
- Allows recipients to modify existing files directly
- Requires Read permission to be effective
- Use for: Collaborative documents, shared working files
Delete
- Allows recipients to remove files and folders
- Highest risk permission for public shares
- Use for: Trusted collaborators only, temporary project spaces
Advanced Sharing Options
- Add a custom name for your shared link
- Helps you identify shares in your sharing overview
- Example: "Client Portfolio Review" or "Q4 Budget Collaboration"
Set Password ✅ (Recommended)
Set Expiration Date ✅ (Recommended)
- Automatically disable the share after a specified date
- Prevents indefinite access to your files
- Good practice: Set expiration based on project timeline
Hide Download
- Prevents bulk downloading of folder contents
- Recipients can still view individual files
- Use for: Portfolios where you want to control access
Note to Recipient
- Include a custom message with the share
- Explain the purpose and any instructions
- Example: "Please review and provide feedback by Friday"
Show Files in Grid View
- Display files as thumbnails instead of list view
- Better for image galleries and visual content
- Improves user experience for media-heavy shares
🔒 Security Warnings for Public Sharing
High-Risk Scenarios
Best Practices for Secure Sharing
✅ Always Use Passwords
- Required for confidential content
- Use strong, unique passwords for each share
- Never include passwords in the same email as the share link
✅ Set Expiration Dates
- Default: 30 days for client reviews
- Short-term: 7 days for temporary collaboration
- Long-term: 90 days maximum for reference materials
✅ Minimum Necessary Permissions
- Read-only for deliverables and portfolios
- Create only when you need file uploads
- Edit only for trusted collaborators
- Delete only for internal team members
- Check your Activity feed for share access
- Review active shares monthly
- Delete unused shares immediately
Recommended Permission Combinations
Client Portfolio Sharing:
- ✅ Read
- ✅ Set Password
- ✅ Set Expiration Date (30 days)
- ✅ Note to Recipient
File Collection from Clients:
- ✅ Read + Create
- ✅ Set Password
- ✅ Set Expiration Date (14 days)
- ✅ Hide Download (optional)
Team Collaboration:
- ✅ Read + Create + Edit
- ✅ Set Password
- ✅ Set Expiration Date (project duration)
- ✅ Share Label for identification
Public Portfolio (Non-sensitive):
- ✅ Read only
- ✅ Show Files in Grid View
- ✅ Set Expiration Date (90 days)
- ❌ No password needed for public portfolios
Alternative to Public Sharing
For Highly Sensitive Content: Consider using internal user sharing instead of public links:
Remember: Public shares are accessible by anyone with the link. When in doubt, use internal sharing or password protection with separate password delivery.
Advanced Features and Power User Tips
Take your Junovy Cloud Storage experience to the next level with these advanced features and workflows. This page covers automation, backup strategies, mobile optimisation, and professional tips to maximise your productivity.
Understanding Advanced Features
Advanced features help you work smarter, not harder, by automating routine tasks and optimising your workflows:
Automation: Streamline repetitive file operations Backup Strategies: Protect your data with multiple safety nets Mobile Workflows: Optimise cloud storage for mobile productivity Monitoring: Track usage and performance for better organisation
Step 1: File Automation and Workflows
Business & Enterprise Subscription Requirement
Important: File automation and workflows are available as an add-on feature for Business and Enterprise subscriptions. If you're interested in connecting external storage services to your Junovy Cloud Storage, please contact our support team to discuss adding this feature to your account.
Automatic File Organisation
Set up rules to automatically organise incoming files:
Auto-Upload Rules:
- Configure mobile apps to upload photos to specific folders
- Set up date-based folder creation (YYYY-MM format)
- Use file type sorting to automatically categorise uploads
- Enable duplicate detection to prevent redundant files
Workflow Automation Examples
Client File Processing:
Incoming Client Files/
├── Auto-sort by file type
├── Apply client tags automatically
├── Move to project folders based on filename patterns
└── Send notifications to relevant team members
Photo Management Workflow:
- Auto-upload photos from mobile devices
- Sort by date into monthly folders automatically
- Apply location tags based on GPS data
- Generate thumbnails for quick browsing
Step 2: Backup and Version Control Strategies
Multi-Layer Backup Approach
Implement a comprehensive backup strategy to protect your data:
Layer 1: NextCloud Built-in Versioning
- Automatic version history for all file changes
- Restore previous versions easily from the web interface
- Configure retention (typically 30 days or 10 versions)
Layer 2: Local Synchronisation
- Desktop sync clients act as local backups
- Multiple device sync provides redundancy
- Selective sync for important folders
Layer 3: External Backup (Business & Enterprise Add-on)
- Automated backups to external storage (S3, Google Drive)
- Regular backup schedules (daily, weekly, monthly)
- Offsite storage for disaster recovery
Version Control Best Practices
File Naming for Versions:
- Use consistent version numbering (v1, v2, v3)
- Include dates for major revisions (2024-08-30-v1)
- Tag significant milestones (DRAFT, REVIEW, FINAL)
Project Backup Workflow:
- Weekly project archives to backup folders
- Monthly client deliverable backups
- Quarterly full system backups
- Annual archive cleanup and long-term storage
Step 3: Mobile Workflow Optimisation
Smart Mobile Synchronisation
Configure mobile apps for optimal productivity whilst managing storage:
Selective Sync Strategy:
- Always sync: Active projects, templates, essential documents
- On-demand sync: Archive folders, large media files
- Never sync: Temporary files, system backups
Mobile Productivity Workflows
Field Work Setup:
- Download essential files for offline access before going mobile
- Enable auto-upload for photos and documents captured on-site
- Use favourites for frequently accessed files
- Configure notification settings for urgent shares
Travel Workflow:
- Star important documents (travel docs, presentations, contacts)
- Download presentations for offline access
- Set up mobile hotspot sharing for team access
- Enable low-data mode when using mobile networks
Mobile Security Best Practices
Device Security: ✅ Enable app PINs or biometric locks ✅ Use automatic logout after inactivity ✅ Avoid public WiFi for sensitive file access ✅ Regular app updates for security patches
Step 5: Advanced Search and Discovery
Power Search Techniques
Master advanced search to find files quickly in large storage systems:
Search Operators:
- Filename:
name:budget(finds files with 'budget' in name) - File type:
type:pdfortype:image - Date range:
modified:>2024-08-01(files modified after date) - Size:
size:>10MB(files larger than 10MB) - Tags:
tag:urgent(if tagging system enabled)
Complex Search Examples:
type:pdf modified:>2024-08-01 name:proposal
(PDFs modified after Aug 1st with 'proposal' in filename)
size:>50MB type:video
(Video files larger than 50MB)
modified:<2024-01-01
(Files not modified since New Year)
Saved Searches and Smart Collections
Create reusable searches for common queries:
- Recent client work: Files modified in last 30 days with client tags
- Large files for cleanup: Files over 100MB older than 6 months
- Pending reviews: Files with 'review' or 'draft' in names
Step 6: Integration and Automation Tools
Business & Enterprise Subscription Requirement
Important: Integration and automation tools are available as an add-on feature for Business and Enterprise subscriptions. If you're interested in connecting external storage services to your Junovy Cloud Storage, please contact our support team to discuss adding this feature to your account.
Third-Party Integrations
Enhance your workflow with external tool integrations:
Productivity Integrations:
- Calendar sync for file sharing schedules
- Email integration for automatic file attachments
- Task management linking files to project tasks
- Time tracking integration for client billing
Creative Workflow Integrations:
- Adobe Creative Cloud sync (if supported)
- Design asset management through external tools
- Automated thumbnail generation
- Metadata extraction for media files
Automation Examples
Client Onboarding Automation:
- New client folder created automatically
- Template files copied to client folder
- Standard sharing permissions applied
- Notification sent to account manager
Project Completion Automation:
- Archive project files to completed projects folder
- Generate project summary with file statistics
- Create backup to external storage
- Update project tracking systems
Step 7: Advanced Security Configuration
Business & Enterprise Subscription Requirement
Important: Advanced security options are available as an add-on feature for Business and Enterprise subscriptions. If you're interested in connecting external storage services to your Junovy Cloud Storage, please contact our support team to discuss adding this feature to your account.
Enhanced Security Settings
Configure advanced security features for professional use:
Two-Factor Authentication:
- Enable 2FA for all team members
- Use authenticator apps rather than SMS
- Configure backup codes for account recovery
- Regular security reviews and updates
Access Control:
- IP restrictions for sensitive shares (if available)
- Time-based access controls for temporary projects
- Device management and trusted device lists
- Regular permission audits and cleanup
[Screenshot: Advanced security settings showing 2FA and access control options]
Compliance and Auditing
For Business & Enterprise Users:
- Activity logging for all file operations
- Share audit trails for compliance reporting
- Data retention policies for different file types
- Regular security assessments and documentation
Best Practices Summary
✅ Automation:
- Set up consistent auto-upload rules across devices
- Use automated backup strategies with multiple layers
- Implement workflow automation for repetitive tasks
- Monitor automation performance regularly
✅ Performance:
- Maintain organised folder structures for optimal speed
- Use selective sync strategically on mobile devices
- Monitor storage usage and clean up regularly
- Optimise network usage for large file operations
✅ Security:
- Enable comprehensive security features (2FA, device management)
- Regular audits of shares and permissions
- Keep apps and systems updated
- Document security procedures for team consistency
Next Steps
You've now mastered the advanced features of Junovy Cloud Storage! These power-user techniques will help you maintain an efficient, secure, and well-organised cloud storage system. Consider documenting your custom workflows and sharing best practices with your team to maximise the benefits across your organisation.
For ongoing optimisation, review your setup quarterly and stay updated with new NextCloud features as they're released in future Junovy Cloud Storage updates.